|
|
How to
lower your MGF: shortening the displacer cone method
|
|
This page contains: |
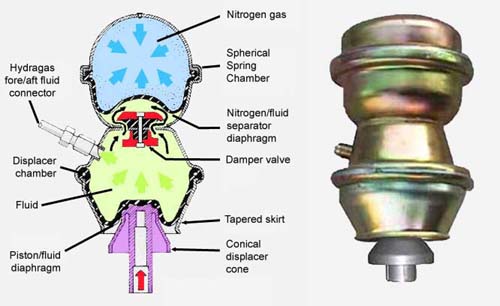
Yes, I know, when your MGF is pumped to standard ride height (a fraction under 370mm between front wheel centre and wheel arch vertically above), your MG wouldn’t look out of place at an off-roader convention. Mind you, with the height of some of the "traffic calming" measures around our area, having off-roader style ground clearance is something of an advantage. But it looks wrong. The car’s designer, Gerry McGovern knew this, and MGFs when displayed at motorshows were always lower than ex-factory specification. And a higher ride height raises the centre of gravity. And there are some geometry issues related to rear suspension compression that I shan’t bore you with. In any case, the net result is that many seek to lower the car – and by far and away the easiest way to do this is to let out some hydragas fluid (see here).
 I would urge you not to do this. You might be able to get away with a ride
height of a little over 350mm (with a hydragas line pressure of over 300psi),
but much more than that, the suspension gets far too soft. Soft springing
combined with less suspension movement essentially means the car crashes and
bounces from one road blemish to the next rebounding off its bump stops, rather
than absorbing the energy in the suspension. As a result, the ride feels harsh.
And the car rolls more. And the handling is worse. Far better for you as the
driver and your car if you can keep the standard hydragas line pressure of
400psi.
I would urge you not to do this. You might be able to get away with a ride
height of a little over 350mm (with a hydragas line pressure of over 300psi),
but much more than that, the suspension gets far too soft. Soft springing
combined with less suspension movement essentially means the car crashes and
bounces from one road blemish to the next rebounding off its bump stops, rather
than absorbing the energy in the suspension. As a result, the ride feels harsh.
And the car rolls more. And the handling is worse. Far better for you as the
driver and your car if you can keep the standard hydragas line pressure of
400psi.
Can this be achieved? Well, if you’ve found my website, chances are you’ll have already heard of "lowering knuckles". These are available from any number of MG specialists (Brown and Gammons, Mike Satur and Moss, to name but three). A set of four can be had for a little under a 100 quid. But there is another way for the DIYer. You can shorten the hydragas displacer cone to achieve the same affect. This web article shows you how.
How to modify your hydragas spheres:
| Tools required: | Materials required: | Time required: | ||
|
|
|
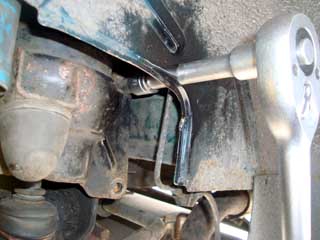 I am going to assume that you know how to remove and replace hydragas
spheres. With the subframes off the car, this is a very simple process – and
would be the preferable route. However, it may be possible to do this
without removing the subframes – as shown in
this article which details the
removal of a rear hydragas sphere and its subsequent replacement.
I am going to assume that you know how to remove and replace hydragas
spheres. With the subframes off the car, this is a very simple process – and
would be the preferable route. However, it may be possible to do this
without removing the subframes – as shown in
this article which details the
removal of a rear hydragas sphere and its subsequent replacement.
| 1. |
Picture right: shortened knuckle pin (above) compared to standard length item (below). |
| 2. |
 The damper springs will also need shortening, or they’ll go coil-bound
when compressed in the shorter hydragas displacer cone. Aim for a free
length of around 60mm. The damper springs will also need shortening, or they’ll go coil-bound
when compressed in the shorter hydragas displacer cone. Aim for a free
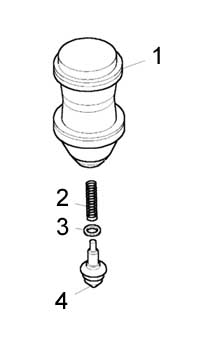
length of around 60mm.Key to diagram opposite: 1 - hydragas sphere. 2 - damper spring. 3 - spacer (available from MG Rover in 2.3 and 3.2mm thicknesses). 4 - knuckle pin. |
| 3. |
We need to cut off some material from the end of the displacer cone. I estimate that for every 1mm removed from the displacer cone equates to a 3mm drop in ride height. Therefore removing 9mm from the cone will drop the ride height 27mm – or in other words from a standard ride height of 368mm down to a good looking ride height of around 340mm. Experiment in your own hands; remove material in stages, fit to car, pump to 400psi, and assess. If too much material has been removed accidentally, all is not lost: spacers can be fitted over the knuckle pin to raise the height. These spacers are rather like large washers. The spacers could also be used to adjust corner weights – but that is another story! Measure many times, cut once. With the hydragas unit now modified (and repeated for both front and rear units), the hydragas spheres can be re-fitted to the car and the suspension pumped up. |
| 4. | Review with the suspension sitting at 400psi after a drive over some suitably challenging roads. Spacers can be used to trim the ride height if necessary. |
| 5. | Now get the car’s tracking re-checked! |
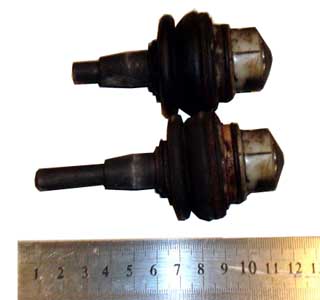 The first task
is to shorten the knuckle pins themselves. This will have no impact on the
final ride height of the car, but as you are also shortening the displacer
cone, the knuckle pins need to be shortened accordingly. Remove 10-15mm of
length. A hack saw can be used, but these knuckle pins are made from
high-tensile steel, so you’ll end up going through a number of hack saw
blades! A better option may be to gain access to a lathe to shorten these.
The first task
is to shorten the knuckle pins themselves. This will have no impact on the
final ride height of the car, but as you are also shortening the displacer
cone, the knuckle pins need to be shortened accordingly. Remove 10-15mm of
length. A hack saw can be used, but these knuckle pins are made from
high-tensile steel, so you’ll end up going through a number of hack saw
blades! A better option may be to gain access to a lathe to shorten these.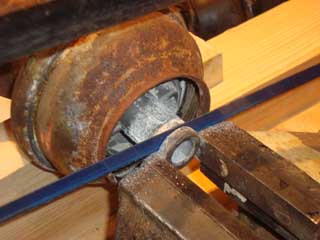 Now we need to modify the hydragas spheres. If you can, remove the
displacer cone from the hydragas unit – but this is not essential. If
leaving the assembly as one piece (as I did), take care to avoid metal swarf
from entering the unit, as sharp metal fragments will make short work of the
vulcanised rubber internals. Use moistened tissue paper packed into the
displacer as a barrier, or otherwise leave the dust cover in place (in
picture dust cover removed – don’t do what I did! Retrospection is a
magnificent thing indeed)
Now we need to modify the hydragas spheres. If you can, remove the
displacer cone from the hydragas unit – but this is not essential. If
leaving the assembly as one piece (as I did), take care to avoid metal swarf
from entering the unit, as sharp metal fragments will make short work of the
vulcanised rubber internals. Use moistened tissue paper packed into the
displacer as a barrier, or otherwise leave the dust cover in place (in
picture dust cover removed – don’t do what I did! Retrospection is a
magnificent thing indeed)It’s remarkable that a car suspension can be modified so easily. In maintaining the pressure at 400psi, you’ll keep the standard spring and damper rates, thus maintaining ride and handling characteristics. If you’ve gone to this extent mind you, perhaps the next step is to replace the dampers with up-rated replacements. I have gone for Bilsteins specified by Tech-speed Motorsport – but other varieties exist and can be considered, including adjustables from Spax and Avo for example.