|
How to adjust the ride height of Hydragas suspended MGFs |
|
| This guide is divided into two: | ||
| 1. | Lowering without a hydragas pump | |
| 2. | ||
|
How to adjust the ride height of Hydragas suspended MGFs |
|
| This guide is divided into two: | ||
| 1. | Lowering without a hydragas pump | |
| 2. | ||
The rule of 'thirds'
It is important to note that ambient temperature will have a significant impact on the ride height. It is therefore advisable to avoid performing this procedure on a particularly hot day. |
Lowering Instructions, without a Hydragas pump:
Tools required:
Phillips screw driver, 10mm spanner or socket and a jam jar!
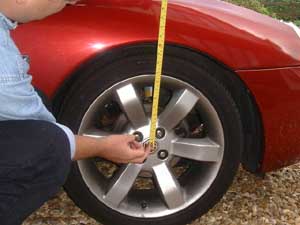
| 1. | Find a level stretch ground to park the car. Measure the suspension height from the wheel centre to the wheel arch lip vertically above (see step 1 of picture sequence below). |
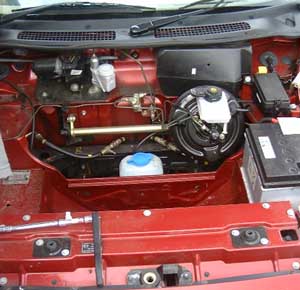
| 2. | Open front bonnet and remove the black plastic shroud by undoing the nuts and single phillips headed screw.The hydragas valves (there are two) are then revealed (for picture, click here. See also picture sequence below). |
| 3. | Remove valve caps. Like tyre valves, the hydragas fluid is expelled underpressure by depressing the centre pin of the valve (see picture sequence below). Do this, and fluorescent green fluid is released- this is where that jam jar comes in handy! |
| 4. | Keep the pin depressed to expell the fluid and lower the suspension. Stop the lowering at at least 5mm higher than the desired ride height (the best approach to this is with a great deal of caution! Dropping the height to about a third of the final desired height is desirable, although the time to reach the final ride height is slower, at least you will not overshoot). Repeat the process for the other side. |
| 5. | Take the car for a drive around the block to hasten the rate at which the suspension takes to reach its equibirium state. |
| 6. | Recheck the ride height, and release further fluid to achieve ever smaller reductions in ride height to achieve the level desired, each time taking the car for a spin and rechecking suspension height and ensuring both sides are level. |
The manual states that the car needs to 'rest' for two hours before changing suspension height in this manner. I have not found this necessary with the methodology outlined above. |
|
| 7. | Once desired level achieved, replace the under bonnet shroud, and head off to a tracking centre to have the suspension re-aligned. |
Raising or Lowering the suspension with the aid of a hydragas pump
It is preferable to lower the car using a hydragas pump (so the above should be used if there is no ready access to this useful tool), but to raise the car, the pump is clearly essential. The picture sequence below describes the method used to raise the suspension with a hydragas pump - but effectively the procedure is the same if you were to lower the car using this equipment.
Tools required:
|
 |
 |
 |
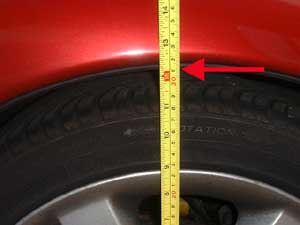
| Step 1. Measure the ride height on both sides of the car. This is done from the front wheel centre to the wheel arch lip vertically above. Standard trim height is 368 mm +/- 10 mm - but this will obviously vary if lowering knuckles are fitted. | This image shows the upper reference point: I usually use the rubber trim as the marker. This particular car, I think you can see, is exceptionally low with a ride height of 310 mm. It grounded out everywhere, and the ride quality was poor. | Step 2. Open the front bonnet. Remove the spare wheel and tool bag. This will give you better access to the cowl and its fixings. The white arrows show the location of two 10 mm nuts that need to be removed before removal - plus there are an additional 2 lugs under the cowl and not visible from this angle (yellow arrows). One further philips head screw needs to be removed prior to lifting out the cowl: this is located above the brake master cylinder & servo (green arrow). |
 |
 |
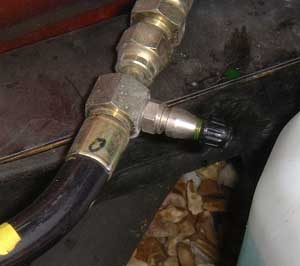 |
| Step 3. Now the cowl can be removed. Here you can see Andy 'Scarlet Fever' Phillips removing the cowl, paying particular attention to those lower locating lugs mentioned previously. | Now the location of the hydragas valves are revealed (either side and above the washer fluid bottle in this image) | Close up of the left hand valve - note similarity to a tyre valve! |
 |
 |
 |
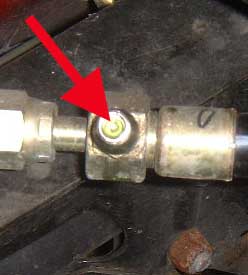
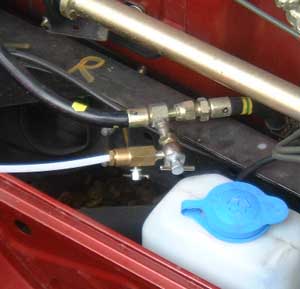
| The analogy with a tyre valve continues when you look into the valve itself: note that it has a central pin, which, when depressed, releases pressurised hydragas pressure (used in step 3 of lowering protocol above) | Step 4. Now attach the hydragas pump connector to the valve (ensuring that all air is bleed away first - different pumps have different procedures for achieving this, so follow your pump's manual). | Step 5. Now add hydragas fluid. As with lowering, the 'safest' method is to use the 'Rule of thirds' described above in the lowering section. The final pressure (for best ride and handling) should be approx 400 psi - but getting the ride height correct is more critical than getting this pressure - don't worry if it is even 80 psi less than this figure. |
|
 |
|
| Step 6. As mentioned above, add fluid whilst keeping a close eye on the ride height. Aim somewhat short of the final desired height and work up towards it over a series of cycles. Once both sides have been adjusted, drive the car around the block to force the suspension into equalibrium. Return to base, and determine whether further fluid needs to be added (or even taken away if you've overshot - but this shouldn't be necessary following this procedure). Repeat from step 4 until desired ride height obtained. | Job completed. This car has
lowering knuckles fitted - so final ride height in this case was 330 mm. Superb! :o) (Note 'designer splash' on bodywork - who said you couldn't have some fun whilst adjusting ride height? ;o) |