Rotor arm and distributor cap replacement
![]() Common
problems: Loss of Power/ stuttering
Common
problems: Loss of Power/ stuttering
Rotor arm and distributor cap replacement
|
Words and pictures: Rob Bell |
When my MGF was about 7 years old, it developed an
irritating intermittent problem that progressively grew more frequent - that of
loss of power and a 'stutter' in power delivery. This occurred most frequently
when attempting to accelerate in an intermediate gear (most pronounced, it seemed,
in 3rd) from relatively low engine speeds (about 2000rpm). The problem's
solution however, turned out to be refreshingly simple: replace the distributor
cap and rotor arm.
The distributor cap and rotor arm seems to be a frequently over-looked item on the MG service schedule - and perhaps relies on owners reporting the problem to the servicing garage in order for the problem to be fixed. As a consequence, this is becoming a very common problem being reported by owners of pre-2001 MPi MGFs (later cars use a different, wasted spark ignition system that does away with the distributor all together). This is, however, a very simple item to DIY, as the instructions below show.
Time required: 40 minutes
Tools required:
Parts required:
| 1. |
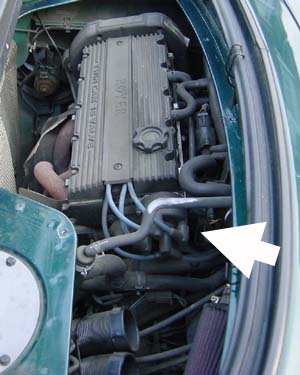 The first task
is to remove the engine inspection cover, as detailed
here. The first task
is to remove the engine inspection cover, as detailed
here.Now identify the location of the distributor. The distributor is driven from the end of the inlet cam, so can be found at the rear left corner of the engine - and is highlighted here in the picture right, by the white arrow. |
| 2. |
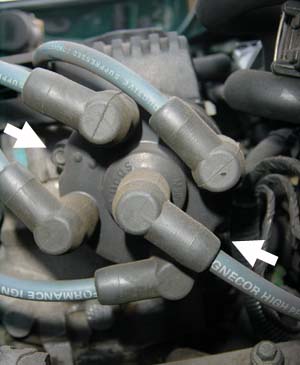 Here is a
close up of the distributor, taken end on, and showing the five high tension
(HT) leads - one for each cylinder's spark plug, and one from the coil. Here is a
close up of the distributor, taken end on, and showing the five high tension
(HT) leads - one for each cylinder's spark plug, and one from the coil.The distributor cap is held in place by two bolts - arrowed in the picture opposite. Remove the HT leads from the distributor head (make a note of which lead goes where before removing however!), and undo the two retaining bolts. These have 8mm heads. Some distributor caps use bolts that are slotted to allow the use of a screw driver (certainly, the replacement cap that I fitted did), which may be easier given the nature of the access to the bolts. |
| 3. |
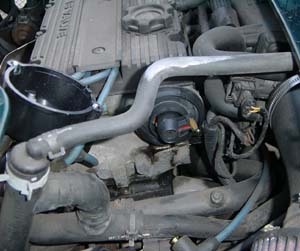 This next
image shows the distributor head removed (its to the left of the picture),
and shows the rotor arm in situ. This next
image shows the distributor head removed (its to the left of the picture),
and shows the rotor arm in situ. |
| 4. |
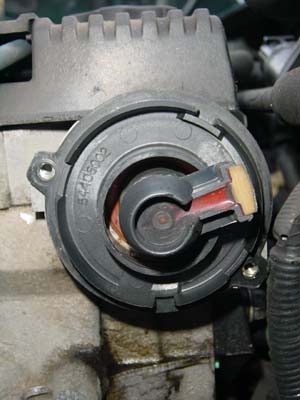 Another shot
of the rotor arm inside the distributor. You can see the blacked damage to
the tip of the rotor arm, that is shown to greater effect below in
comparison to the new rotor arm. The next job is to remove the rotor arm
from the distributor spindle: there is a retaining screw that is located
immediately opposite the copper electrode on the rotor arm - and this is
shown much more clearly on the figure below. Another shot
of the rotor arm inside the distributor. You can see the blacked damage to
the tip of the rotor arm, that is shown to greater effect below in
comparison to the new rotor arm. The next job is to remove the rotor arm
from the distributor spindle: there is a retaining screw that is located
immediately opposite the copper electrode on the rotor arm - and this is
shown much more clearly on the figure below.
When removing the retainer screw, be careful not to damage the flash guard: cracks in this can lead to ignition problems - especially in damp weather, and so will need replacing if damaged. |
| 5. |
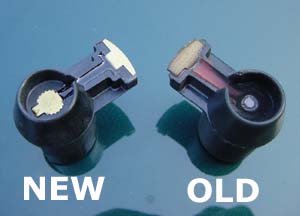 In this
figure, we can see how the old, original rotor arm compares to the new
replacement. In this
figure, we can see how the old, original rotor arm compares to the new
replacement.From above, we can see that the old rotor arm has a darker coloured electrode, with evidence of carbon at the tip, where it comes into contact with the post electrodes inside the distributor cap. |
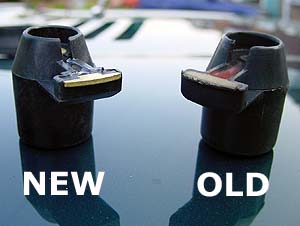 Another
picture showing the damage to the old rotor arm. Here it is possible to see
the significant erosion of the electrode tip. It is in clear need of
replacement. Another
picture showing the damage to the old rotor arm. Here it is possible to see
the significant erosion of the electrode tip. It is in clear need of
replacement. |
|
| 6. |
Reassembly is in the true Haynes tradition: a reversal of
the disassembly. The flash guard needs placing over the distributor drive
first, followed by the flash guard. The slot on the new rotor arm. The
retainer screw needs to be tightened to 10 Nm. Now replace the distributor cap with a new item: if the rotor arm is in need of replacement, it surely means that the cap does too. Ensure that the correct HT lead is attached to the correct position on the cap, and offer up the cap to the distributor mounting flange. Now tighten the two retaining bolts (2 Nm). The engine cover can now be replaced, and you can go off on a test drive to confirm that the problem has been solved. |
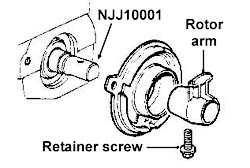 In
this figure, the rotor arm has been removed - the flash guard is also free.
The component labelled 'NJJ10001' is the distributor bush-drive spindle: if
you are using an alternative cam shaft, you have to obtain one of these in
order to use distributor based ignition.
In
this figure, the rotor arm has been removed - the flash guard is also free.
The component labelled 'NJJ10001' is the distributor bush-drive spindle: if
you are using an alternative cam shaft, you have to obtain one of these in
order to use distributor based ignition.