 |
Big Rear Brakes
The VHS rear brake conversion
|
Words and pictures: Rob Bell, with
thanks to Wayne Nation of VHS for his assistance in putting this
article together |
|
Introduction
Why have big brakes on your MG? If you had a properly set up brake system, you
could probably pull an F to a halt with discs the size of 50 pence pieces in
practically the same distance as the same car with discs the size of dinner
plates. Big brakes are heavy too – increasing unsprung weight. The way I look at
this, unsprung weight describes that mass of metal at the end of the axle – the
wheel, the tyre, the hub. The heavier this is, the harder the springs and
dampers have to work to keep them under control after bouncing over bumps. Lower
the unsprung weight, the easier it is to make a car handle and ride well. Big
brakes are also expensive – not least because you’re looking at much more
material being incorporated in them.
Big brakes can be a hazard.
Why on earth would anyone want big brakes? Putting aside marketing (go on, admit
it, you love the look of huge brakes behind those shiny alloys of yours!), big
brakes do have a purpose. It’s all about heat. While those 50pence-sized brakes
could probably lead to wheel locking just as effectively as a big brake, they’d
get so hot that they’d probably boil your brake fluid and probably ignite the
friction material on the brake pads. Brakes convert kinetic energy into heat –
and if you’re travelling fast, there may well be vast amounts of energy to
disperse! Big brakes have an advantage: their much larger surface area means
that they can shift much more heat in a much shorter period – which is ideal of
a high performance sports car that is being used heavily on the track or on the
road. But ultimately, they won’t stop your car any faster than an otherwise
identical, smaller disc-equipped car. That said, the greater braking leverage
that is to be gained from applying a retardation force at the edge of a larger
disc means that for any given brake-pedal movement, you will get more stopping
force applied. Unsurprising then that we all feel that big brakes mean more
stopping power – but this is a subjective impression, and not the reality.
The funny thing is, the ultimate limiting factor of the
rate of deceleration you get from brakes is not the braking system at all. It’s
the tyres! No matter how heavy or light the car, the braking force is limited
purely by how much grip your tyres can generate; the vehicle’s mass is simply
not part of the equation.
Why bother?
|
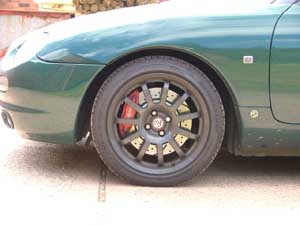
Stunning front AP racing 304mm front rotors
and red-painted, MG-logo'd 4-pot calipers. What's not to like? |
So why are we writing an article about big brakes in FTF?
Well, MG started it. They started fitting 304mm AP Racing 4-pot calliper brakes
to MGFs and then TFs. You have to agree that they do look sublime.
The odd thing was that they did absolutely nothing about
the rear discs. MG didn’t even bother altering the settings of the brake bias
valve.
Why should this matter? If the MGF and TF were a front
engine car, then actually it probably wouldn’t matter at all. In a 1G stop (the
same rate of change of velocity you’d feel if you’d jumped off a cliff edge), a
front-engine car would load up its front wheels due to weight transfer
effectively leading to 80 or indeed 90% of the work being performed by the front
wheels. An MGF is rather different. It’s weight distribution is rather more rear
biased (55% of the MG’s weight is over the rear wheels! [more]),
meaning that under the same circumstances, the rear brakes are still playing an
important role in slowing the progress of the car even during a 1G stop.
Estimates suggest that the split is something more like 60:40 front/rear under
these conditions. You can read more about this
here.
Which is where my problem with the big front brake kits comes in. When ever I
have driven cars fitted with the 304mm front disc, I have found that that is
just too easy to lock the front wheels – it’s as though the rears simply aren’t
pulling their weight in the stopping department. Given the mismatch in braking
torques between a 304mm and a 240mm disc, this perhaps is not surprising.
Frankly, a standard set up using race-bred pads all-round is far, far better
from this balance perspective.
Balancing out bigger front brakes
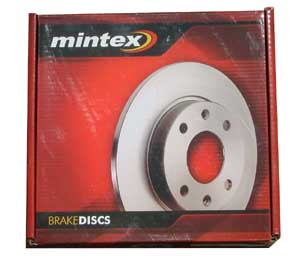
One solution for the big brake imbalance is to fit more
aggressive rear pads – say Mintex 1177 to Mintex 1144 at the front. But as
anyone who is familiar with the 1177 pad will testify, they eat discs, and cover
everything with tenacious pad dust… not ideal for a road car.
|
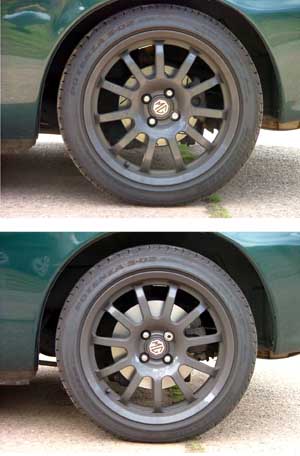
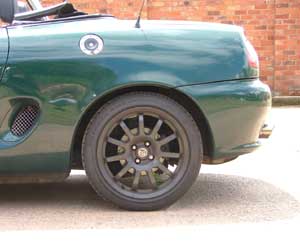
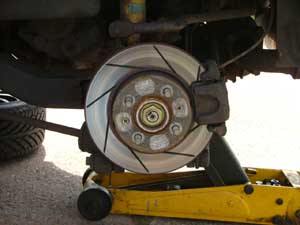
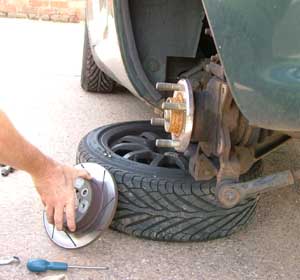
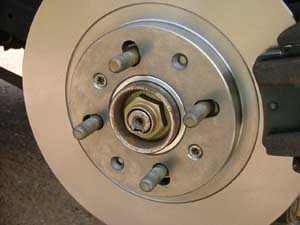
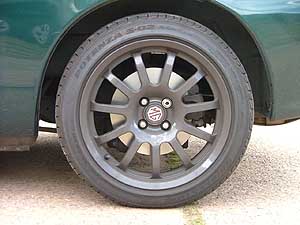
Top: before with standard sized 240mm rear
discs and bottom: the new VHS 280mm rear disc conversion. |
The only other solution is to fit a larger rear disc.
And given that 240mm discs look lost behind 16” wheels, there is an undeniable
aesthetic justification for going down this route too.
It is probably no coincidence that this yawning chasm of a gap in the market
has, until very recently, been left unfilled. Get your rear brakes wrong, and
you run the very real risk of dangerous over-braking of the rear wheels and
consquent rear lock up. Get rear-end lock up on entry to a corner, or even mid
corner, and you’ll be saying a big hello to the scenery (and everything that
Bill Oddy holds dear) as the rear of your MG goes hedge trimming. Dangerous.
Brake design is probably best left to the professionals.
One of the ironies of the collapse of MG Rover is the release of engineering
talent from the company into realms that hitherto it would never have
travelled; into the hands of the enthusiast market. The chassis development
team who worked with Rob Oldaker are a case in point. These guys have now set
up their own company (Vehicle Handling Solutions) and are producing kits for
MGF and TF owners. Find your TF too bouncy? They’ll do you replacement
Bilstein dampers in the specification that they wanted them in the first place
but weren’t allowed due to budget constraints. Want a better braking system
for your MG, then you’d better ask…
Which is what the MGF Register has done. And these guys
have come up trumps. And as you can see from the picture to the left, the
larger rear discs are worth fitting for the looks alone!
On the left is the standard-sized 240mm rear disc. On
the right, the new 266mm rear discs. They don’t look quite so puny any more do
they?
So you are interested in fitting these discs, how do you go about it?
What's required:
Tools required:
- vehicle jack and axle stands
- wheel brace
- socket set
- torque wrench
- set of Allen keys
|
|
Materials required:
- the VHS Big rear brake kit – approx 340 quid + VAT
|
|
Time required:
|
Instructions: How to fit the VHS rear
brake kit
|
1. |
 First task is to move your car onto
solid level ground. As with MG’s ageless paraphrase goes,
safety first. First task is to move your car onto
solid level ground. As with MG’s ageless paraphrase goes,
safety first.
|
|
2. |
  Now
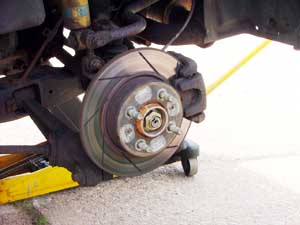
raise the rear of the car up onto axle stands and remove the road wheels. Now
raise the rear of the car up onto axle stands and remove the road wheels.
With the road wheels removed, we can now gain access to the brakes
themselves.
|
|
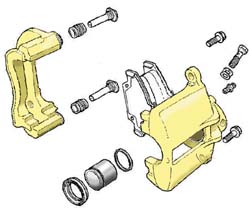
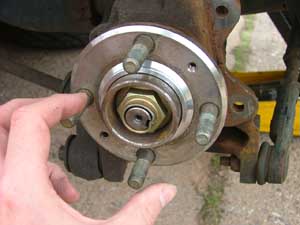
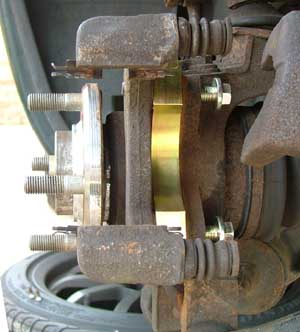
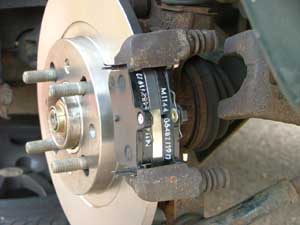
3. |
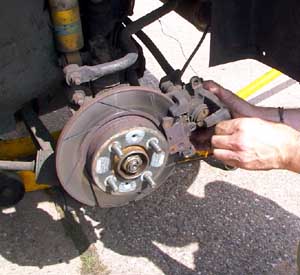 Disassemble
the brake carrier – there are two 8mm sliding bolts to undo – and once done
the outer pad carrier can be removed, along with the pad, as shown below. Disassemble
the brake carrier – there are two 8mm sliding bolts to undo – and once done
the outer pad carrier can be removed, along with the pad, as shown below. |
|
4. |
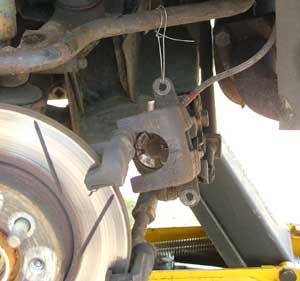 Next
remove the calliper, swinging it up and away and secure on some wire (an old
coat hanger is ideal for this). Next
remove the calliper, swinging it up and away and secure on some wire (an old
coat hanger is ideal for this). |
|
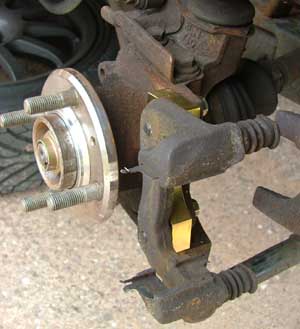
5. |
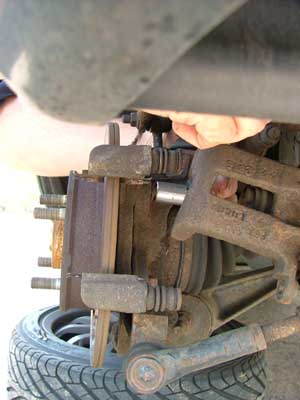 Next
identify remove the bolts retain the calliper to the hub carrier – in the
image to the right, we see that Wayne has already put a socket onto one of
the retaining bolts. Next
identify remove the bolts retain the calliper to the hub carrier – in the
image to the right, we see that Wayne has already put a socket onto one of
the retaining bolts.
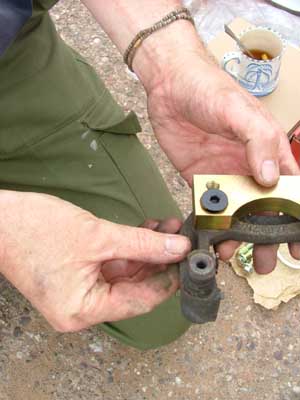
 Remove
both bolts, and remove the calliper carrier. Remove
both bolts, and remove the calliper carrier.
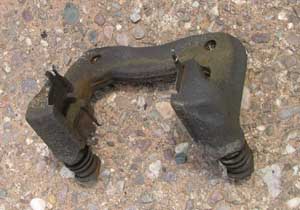 The removed
caliper carrier: The removed
caliper carrier:
|
|
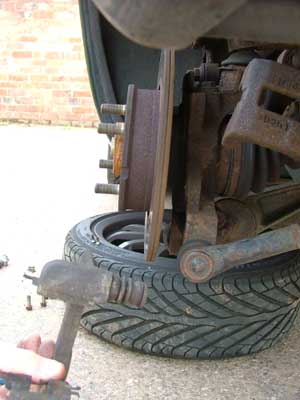
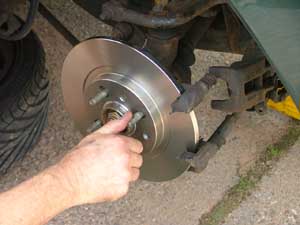
6. |
 Now remove the
discs – mine came off very easily as they had been replaced fairly recently
(oh well). The steps not shown here are removal of the two set-screws that
are fitted to help locate the disc to the hub, and the ‘gentle’ persuasion
required to release the disc from the hub – this may require some thumping
with a lump hammer, rotating the disc through 90 degrees between clouts to
release. Now remove the
discs – mine came off very easily as they had been replaced fairly recently
(oh well). The steps not shown here are removal of the two set-screws that
are fitted to help locate the disc to the hub, and the ‘gentle’ persuasion
required to release the disc from the hub – this may require some thumping
with a lump hammer, rotating the disc through 90 degrees between clouts to
release.Wayne made light work of these. I was
happy to take photographs… ;o)
|
|
7. |
 Now clean up the
hubs with a wire brush to remove any loose rust or dirt from the hub
mounting surfaces. You’ll notice that the hub is nice and silver- that’s
because this was replaced very recently following a track day at Brands
Hatch; the bearing had completely failed – a known weak point in the MGF
chassis. Now clean up the
hubs with a wire brush to remove any loose rust or dirt from the hub
mounting surfaces. You’ll notice that the hub is nice and silver- that’s
because this was replaced very recently following a track day at Brands
Hatch; the bearing had completely failed – a known weak point in the MGF
chassis. |
|
|
 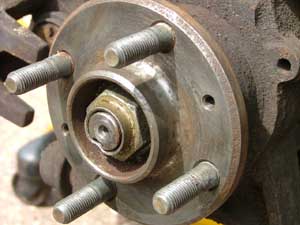 Here
are two close up pictures of the rear wheel hub. On the left, you'll notice
that the centre locator spigot has a rounded appearance as it meets the
mating face of the hub. On the right is the other design, which is squared
of, and has an additional ridge. Thus, as can be seen, there are in fact
more than one design of hub – but they all share one part number as far as I
can make out and appear to be fitted randomly to either side of the vehicle
(for instance my car had both designs, differing from one side to the other
– which makes things very confusing! Here
are two close up pictures of the rear wheel hub. On the left, you'll notice
that the centre locator spigot has a rounded appearance as it meets the
mating face of the hub. On the right is the other design, which is squared
of, and has an additional ridge. Thus, as can be seen, there are in fact
more than one design of hub – but they all share one part number as far as I
can make out and appear to be fitted randomly to either side of the vehicle
(for instance my car had both designs, differing from one side to the other
– which makes things very confusing!
This becomes important on this big brake conversion,
as the central spigot is essential for locating the disc properly to the
wheel hub as we’ll see… |
|
8. |
 But
first, yet more preparatory work with a wire brush! This time cleaning up
the hub carrier so that the calliper spacer/adapter plate can be fitted… But
first, yet more preparatory work with a wire brush! This time cleaning up
the hub carrier so that the calliper spacer/adapter plate can be fitted… |
|
|
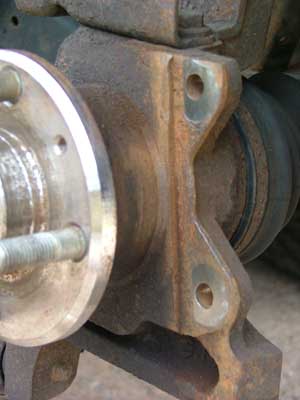 You may find
that you need a metal file to get a nice, flat mounting surface – the end
result should be as neat as this… You may find
that you need a metal file to get a nice, flat mounting surface – the end
result should be as neat as this… |
|
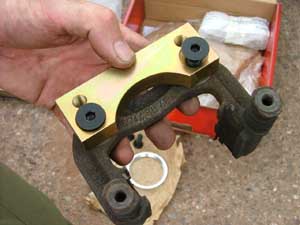
9. |
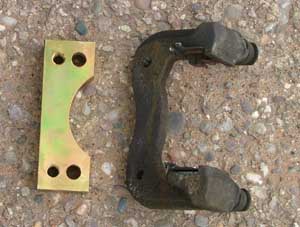 Now
we come to the first part of the kit to be fitted – the calliper spacer
bracket – a nice piece of anodised steel… Now
we come to the first part of the kit to be fitted – the calliper spacer
bracket – a nice piece of anodised steel… |
|
|
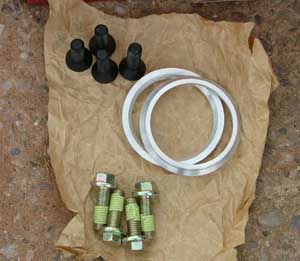 And some of the
rest of the kit – the silver rings are aluminium disc locators – recall what
I was saying about the disc locating on that central spigot – this is where
these come in… And some of the
rest of the kit – the silver rings are aluminium disc locators – recall what
I was saying about the disc locating on that central spigot – this is where
these come in… |
|
|
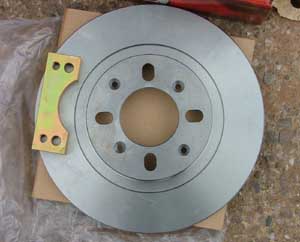 And of course,
the big brakes themselves! They are re-drilled standard discs from the PSA
stable. The MGF PCD is established by slotting the existing mounting holes,
and two additional centring holes are also machined in the bell of the
discs. Nice work. When replacements are required, they’ll cost 80 quid plus
VAT… And of course,
the big brakes themselves! They are re-drilled standard discs from the PSA
stable. The MGF PCD is established by slotting the existing mounting holes,
and two additional centring holes are also machined in the bell of the
discs. Nice work. When replacements are required, they’ll cost 80 quid plus
VAT… |
|
|
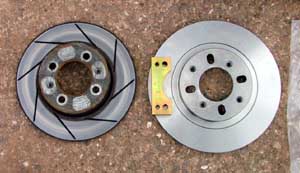 Always
worth comparing new and old – the new discs are usefully larger than the
originals – just a shame they’re not slotted like the Rover Sport items I
was taking off… Always
worth comparing new and old – the new discs are usefully larger than the
originals – just a shame they’re not slotted like the Rover Sport items I
was taking off… |
|
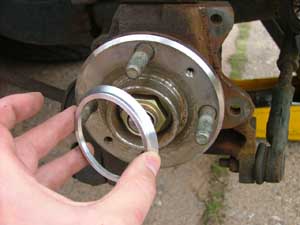
10. |
 This is the
clever bit. Whereas the standard disc locates to the outer edge of the
standard hub, the replacement discs centre on these adapter rings over the
centre bore spigot. Here’s Wayne offering up on of the adapter rings to this
hub. As mentioned earlier, there is more than one design of wheel hub – but
fortunately, the chaps at VHS are able to supply adapter rings to suit what
ever hubs you happen to have on your car – be they square shouldered, as
here or… This is the
clever bit. Whereas the standard disc locates to the outer edge of the
standard hub, the replacement discs centre on these adapter rings over the
centre bore spigot. Here’s Wayne offering up on of the adapter rings to this
hub. As mentioned earlier, there is more than one design of wheel hub – but
fortunately, the chaps at VHS are able to supply adapter rings to suit what
ever hubs you happen to have on your car – be they square shouldered, as
here or… |
|
|
…the
round-shouldered hub as pictured here (this happens to be the hub on the
opposite side of the car on my MGF - as mentioned above in point 7). |
|
|
 The
ring adapter simply slides neatly into place. With the disc bolted in place,
it is sandwiched in place, so isn’t going to go anywhere! The
ring adapter simply slides neatly into place. With the disc bolted in place,
it is sandwiched in place, so isn’t going to go anywhere! |
|
11. |
 Now we move
to the next stage: a nice cup of tea, and bolting the calliper carrier to
the spacer using the supplied counter-sunk screws… Now we move
to the next stage: a nice cup of tea, and bolting the calliper carrier to
the spacer using the supplied counter-sunk screws… |
|
|
 One in, one more
to go… One in, one more
to go… |
|
|
 …
and now the calliper can be mounted into its new position somewhat further
displaced from the centre of the hub than before. …
and now the calliper can be mounted into its new position somewhat further
displaced from the centre of the hub than before. |
|
12. |
 Replacement
calliper carrier bolts are supplied with the kit – and here we can see the
assembly being bolted into position. Replacement
calliper carrier bolts are supplied with the kit – and here we can see the
assembly being bolted into position. |
|
|
 Job done:
calliper carrier now securely bolted into place. Job done:
calliper carrier now securely bolted into place. |
|
13. |
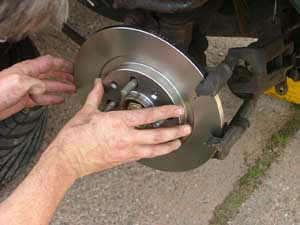 Now we can
slide the new larger disc into place. Now we can
slide the new larger disc into place. |
|
|
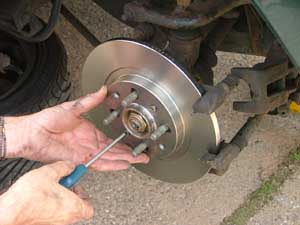  The
retaining screws are now fitted to bring the disc into the correct position. The
retaining screws are now fitted to bring the disc into the correct position. |
|
|
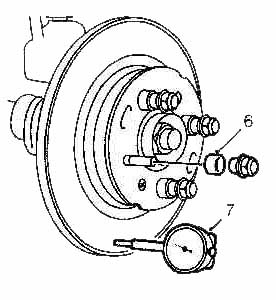
 Disc rotated
through 360 degrees several times to ensure that there is no significant
‘wobble’ or ‘run-out’… You can use a dial position indicator (DPI, arrow 7
below) to ensure millimetric location precision. Disc rotated
through 360 degrees several times to ensure that there is no significant
‘wobble’ or ‘run-out’… You can use a dial position indicator (DPI, arrow 7
below) to ensure millimetric location precision.
 |
|
14. |
 Satisfied that
the disc is true when rotated, the calliper can be reassembled… First with
nice, new Mintex 1144 pads. Satisfied that
the disc is true when rotated, the calliper can be reassembled… First with
nice, new Mintex 1144 pads.
|
|
15. |
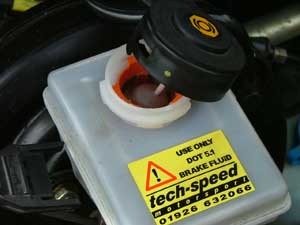 Before the
remainder of the calliper can be fitted, the piston needs to be screwed back
into its housing. Before doing this, remove the cap on the brake master
cylinder to ensure that there isn’t too much fluid already in the reservoir
– if there is, it may spill out over the paintwork and burn it off! Brake
fluid is a very effective paint striper… Before the
remainder of the calliper can be fitted, the piston needs to be screwed back
into its housing. Before doing this, remove the cap on the brake master
cylinder to ensure that there isn’t too much fluid already in the reservoir
– if there is, it may spill out over the paintwork and burn it off! Brake
fluid is a very effective paint striper… |
|
|
 Once the
piston is screwed in (it moves clockwise – you can use any straight edge to
screw the piston into the calliper housing, or you can use a pair of pliers,
or you can even buy the Rover tool designed specially for the job!) Once the
piston is screwed in (it moves clockwise – you can use any straight edge to
screw the piston into the calliper housing, or you can use a pair of pliers,
or you can even buy the Rover tool designed specially for the job!)
Here Wayne finishes off the job – calliper now back in place. Perhaps we
should have given the calliper a lick of paint before refitting? You could
certainly do this when working on your own car.
|
|
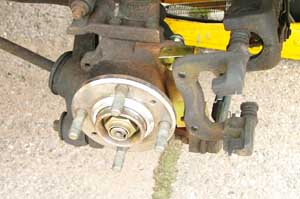
16. |
 Close up of the
completed disc and adapter assembly – it could almost be standard equipment
couldn’t it? Close up of the
completed disc and adapter assembly – it could almost be standard equipment
couldn’t it? |
|
|
 And now
with the road wheel fitted, looking absolutely stunning. And now
with the road wheel fitted, looking absolutely stunning. |
 Big
rear brakes fitted – worth doing?
Big
rear brakes fitted – worth doing?
The answer to this is definitely yes. Some would argue that
they’re worth fitting for the aesthetic value alone – those discs no longer look
lost behind 16” alloys in the way that the original 240mm items did. But that
wasn’t the reason for fitting them. The real proof of the pudding is on the road
and track – and I have to say that the brake balance with these discs is simply
brilliant. You can really heave on the middle peddle without fear of inducing
premature lock up of the front wheels – the rears also mean that the total
retardation is ultimately great than if you were braking using the front wheels
alone. And I am hopeful of additional benefits too – compared to my old brake
set up, I am hopeful that these discs will run a good deal cooler, which ought
to be good news in terms of brake disc and brake pad longevity, not to mention
the life span of the rear bearings themselves.
If you find yourself close to needing new rear discs and pads on your MGF/TF, I
would certainly recommend fitting these rear brakes. In the words of Tony the
Tiger: “They’re Grrrrrreat!”