MGF Interior: the BRM concept
|
MGF Interior: the BRM concept
|
I'm currently in the process of up dating the interior of my MGF. The plan is to use as many official MG Rover parts as possible. The inspirations are the Rover BRM (click here to visit Matt's Rover BRM enthusiast's site) the MY2000 MGF and the Audi TT.
Thus far, modifications are limited to:
This page is work in progress, but below is a list of projects that have so far been completed:
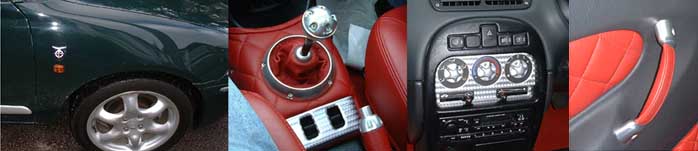
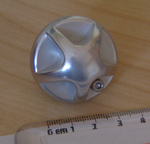
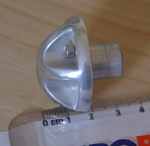
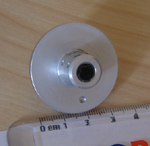
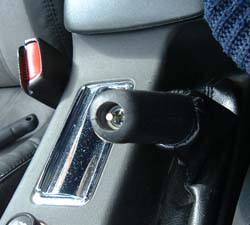
BRM heater control knobs and RDM ring trims
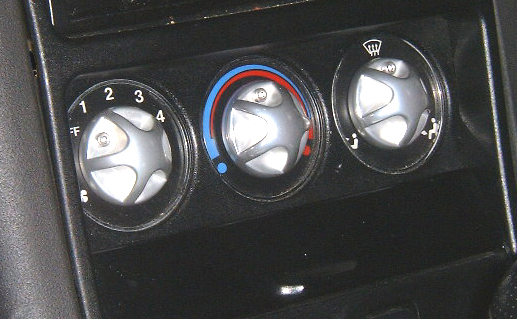
Below is a picture of how the combination of the RDM heater rings and the BRM control knobs look on my Mk1 MGF centre console:
 |
 |
 |
| Front aspect | Side aspect | Rear aspect |
| Note that the postion of
the knob is indicated by the allen-bolt (M6 I think) screwed into the alloy turning. The
position of this allen-bolt precisely overlays the dial illumination strip used to light
up the standard plastic knobs. This means that these knobs could also be illuminated by
either simply removing the allen-bolt, or through its replacement with a transluscent
plastic item. Part number: JFD 100640MDC @ £37.37 each (+VAT) |
||
| Door Pin trim | |
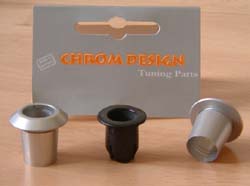 |
There are plenty of door pin options
currently available on the market - both to replace the standard pin (Mike Satur), or the
trim around the door pin in the door card (B&G do a nice octagonal trim). The option I've gone for, and pictured opposite, is the adonised alloy trims available from the German company, Chrom Design (thanks to Dieter for arranging these for me, cheers!) |
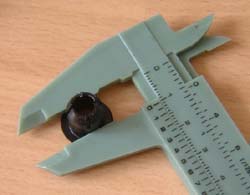 |
The black T-shaped trim is the standard
item from the door card. This is an interference fit with the door card, and takes a
little bit of effort to push out. As can be seen in the picture opposite, the outer diameter is 10mm. I show this measurement, because when offering up the Chrom Design trim T-piece, I found it wouldn't fit. The reason for this is immediately obvious... |
 |
... when I measured the outer diameter, I
found it to measure 13mm at its widest. This means, to fit the trim, you need to enlarge
the hole to about 12mm. Unfortunately, a hunt through my tools demonstrated that I didn't have any drills between 10 and 13mm; nor did my local DIY store. Fortunately I was able to purchase a circular file with which to enlarge the hole in the door card to fit these trims. Worth the effort? Yes. Interestingly, as well as the internal diameter being larger than the standard trim, so is the internal diameter. Therefore to stop the door pin from rattling, you need to fit the alloy door pin cover that Chrom Design produce. Fortunately, I had already ordered these. In my opinion these items should be sold as a matched pair. |
| Handbrake button | |
 |
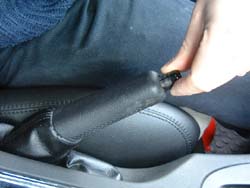
If, like me, you own an early MGF, or an F or TF without the 'Chrome Pack' option, you'll have a gloss black handbrake button. All very well, but it looks a little dull - especially if you have any other bright metal trims in your car's interior - as I did. Rover's hand brake button is chromed steel. I little brighter than my brushed alloy theme. Therefore I opted for Mike Satur's alloy handbrake button (pictured opposite). |
 |
To fit, you must first remove the
original button. Certainly, on my car, this button is an interference fit to the ratchet
release rod inside the handbrake handle. To remove, rotate the button (use a rag and a
suitable pair of plyers), and then slowly withdraw the button. It eventually becomes loose enough to be withdrawn by a gentle tug on the button using your fingers (pictured opposite). |
 |
You are then left with a handbrake without the button. Look inside the handbrake, and you can see the ratchet release rod (opposite). The Mike Satur handbrake button is drilled with a slighly smaller hole, which is tapped. There is no thread on the handbrake ratchet release rod, so persumably, the thread in the replacement button is there to provide grip onto the release rod.Tap the replacement button into the handbrake using a soft-faced hammer (if you don't have one of these, use a block of wood to cushion the impact of a metal hammer). |
| MGF Mk1 versus MY2000 door cards | |
 |
Here's confirmation that the later Mk2,
or MY2000, door card is all but identical to the earlier 'Mk1' design. Below
is my original door card, complete with BRM main and tweeter speaker grilles, and also
sporting a Newton Commercial door pocket (Mike Satur does something very similar, but made
of leather). Above is the MY2000 door car, complete with additional tweeter,
leather trim pod, and alloy-effect trim piece. Primary differences between the two door cards are the MY2000's silver alloy-effect trim, the oval door handle trim, tweeter and a different design for the speaker covers. |
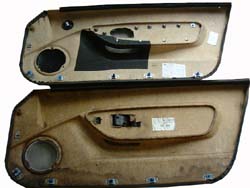 |
Behind each panel you can see how similar
the architecture of the two panels are - the trim clips for
example are in identical locations. What is different is the way that the soft trim pad is attached - not bonded in the case of the MY2000 panel - you can just make out the metal tabs in this picture. Also visible are the nuts that hold on the alloy trim piece. So if you fancy a different trim piece, a swap is pretty easy. |
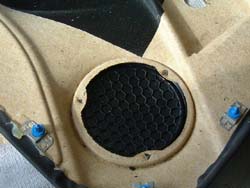
| BRM main speaker grille fitting | |
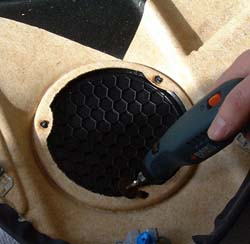 |
To fit the BRM speaker grilles, you must first remove the original speaker covers from the door cards. These are attached to the cards using three plastic lugs, whose ends have been heated and squashed down - somewhat akin to a rivet. To remove you can either grind the lugs down, or you can drill them out. Here (opposite), I chose to grind them off using a 'Dremel' type tool that's perfect for the job. |
 |
Once you've done all three (opposite), you are ready for the next step... |
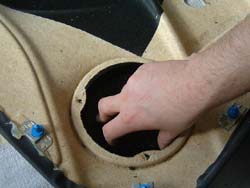 |
...which is simply to push the grille cover from behind. The cover should readily fall out. |
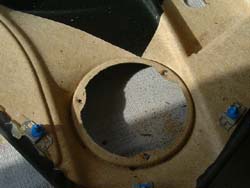 |
Here, with speaker cover now removed. |
 |
Now the door card can be flipped over, and the BRM speaker grille offered up. Use a drill of make guide holes in the card for the retaining bolts (5 in all). |
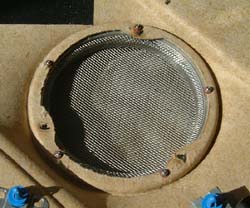 |
Then push through each of the
allen-bolts, and fix into place by screwing up the nuts (use washers to dissipate the
clamping load). Job done. |
| BRM tweeter grille fitting | |
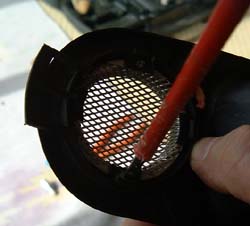 |
The BRM tweeter grilles come afixed to
the Rover 200 interior door handle trim. They are attached with two very small screws on
the back of the trim. Carefully undo these, and be careful not to loose them. Next the trim needs to be offered up to the door card. If you are using a MY2000 door card, then the existing tweeter needs to be removed, and the existing hole enlarged (I used a circular file for this purpose). |
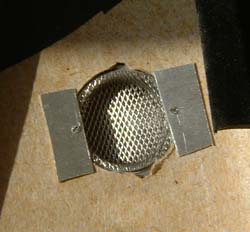 |
Then there is a hole large enough for the
grille to be mounted flush to the surface of the door card, use to 1mm rectangles of
aluminium to spread the clamping force of the mounting screws to the door card (as shown
opposite). Job done. |
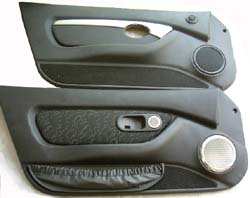
| MY2000 door card with BRM grilles | |
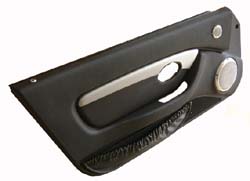 |
Opposite is shown the MY2000 door card, complete with BRM speaker and tweeter grilles, and Chrom Design door-pin trims. Also fitted is the Newton Commercial door pocket. |
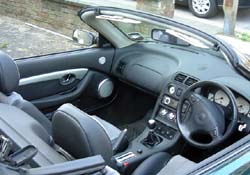
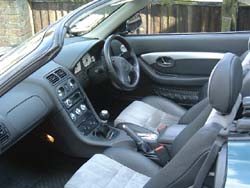
| Door cards in situ... | |
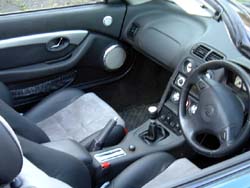 |
The following three pictures show the
MY2000 door cards in situ in my 1996 vintage MGF (proof positive that they fit earlier
MGFs - if ever it were needed!). Also just visible in these shots are:
|
 |
No decision has yet been taken with regard to the centre console. I'm not sure whether I want to leave the console standard, in its original black plastic, paint it X-Power grey to complement the smokestone alcantara seat inserts, or replace the centre console is a more contemporary MY2000/TF item (which will necessitate new switch gear, and potentially a new heat control fascia). |
 |
Interior has spruced up nicely with new trim fitted. Also have a leather steering wheel to fit (it'll look exactly the same as the plastic item currently fitted). And, because TF seats do not have map pockets, I plan to fit a pair of MGF boot luggage tidy nets behind the seats to carry surplus maps (essential for those European touring trips). |