![]()
Interior Trim
Words: Russell Reeve, Rob Bell
Pictures: Russell Reeve and Rob Copeland
|
"Mk1" to
"MY2000" Centre Console Up-grade Words: Russell Reeve, Rob Bell Pictures: Russell Reeve and Rob Copeland |
Owners of early, pre-2000 MGFs (also known as "Mk1"s) may be interested to know that the interior of their car can be readily modernised using interior parts from more recent models of the MGF family (including the MG TF). The most dramatic change can be had by replacing the 'flat' centre console panel found on with the Mk1 MGF with the more rounded trim found in the later model year (MY) 2000 cars. Here Russell Reeve and Rob Copeland show us how...
The first task is to remove the existing centre console - this is detailed here.
Next, Russell Reeve, tells us how he completed this job (these instructions were originally posted on the MGF General BBS in 2002).
"Fitting the MK2 centre console in a MK1 MGF is almost as simple as the MK2 rear speaker modification. Their are 4 main problems but each one is easily over come.
The 5 fixing tabs that are part of the MK1 console that attach the console to the 5 blue clips in the dashboard are supplied separately by MGR as FWJ 100240 for the 3 upper fixings and FWJ 100260 and FWJ 100270 as lower fixings left and right hand side.
The heater control box is the same on both the MK1 and the MK2 MGF just the front facia has changed this can be removed by removing the 3 heater knobs and unscrewing/unclipping the front facia and swapping for the MK2 heater control box facia and avoiding the hassle of removing the entire heater control box. This is delt with in more detail in Rob Copeland's photo-sequence shown below.
The switches in the MK2 console are
different and the loom-plug keying on both the MK2 rear fog lamp and rear heated screen
switches prevent the switches fitting the connectors on the cars wiring harness. This is
easily corrected by carefully unclipping and swapping the legends (the switch fronts) on
the front of the rear fog lamp switch YUG102740 PMP with the heated rear window switch
YUG102570 PMP. The switches are internally the same but now the keying on the rear of each
of the switches will match the car's wiring harness. The alternative solution to this is
to remove the keying on the loom plugs so that the connectors can be fitted to either
switch (probably easier than swapping the front of the switches?). Remember to re-use your
original Mk1 window lift switches, as the MY2000 switches are wired differently to the
earlier cars. This isn't a problem as the Mk1 window controls fit straight into the later
console. ![]()
When you come to fit the MK2 centre console you may find it will not fit, this is because the 2 lower fixings have to be modified. All that is required is the removal of the inner top corner on the 2 lower fixings. See image below:
The windows switches and the clock and oil temperature gauge are interchangeable."
Parts required:
Part name |
Part number (MG Rover) | Cost (estimate) |
| Centre Console | FHD102460 PMA | 50.69 |
| Moulding Facia Upper | FWJ 100240 | 18.33 |
| Moulding Facia Lower LH | FWJ 100260 | 2.30 |
| Moulding Facia Lower | RH FWJ 100270 | 2.30 |
| Finisher Gear lever | FJV 101910 MDC | 51.00 |
| Mat-Front [trinket tray] | FIF100070 PMA | 1.87 |
| Gear lever gaiter | FJL101920 PMA | 16.56 |
| Switch - Blanking panel | YXJ100200 PMP | 1.87 |
| Switch rear fog | YUG102740 PMP | 5.21 |
| Switch rear heated screen | YUG102570 PMP | 5.21 |
| Screws | DA 608044 | ? |
| Heater Control Box Facia | ? | ? |
Note that a number of these parts can be alternatively sourced through specialist autobreakers - as listed here
Rob Copeland has sent this photo-sequence of how he completed the job:
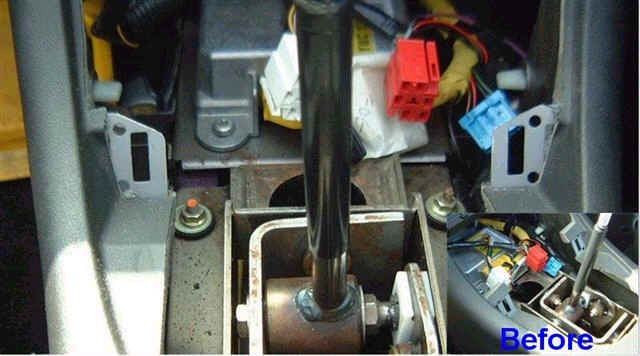
| 1. | First remove the existing centre console as described here. This exposes the heater box and the wires behind the centre console, as shown in the picture, right. | 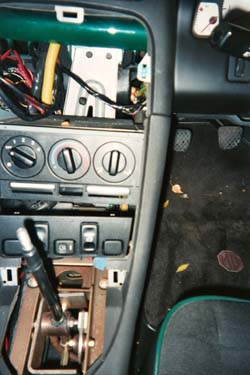 |
| 2. | Now concentrating on the heater box - because the MY2000 fascia is set forward of the original console trim, the original heater box controls are set too far back - which can result in an unsightly gap between the heater box and the MY2000 trim. To overcome this problem, the heater box fascia needs to be replaced. The first job then is to remove the existing fascia. Start by removing the existing control knobs (grab with a pair of plyers, and pull). Then with the screws exposed, remove the fascia panel, as shown opposite. | 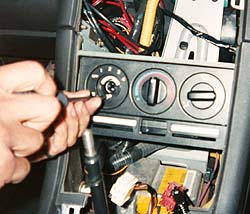 |
| 3. | This exposes the heater box as shown left. Now using donor MY2000 parts, reassemble the heater box fascia... | 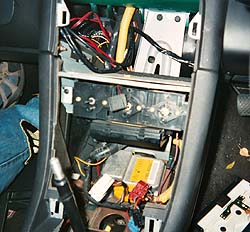 |
| 4. | ... as shown here: the spacer unit is screwed into place. | 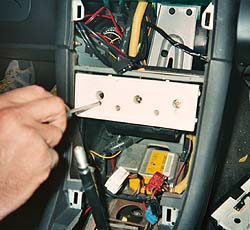 |
| 5. | Now the MY2000 fascia panel can be attached (distinguished from the earlier version by its silver finish). | 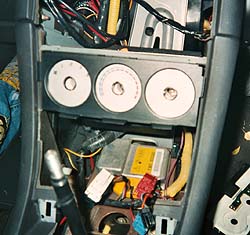 |
| 6. | Next, as Russell noted (in 'problem #4' above), the dashboard trim itself needs a little modification: remove the tabs above the clip retainers - as Rob demonstrates in this picture. This enables the new trim to fit snuggly into the dash. | 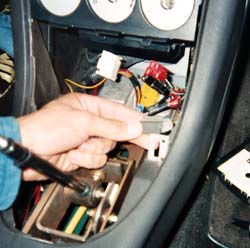 |
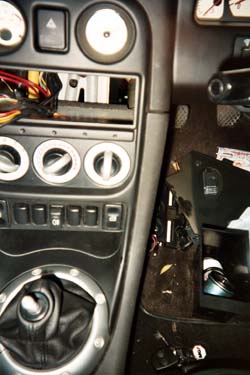
| 7. | And finally, you can install the new centre
console trim (effectively the reverse of the centre console removal instructions). Note
the problem with the fog/ rear demist button wiring that Russell mentions above. The job is pretty straightforward - but as can be seen in these instructions,
it can be a little 'involving'! |
 |