|
Words and Pictures: Rob Bell |
|
|
DIY: how to remove the
front wing (MGF and MGTF)
|
 The
front end panels, in common with most cars on the road today, are designed to be
readily unbolted for easy replacement. On the MGF and TF, this may be to replace
corrosion or accident damaged panels. On this page, we look to see how to remove
a front wing on an MGF. As will be explained, this is a relatively simple task -
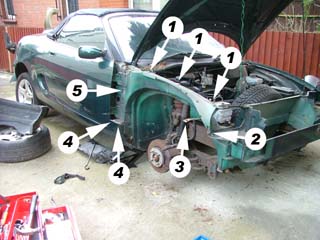
with the wing held in place by 8 bolts (locations shown opposite, right).
The
front end panels, in common with most cars on the road today, are designed to be
readily unbolted for easy replacement. On the MGF and TF, this may be to replace
corrosion or accident damaged panels. On this page, we look to see how to remove
a front wing on an MGF. As will be explained, this is a relatively simple task -
with the wing held in place by 8 bolts (locations shown opposite, right).
Picture key:
| Tools required | Materials required | Time required | ||
|
|
|
MGF/TF front wing removal:
|
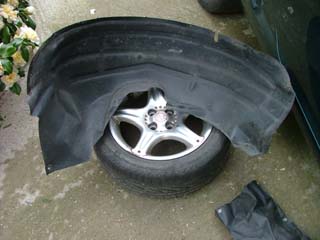
1. |
 The first
step is the removal of the front bumper and headlamps, as covered
here. The first
step is the removal of the front bumper and headlamps, as covered
here.
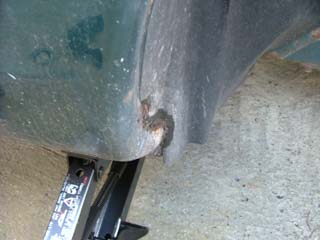
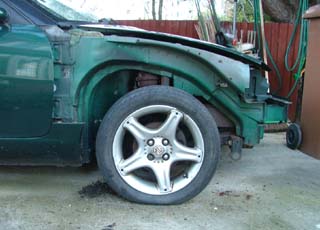
As you can see from the picture, the wing in question is heavily corroded in two of the commonest areas - between the front wheel and headlamp and the rear corner of the wing in the wheel arch. Surprisingly, the other problem area, around the side repeaters, was in remarkably good condition! Now may also be a good time to remove the road wheel. Ensure that the car is on a level surface and well supported (an axle stand is highly recommended here). |
| 2. |
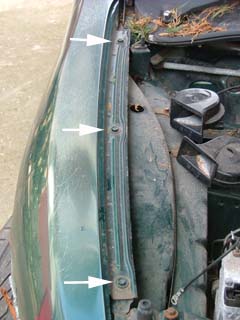 The
next step sees removal of the three upper wing retaining bolts (arrowed,
opposite) that hold the upper wing to the inner wing assembly. The
next step sees removal of the three upper wing retaining bolts (arrowed,
opposite) that hold the upper wing to the inner wing assembly. |
| 3. |
  The
next step is to remove the wheel arch liner. Once the road wheel is removed,
it is straightforward to remove the liner - it is held in place by a couple
of plastic expanding plugs (scrivets). These need to be identified. The
next step is to remove the wheel arch liner. Once the road wheel is removed,
it is straightforward to remove the liner - it is held in place by a couple
of plastic expanding plugs (scrivets). These need to be identified.Hypothetically, these should unscrew with a phillips screw driver. I found this was not quite the case... I ended up having to drill them out after the phillips heads were chewed up by the screw driver... |
| 4. |
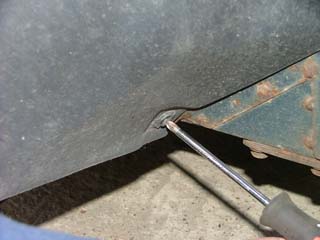
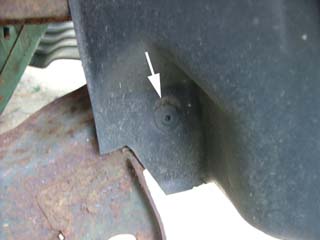
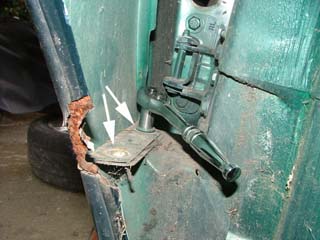
 Now
the remaining bolts can be tackled. Pictured here is the location of the
bolt to the support bracket. This is in an area of complex folded metal
which appears to be something of a dampness trap, leading in this case to
severe corrosion. The bolt should be readily removed however... Now
the remaining bolts can be tackled. Pictured here is the location of the
bolt to the support bracket. This is in an area of complex folded metal
which appears to be something of a dampness trap, leading in this case to
severe corrosion. The bolt should be readily removed however... |
| 5. |
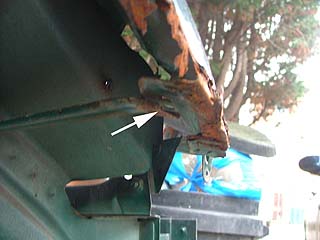
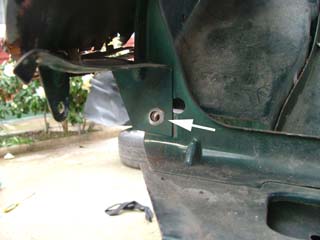 This bolt
however proved somewhat problematic. It's located in the headlamp closure
panel, and has an 8mm head. Being somewhat smaller than the other bolts, it
simply sheared off. I ended up needing to drill the bolt remnant out, and
re-tapping the thread - oh joy... This bolt
however proved somewhat problematic. It's located in the headlamp closure
panel, and has an 8mm head. Being somewhat smaller than the other bolts, it
simply sheared off. I ended up needing to drill the bolt remnant out, and
re-tapping the thread - oh joy... |
| 6. |
 There
are two 10mm head bolts attaching the base of the wing to the sill. Both
need removing. There
are two 10mm head bolts attaching the base of the wing to the sill. Both
need removing. |
| 7. |
 And
finally, the bolt to the A-post (very difficult to photograph, but
fortunately, much easier to remove!) And
finally, the bolt to the A-post (very difficult to photograph, but
fortunately, much easier to remove!)There is also a plastic rivet to remove at the base of the windscreen pillar that ties the seal to the top of the A-post - and this passes through a support tab in the top corner of the wing. It's readily prised out. After that, you're nearly there... |
| 8. |
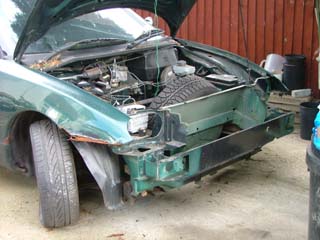
 Before
removing the wing, the side repeater needs removing. Slide the repeater
rewards, and pull out. The lamp screws out - and the loom can be pushed
through the wing. Now the wing can be pulled clear. Before
removing the wing, the side repeater needs removing. Slide the repeater
rewards, and pull out. The lamp screws out - and the loom can be pushed
through the wing. Now the wing can be pulled clear.The astonishing thing here is that despite extensive corrosion on the outer wing, the substructure remains in remarkably good condition (despite what is clearly very thin paint application in this area). This is likely to be as a result of both good basic rust protection and the benefit of a plastic wheel arch liner! |
| 9. | Wing replacement is, remarkably perhaps, just a reversal of the disassembly process. Yes, wing replacement really is that simple! |