|
Words and pictures: Rob Bell |
|
|
Removal and
refitting the exterior door handles
|
Introduction
 The commonest reason historically
to remove the exterior door handles of your MGF (or TF) has been to up-grade a
dowdy standard door handle with a chrome pack item (with the chromed handle), or
if you've got a 1.6 litre MG, you my be wanting to change your existing
unpainted black plastic
handle for one in body-colour. However, as our cars get older, it is inevitable
that some problems may arise that may require removal of the handle. I
originally wrote these instructions in around 1999 because I had fitted
Abingdon-style chrome handles to my car. However, but by the time I revisited
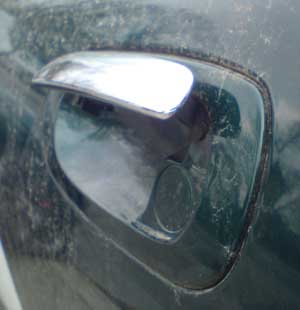
the door handle removal topic in 2010, I had a problem - the passenger door
handle was no longer operating the door lock (see image opposite - apologies
that the car was filthy at the time the picture was taken - but it shows how the
handle could be raised impotently without any unlatching of the mechanism). I
feared the worst, but the answer was reassuringly simple.
The commonest reason historically
to remove the exterior door handles of your MGF (or TF) has been to up-grade a
dowdy standard door handle with a chrome pack item (with the chromed handle), or
if you've got a 1.6 litre MG, you my be wanting to change your existing
unpainted black plastic
handle for one in body-colour. However, as our cars get older, it is inevitable
that some problems may arise that may require removal of the handle. I
originally wrote these instructions in around 1999 because I had fitted
Abingdon-style chrome handles to my car. However, but by the time I revisited
the door handle removal topic in 2010, I had a problem - the passenger door
handle was no longer operating the door lock (see image opposite - apologies
that the car was filthy at the time the picture was taken - but it shows how the
handle could be raised impotently without any unlatching of the mechanism). I
feared the worst, but the answer was reassuringly simple.
In any case, these instructions show how the door handle may be removed and then replaced.
As a quick note, the drivers door handle
is trickier than the passenger's side because of the door lock barrel - so
attack this side first - it can only get better!
|
Tools required: Phillips screw driver Socket set Patience! |
Time required: Variable, but budget a couple of hours for the driver's side at the first attempt; it's the lock barrel that in my experience is the trickiest part. You'll probably need about 30 minutes for the passenger side. |
New Parts required: Depends on your project! |
| 1. |
|
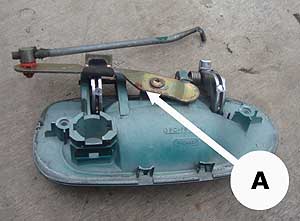
| 2. |
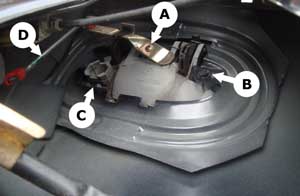 Lower
the door window fully. If you then peer into the door cavity, you can then
see something similar to that shown in the image here (in this case the LH
handle on the passenger side). Lower
the door window fully. If you then peer into the door cavity, you can then
see something similar to that shown in the image here (in this case the LH
handle on the passenger side).
Image key: |
| 3. |
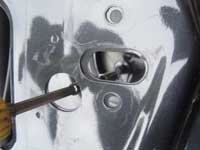 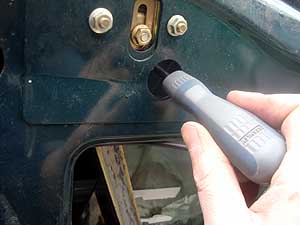 Undo
the two hex- headed bolts retaining the door handle to the door- they are
found inside the outer door skin. On my 1995-build car, a curiosity is that
the passenger side handle is held in place with Phillips screws rather than
hex-headed screws. You probably just have to deal with what you find, but I
suspect that you'll find hex-head screws! Undo
the two hex- headed bolts retaining the door handle to the door- they are
found inside the outer door skin. On my 1995-build car, a curiosity is that
the passenger side handle is held in place with Phillips screws rather than
hex-headed screws. You probably just have to deal with what you find, but I
suspect that you'll find hex-head screws!
To make this whole process that little bit easier, the inner skin of the door has two useful holes that make access to the two screws that much easier. Fortunately there are access holes on the inner membrane to access them, although for the furthest forward bolt, you may need to assemble the socket to the extension inside the door... |
| 4. | Remove the door lock barrel. It is held in place with a circlip from above: push it upwards and to one side to remove. DON'T LOSE IT! |
| 5. | The handle assembly is now held in with the handle's clips- push the assembly out. It only requires gentle force. |
| 6. |
The cause for the non-operation of my door handle centred around that pivot screw (A) in the image in step 2. It was loose, allowing the return spring to dislodge from the lever (it should be hocked under the lever where the rusty patch is on this lever (image, left, labelled "A") - and isn't here - compare it with the image to the right , where the spring can be seen hocked up under the lever arm). The spring was sitting underneath doing not a lot. I re-positioned the spring and reassembled. |
| 7. |
If you need to put the chrome handle into your existing handle's surround, then the assembly will need further 'undressing'. Easily done- unscrew the retaining Phillips screw holding the handle-lever, and watch out for a flying spring! The handle itself is held by two pivot pins that need to be drifted out to remove the handle. I had a problem with mine because the lubricating grease had all dried up, and they both had become seized. Persevere- they do come out eventually. Watch out for the handle return spring. |
| 8. |
Then, in true Haynes- manual style, reassembly is a reversal of disassembly! ;o) The tricky part is getting the driver's door lock retaining circlip back in place. I lost one... D'OH! But fortunately had a spare from the handle I bought from B&G. Took a lot of swearing and cursing to get back on, but finally managed it 45 long frustrating minutes later. The passenger side is a cinch in comparison! |
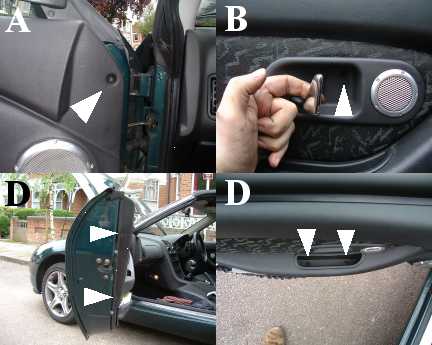 Remove
the interior door trim. This is dealt with in more detail
Remove
the interior door trim. This is dealt with in more detail

 Un-hook
the handle actuator arm/lever from the actuator rod: the handle assembly is
now free.
Un-hook
the handle actuator arm/lever from the actuator rod: the handle assembly is
now free.