REMOVAL
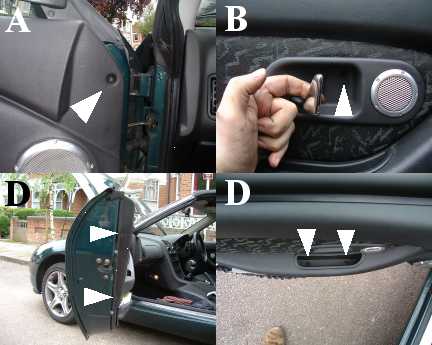
1, You need to identify the trim retaining screws. There are six. Two are on the door’s rear shut face (black D). One is behind the chrome door release handle (B). Two are at the base of the door trim grab handle (white D), and the final screw is towards the front of the door, below the door mirror triangle (A). Remove all six screws.
2. Remove the release handle surround trim and remove.
3. The trim is now only held in place by trim clips. These are located at regular intervals around the trim panel’s lower three edges. Prise the panel away from the door frame; each clip will let go with a ‘pop’. Even with the greatest care, some of these clips will become damaged. Fortunately, cheap replacements can be purchased from the Rover spares department.
4. With the clips released, lift the trim panel at the rear of the door upward, and over the top of the door locking pin. Withdraw the panel upwards and backwards. The panel is now free.
REFITTING
1. Relocate any trim clips that may have been left in the door frame back to the trim panel.
2, It is important to ensure that the trim panel’s interior weather seal is correctly re-aligned. To do this, the easiest approach is to hang the interior weather seal over the door’s window aperture. There is a groove in the trim panel that sits snugly over the door’s flange.
3. Now advance the trim panel forwards, so the upper leading edge of the trim panel moves under the door mirror triangle trim. Now lower the rear of the trim panel, taking care to align the door locking pin into the trim panel locking pin aperture.
4. Now press home all the trim clips around the lower three edges of the trim panel.
5. Replace the interior door release handle trim.
6. Replace the six self tapping screws removed earlier. The panel is now correctly replaced.