Fitting a TF front end to the MGF
|
Words and pictures: Geoff Baron |
|
This page contains: Introduction | Finding parts | Bumper | Lights | Wiring | End result | Costs | Suppliers |
|
|
Converting an F into a TF Fitting a TF front end to the MGF
|
There are many reasons why those with MGFs consider upgrading to TF specification bumper and lights. Some are probably attracted by the style, although others may disagree - arguing the MGFs side sills aren't sufficiently flared to match the new front end's styling. But then, beauty is in the eye of the beholder. Rather more crucially, the TF's projector lamps are far superior to those dim candles we MGF owners have to put up with. Justification enough, many would say, to go through the time and expense of this conversion.
So you're interested in swapping your front bumper for that from a TF. But what's involved? How do you do it? What parts do you need? Here Geoff Baron picks up the story:
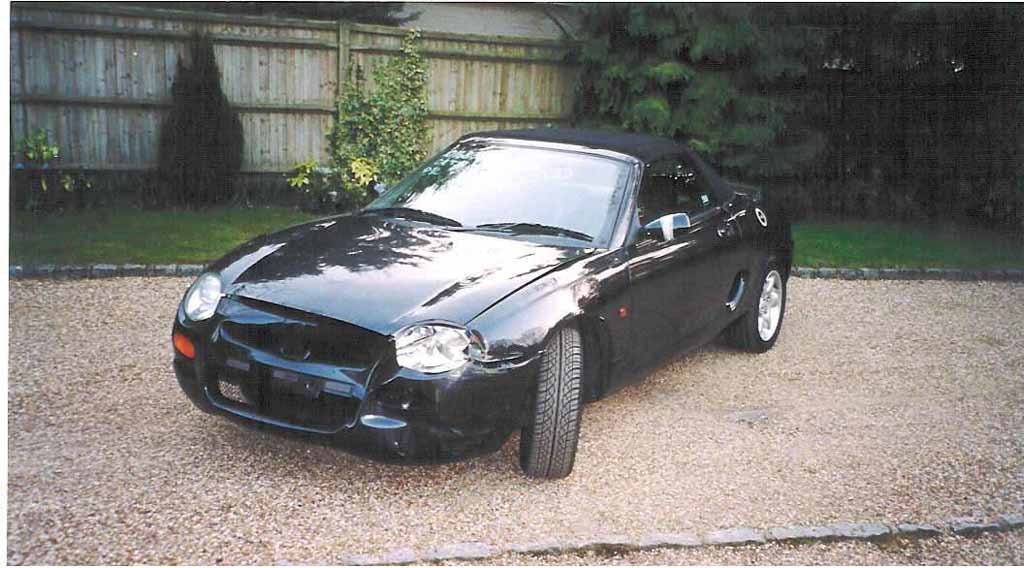 |
I recently acquired an MGF with some very obvious, but basically superficial damage to the front bumper, wing, n/s light and bonnet. Whilst locating used parts to carry out repairs, my daughter suggested the idea of converting at least the front of the car to the current 'TF' styling.
On investigation we found that the bonnet and wings are common to both models. The lights and bumper are all that has basically been changed to produce the new look. The decision was taken.
Finding the parts
Parts were obtained from various MGF specialists.
The lights were easy, as they had to be new. A bumper also proved fairly simple, as there
seem to be a number of shop-soiled and pre-used ones around. The bonnet, however, was very
hard to find and I had, in the end, to resort to a new one from 'MG' Rover. Virtually all
MGFs in breakers yards have front-end damage and therefore second hand bonnets are like
gold dust. The nearside wing was similarly difficult, but I finally found an undamaged
front of a wing, which I was able to graft onto my existing wing. (A number of MGA
restorations had done wonders for my MIG welding skills!)
|
|
The fun begins …
Now we come to the tricky bits. No one told me that, whilst the lights and bumper are the only major changes, there are a number of minor but essential bits and pieces required to put everything together.
Read here on how to remove the MGF's front bumper and head lamps.
… first with the bumper ...
The new shaped bumper has lower mounting bolt positions than the original so you must obtain either purpose made brackets from one of the specialists or, as I did, fit a new bumper "armature" (shock absorbing mounting panel). My old armature had been bent when the other front damage occurred so I needed a new one anyway. The new armature simply bolts to the same mountings as the original, so this method is certainly the simplest way of doing this portion of the work.
The alternative bracket modification system involves bolting the brackets to the bumper, offering the assembly up to the car and marking the bracket position on the original armature. The brackets then need to be welded to the armature, so if you're not a welder opt for the new armature method.
… and then with the lights
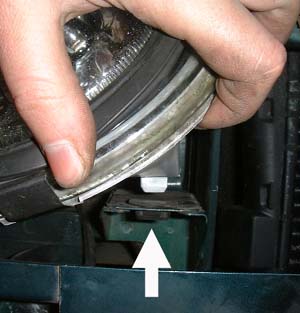 |
The new shape lights use the same top fixings as the MGF ones, but the bottom location points are totally different. Brackets are obtainable to provide modified fixings, but again things are not quite so simple as one is led to believe. Before fitting the lights and new brackets it is necessary to completely remove the triangular base supports for the original lights. This involves either cutting the front projection off or drilling out the spot welds to remove the whole mounting. I opted for the second method, as it meant I could always revert back to standard fixings if I ever wanted to. With the base supports from the old lights removed the new lights will fit over the top two fixing holes and will drop into the correct position to blend with the bumper.
By holding the light assembly to the approximate position it is obvious how the lower, inner brackets are meant to fit. They have captive nuts already attached and final fixing involves drilling through the radiator aperture side panels and bolting the bracket in place. There is of course a degree of difficulty involved in this, as you need the bumper in place to determine the correct light position. Of course when you try to do this you can't reach behind the bumper and under the light to mark the bracket position. I solved this by bolting the bracket to the light first, then fitting the bumper and when everything was lined up I managed to use a long, bent screwdriver to mark the bolt-hole positions.
Everything then has to be removed again to drill the holes.
I made slotted holes in case final alignment wasn't quite right and this proved invaluable as a bit of adjustment was required to get the light/bumper alignment perfect. The outer brackets, as supplied, didn't work at all and rather than spend time and energy exchanging them I modified them totally with the liberal use of a hammer.
The final obstacle – the wiring!
Having completed the bodywork we now move on to the wiring. This is where the fun really starts!!
When MG/Rover designed the original MGF they provided a light unit containing side/head/dip beams with the flashing indicators in a separate light fitting. Power to the main light unit is by way of a six-pin plug into the back of the unit and only three of the pins are utilised. Indicators are powered through a two-pin plug carrying power and earth.
On looking at the new lights I immediately spotted a similar six-pin socket and assumed, wrongly of course, that the original plug would fit the socket – no such luck! In their wisdom MG/Rover decided to change the socket on the new lights and hence a simple job of adding two new connections, utilising unused pins on the original plug, turned into a nightmare.
Initially – owing to the almost complete lack of damaged 'TFs' in breakers yards I was unable to obtain the correct plugs and wiring tails that I needed.
 |
 |
My initial solution
Removing the individual connectors from the original plugs proved fairly easy – a tiny screwdriver down the back of the connector released them after first removing the yellow plug top. I then insulated each one individually with rubber sleeve removed from old electrical cable.
A visit to my local MG/Rover dealer produced the wiring colours to each pin. I then managed, with considerable difficulty, to plug each connector individually into the back of the headlight unit. Luckily the wiring loom colour coding is the same for both cars (why not the plugs then!!) and the indicator connectors are simply added to the original wires.
Whilst this worked OK, I was unhappy with the durability of the solution, as there was very little water protection to the final assembly and I was concerned that individual connectors may shake loose during driving.
MGF Centre to the rescue!
Finally Victoria at the MGF Centre came to my rescue and managed to obtain the correct TF plugs complete with six inches of the wiring loom for me to graft onto my loom. Everything now worked perfectly and the car went off to be painted.
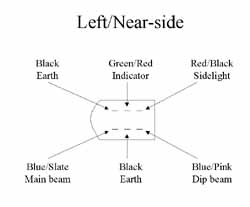
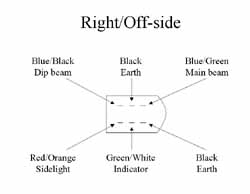
Using the original connectors
To assist anyone opting to use the original connectors on the new headlamp pins the following wiring details will be helpful. These are pictured here, to the right. Click to enlarge the images.
All pins are viewed from the back of the headlamp looking towards the front of the car.
It was worth it in the end
 |
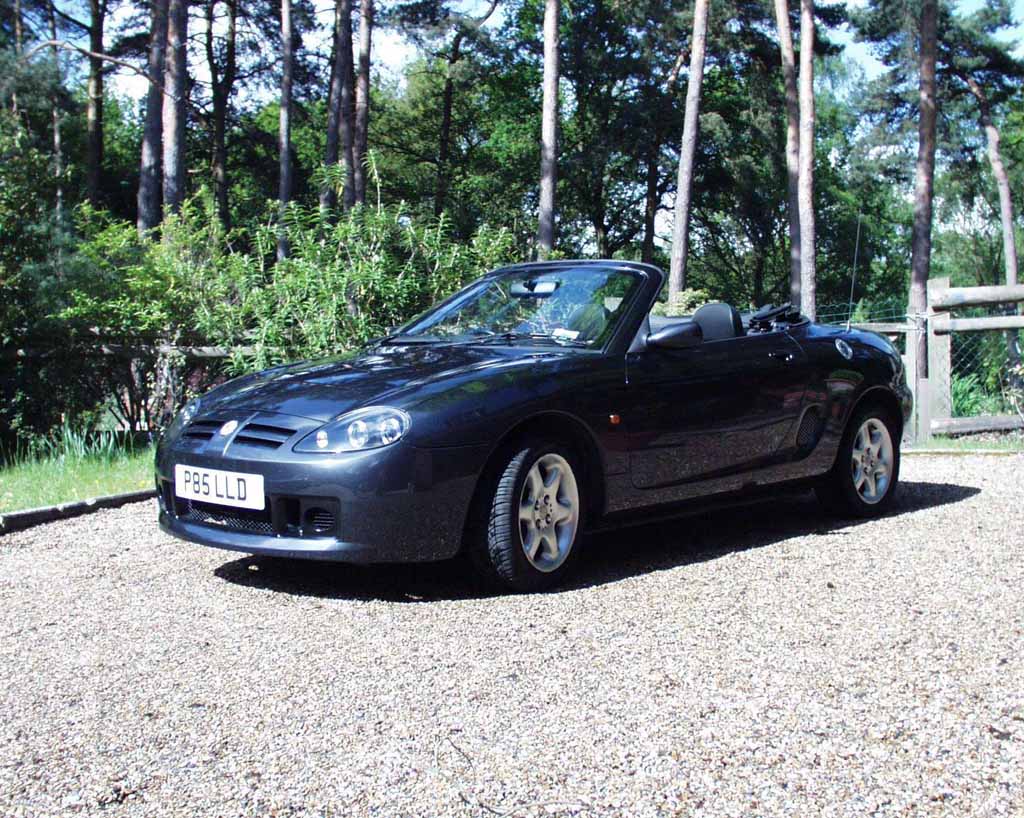 |
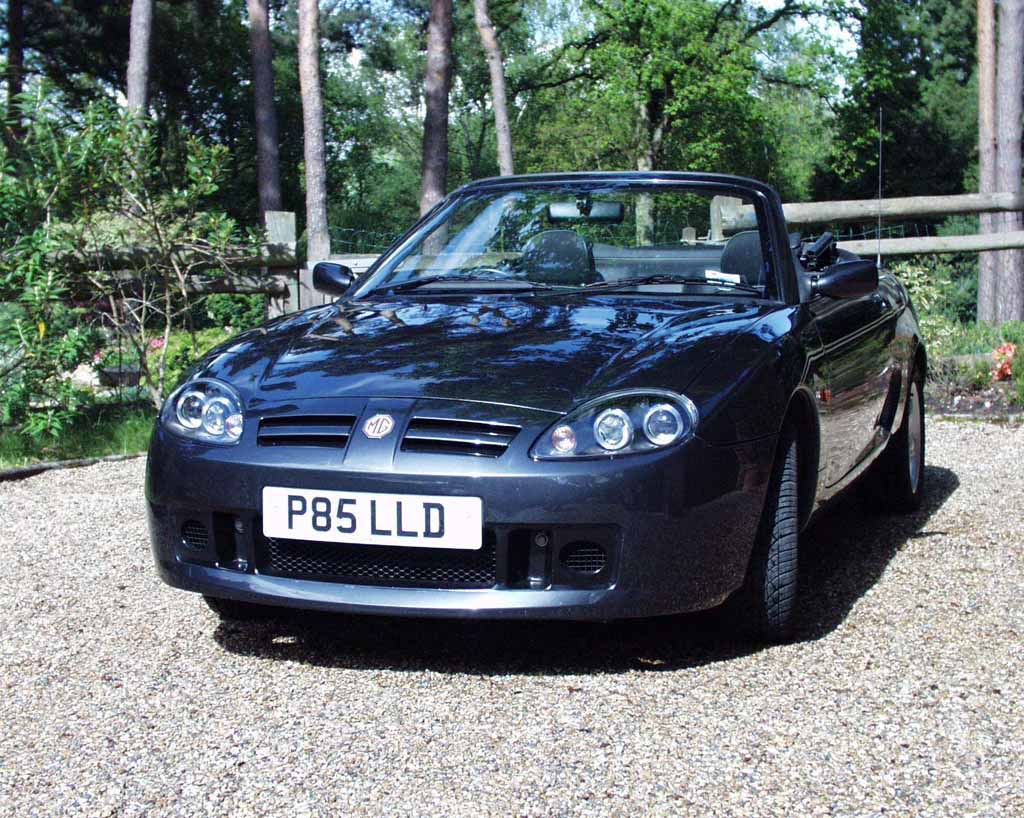
Styling is always a matter of personal taste but I certainly think the blend of TF front and MGF original rear combine the best styling features of both cars in one model. You can make your own mind up - pictured opposite are two shots of my now repaired MG(T)F.
The car will no doubt be seen at some club meetings over the summer, if I can persuade my daughter to join her boring old Dad in his MGA twin cam.
Quite a combination, the first twin overhead cam powered MG and the latest (last?) twin cam MG variant.
Postscript:
The front wheel arch liners dont quite fit owing to the different bumper shape, but they do work if you leave out the front liner to chassis fixing.
Summary of Costs
| Second-hand 'TF' bumper | £130.00 |
| Bumper armature | £75.00 |
|
Headlights x2 (£105 each) |
£210.00 |
| Headlight brackets | £10.00 |
| MG front badge | £15.00 |
| Grille | £15.00 |
| Headlight plugs | £10.00 |
| Total: | £465.00 |
Bumper brackets are £10.00 each so using these in place of a new armature could reduce costs to £410.00 Costs can be further offset by selling the standard components, which are not required:
| Bumper | £80.00 |
|
Lights x2 (£50 each) |
£100.00 |
| Total: | £180.00 |
Therefore the conversion could be completed for around £230.00 plus the cost of painting.
Specialist suppliers
The following specialist suppliers were helpful in obtaining materials and information for this project.
| Mike Satur | Headlamps, Armature, Badge brackets | 01709 890555 |
| Bromsgrove MG | Bonnet, ½ wing | 01527 879909 |
| Midland MGF | Used bumper | 0121 5858734 |
| MGF Centre | Radiator, encouragement and the elusive headlamp plugs | 01902 403045 |
| Trident Garage Ottersham | (Main MG/Rover Dealership) Wiring information and time in the showroom to compare headlamp wiring. | 01932 874411 |