The project build as
featured in
![]()
![]()
|
|
The project build as
featured in |
Part 9: Trials and Tribulations
Global warming
|
|
Blimey, this is frustrating. Events and climatic conditions have conspired to prevent much in the way of meaningful work over the winter and spring. Like last winter, we were once again faced with 2 feet of snow. I mean, snow! In London! Second year in a row! This isn't Global warming, unless someone or something has altered the freezing point of water?! Then, just as I thought I'd get a good run having finally completed the loft conversion on our house, my in-laws, obviously impressed by all the building work and disruption that we went through, decided what a jolly good idea to go through the same process on their house and enjoy the experience for themselves. Wonderful. As I write this, Project Shed is hidden behind a big yellow skip, my tools are hidden under stored domestic detritus, and I've had to move the MGF spares mountain into my own garage, which is 20 minutes drive away. All this, just as the weather has turned and we've finally got some sun, and the seeming permafrosts have finally thawed. A competitive entry into MG Live! 2010 is now not looking terribly likely...
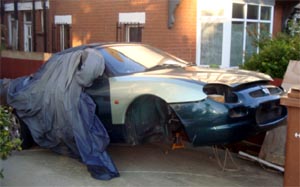
So what to do? Well, in the last frightfully exciting instalment of "Project Shed (the never ending story)," we were stuck with an MG with its nose sniffing the morning air, and a rotten subframe sitting on the floor. Actually, the subframe itself was not in bad nick, little more than surface rust evident on the perimeter frame. However the longitudinal stiffening bars had rotten through from above as folded metal formed a double skin. As it turns out, it is cheaper to buy a second-hand whole subframe than it is to purchase these bars individually new. A lot, lot cheaper. Another call to my good friend, and MGF breaker, Steve (07766 014 017), saw me in possession of a used MGF subframe, complete with suspension (sans Hydragas) for a suitably modest sum. Our 'other' MG, a ZTT was used to transport this, along with the family, as we collected the subframe and a couple of other useful parts from Steve on the way back from an Easter sojourn in Devon. With the estate's boot full of family clobber, it was fortunate that I had already fitted the roof bars to what is I believe one of the most practical MGs ever built. The plan will be to strip, paint and rebuild the suspension on this replacement subframe, and then bolt this up onto the stricken MGF – using parts harvested from this replacement subframe, and those parts that are re-usable from the original. Rather like the whole project, I am looking to make one good example out of the combined parts of two scrap ones...
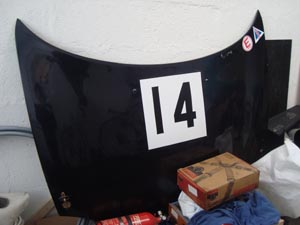
Before this commenced, another old friend, Richard Jones (he of former MG Car Club Chairman fame), let me know that he was clearing out his garage of MGF racing parts as he was making room for another project. The parts haul included a fibre glass bonnet, so naturally I jumped at this opportunity – and once again the ever useful ZTT was pressed into action!
P-p-p-pick up some parts!
|
|
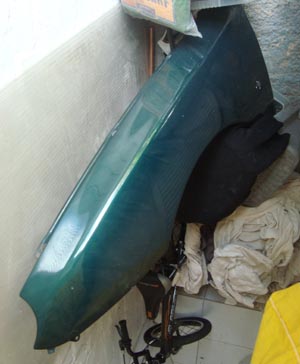
A fruitful trip to the Cotswold's netted a genuine MGF Cup Car GRP bonnet, a fire extinguisher, an FIA approved harness and a few other rather useful spares, including a catalyst – which is nice. The prize item is of course the bonnet. Usefully much lighter than the steel original – but it has certainly seen some 'action'. That action included flipping open at 100mph at Spa, clouting the windscreen and giving our Richard a moment of involuntary bowel action... So yes, it is a bit worse for wear – split and de-laminated in places. But in my naiveté I reckon its salvageable. Experience in repairing GRP? Zip, zero, zilch. So clearly I am very well qualified for this job. Time to buy some resin!
Theiving Scumbags
Well, all that was going swimmingly wasn't it? But uh-oh! Remember that Project
Shed is hidden behind a skip? Well clearly the criminal underclass of Manor
House thought that there may be some thing worth stealing from the in-laws
building site. They were right. The Project Shed wheels!!! All swiped one
evening in March. Let's staple a tail on these people can bring back fox
hunting. Blood hounds! Fetch!
Fortunately, being an automotive Womble, I do happen to have two more sets of
wheels – but it is galling that my previously burgeoning collection of steel
spare wheels has also been, as the Cockney Rhyming slang would go, half inched.
Sigh. Oh well, may be they've done me a favour.
Bad luck, good luck?
|
|
Restoring the 'Zen' of the project to some small extent was the Government's daft "Scrappage Scheme", seemingly designed to prop up the ailing Korean motor manufacturing sector - and not a lot to do with UK PLC. Unfortunately this scheme did see the untimely death of a number of British classics - and the MGF was not immune. The good news was that I was able to retrieve a perfectly serviceable offside front wing in - goodness gracious, the correct colour - British Racing Green (metallic). So at least in one car going to the crusher I could at least preserve one part of it on Project Shed. And not for the last time was I struck by how much better this car, heading as it was to the metal cubing machine, than dear old Project Shed was, and to be honest, still is. Either everyone else is incredibly wasteful, or I am completely off my head.
Hmm.
Don't answer that one.
Back to the future
So now we fast forward to the build up to MGF15. In terms of Project Shed reports, the episode that dealt with the build up to last year's MGFest was just a couple of edits back – shame on me! Progress really has been glacially slow this last 12 months. But I need to crack on now; this year, the Shed is scheduled to be in the main arena. Crumbs! The Shed's a Superstar! We can't disappoint our public can we? Well, I rather suspect that by the time you read this, you'll know whether the Shed has made it or not. As I sit here typing, I am very hopeful that we shall be there! But presently the car is still in pieces (sounds familiar doesn't it?)
Project
Subframe!
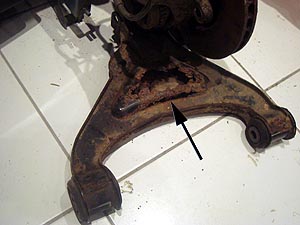
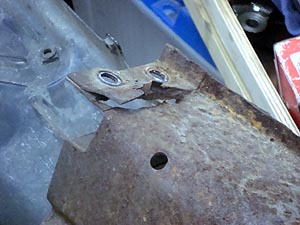 The longitudinal strengtheners from the subframe had corroded through just where there is double thickness steel for the mounting holes… These have now been replaced... |
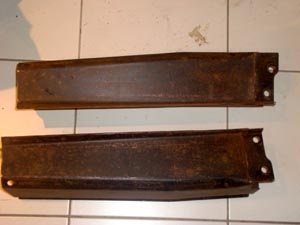 ...with these - purchased complete with an excellent condition front subframe from a 1998 MGF - thanks Steve :) |
As things get very close to MGF15, I have started an on-line build diary on the MGF Register forum – thanks for all the support chaps! This really helps keep me going! If you've been following this, then you already know what I am going to say next – but in summary... deep breath... first I brought the Shed's subframe home.
As it turns out the rot in those longitudinals are not due to fatigue at all. It's plain old corrosion: it looks as though moisture got under a double skinned section and rotted through. I could just swap over the longitudinal box and get it nailed back in the car in a jiffy (see pictures on the right).
But that doesn't seem right.
|
|
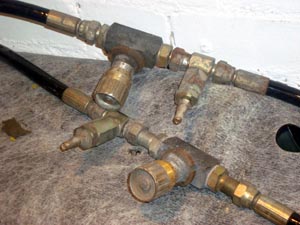
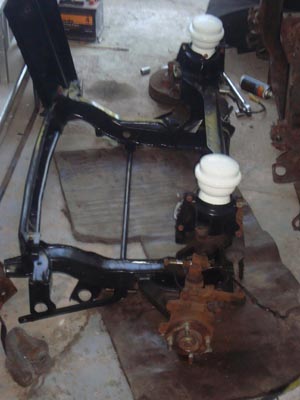
Better just to clean off the old rust, give everything a new coat of paint, and fit some polybushes. (I may have mentioned scope shift before – here's a good example!) Oh, and fit a TF steering rack. And also a pair of adjustable hydraulic isolators for the Hydragas suspension (from Gerry Hiorn's Golden Wheels which I rescued from the bin - and pictured left).
With the two subframes placed side by side, I had to decide which to use on the car. It was a close call, but the donor subrame was just that little bit better than the one originally bolted on the Shed. So that got dismantled, cleaned, sanded and painted (sounds like a quick job when said like that!).
|
|
The lower wishbones from this subframe were so corroded that it was hard to believe that this came off a road car - presumably one with a current MoT at the time of its demise. Swiss cheese, paper doyleys and tea bags would have been proud of these perforations.
Fortunately, the lower wishbones found attached to the Shed's subframe were much better, cleaned up nicely and were painted in the same stuff as the rest of the subframe.
You may be thinking "bet he used Hammerite for that" - but no, you'd be wrong. I'd wasted some time doing some research into various paint products before deciding what to go for...
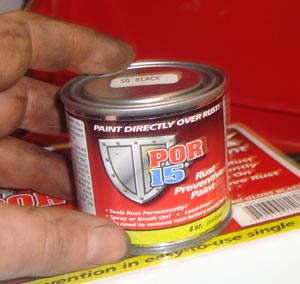
Which Paint? POR 15
I steered away from the usual default product, Hammerite, in favour of something
else that's often praised by the restoration communities on the internet – an
American product called POR15. I thought I'd give it a whirl. It came as 6 small
tins.
 |
|
|
Each tin, the manufacturer claimed, would cover 12 square feet. I was doubtful given their small size, but was astonished that one tin did indeed cover the subframe and suspension parts in three coats with some left over spare!
Incredible. It was also very easy to apply, and I found far more forgiving to brush-on than the more viscous Hammerite.
I think that I may be a fan of this stuff – but let’s see whether it lasts as long as it should. But one word of warning: don't get it on your skin – it doesn't come off all that easily; it's the paint equivalent of superglue!
I haven't rejected Hammerite completely of course – I used
white smoothrite on the hydragas spheres – the rear ones are black, and now the
fronts are white. Why did I do that? Colour coding! The two are outwardly
almost identical, and therefore rather easy to mix up. Simples.
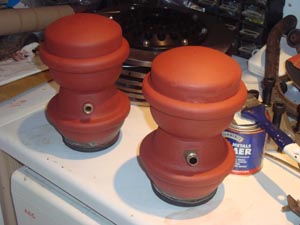 Re-furbishing the Hydragas Spheres - first all old muck and rust was removed. Given that these spheres originally used Zinc-based rust retardant, I decided to slap on a layer of primer so that the smoothrite adheres properly... |
 ...and here they are after a spray or two with white Hammerite. White for the front Hydragas spheres, black for the rears - so it won't be difficult to tell them apart should I need to remove them all in the future. |
Brakes!
|
|
Ahhh! That felt better.
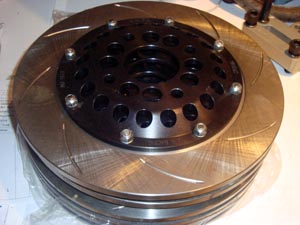
And the discs eventually relented their grip and dropped off... The advantage of doing it this way rather than with the hubs still attached to the subframe is that the shocks aren’t transmitted to the wheel bearings. So with luck, these will last a bit longer before replacement becomes due.
What did I replace the old standard discs with? Well... these rather nice rotors from John Reed Motorsport (http://www.johnreedracing.co.uk/). They look lovely. Apparently they're designed to fit under 15” wheels, front and rear. Well, I'll soon putting that claim to the test!
Next stop: Gaydon!
Now all that remains is to transport the reassembled and painted subframe back to the in-laws (fortunately the drive has just been cleared of the skip), bolt the subframe back on the car, hire a trailer, and swan on up to Gaydon.
Let me know how I get on will you? Thanks.