The project build as
featured in
![]()
![]()
|
|
The project build as
featured in |
Part 5 – Ding ding - strip-down, extra time!
 Last
time I left you with the discovery of why the air-bag had not deployed on the
donor car, despite a full-on full frontal impact: the crucial rotary connector
that carries the essential electrical signals to the air-bag module was
completely u/s. Kapput. Dead. Fortunately, a perfectly usable replacement was
found on ebay for a modest sum (proving, thankfully not for the last time, that
ebay can be useful and affordable), so it was back to the strip down of
the grey donor car.
Last
time I left you with the discovery of why the air-bag had not deployed on the
donor car, despite a full-on full frontal impact: the crucial rotary connector
that carries the essential electrical signals to the air-bag module was
completely u/s. Kapput. Dead. Fortunately, a perfectly usable replacement was
found on ebay for a modest sum (proving, thankfully not for the last time, that
ebay can be useful and affordable), so it was back to the strip down of
the grey donor car.
(Picture right: donor car now devoid of interior and the majority of the front end bolt-on components – now time to move on and get the rest of the parts off the car!)
With the cabin area now devoid of interior trim, removal of 'mechanical' items such as the gear lever and hand brake, and other parts such as the heater controls and the heater box itself could continue apace. While the heater and associated pipework won't be finding a new home in the Shed, they might be of some worth on the second hand parts market, so onto the parts pile they went. Along with volumetric sensors for the alarm, bits of carpet and various other odds and ends. Who knows what will become useful, or what will yield some value in the future to fund further Shed developments?
Removing trim from the area aft of the cabin
Moving backward came the boot lid and engine compartment. The boot lock came off easily enough – once I had figured how to pop the boot lid without access to the key (the key came a little later, courtesy of the ever helpful Steve). I shan't tell you how I did it, in case you're a tea-leaf (thief) on the look-out for some handy tips – but trust me, you can figure it out yourself, but the methods employed are either somewhat destructive or take rather a long time, so not ideal for the opportunistic light-fingered ones. Next, threading out the wiring was a little fiddly, but was straightforward enough. Then removing the boot lid – and wow! I couldn't quite believe how heavy it was! And the hinges, which incorporate assistance springs, were surprisingly weighty too. I was fortunate enough to source a GRP alternative from Ralph Gadsby, who co-owns Executive Motor Services down in Kent. The collection of the panel turned into something of a pantomime, as I made the error of heading down there in my other MGF to collect it. Daft really – the boot lid is surprisingly large, and on a rather wet and cool autumnal day, I had the GRP bootlid partly protruding out of the passenger window, sitting on the adjacent passenger seat. Not really ideal on the M25. But it came home intact – and is usefully lighter than the steel panel it'll replace. It is, however, shall we say, rather "second hand". It's origin was from an MGF Cup car that had been upgraded to TF "specification" - and thus has seen a lot of action. A lot of action landing on the pit garage floor by the looks of things. Still, it looks suitably sheddy, and came at an attractive price, so I hope it is worth repairing.
The wiring loom – oops, got carried away…
With the boot lid and also the engine inspection cover removed from the donor, I could transfer some of the engine and other electrical ancillaries from the donor car across to the Shed. This went very well and was particularly satisfying. In fact, the whole process rather snow-balled... on a day that I had only planned to move a few key items across from the donor I decided that I might try disconnecting the main wiring loom from the engine bay harness. This is pretty simple: the two sets of wires come together with a few connectors hidden from view behind the ECU, located along with the ECU's main relay pack. This assembly is located on the engine side of the boot/engine compartment bulkhead wall, over on the left hand side. "Hmm... so what would be involved to bring that loom into the main passenger compartment?" I wondered. Disconnecting the rear lights (rear light clusters and number plate illumination), bringing through the boot wiring (alarm, lamp, high level brake light) meant that the rear most part of the harness was now free. Then, after disconnecting the fuel pump and the radio aerial, punching through a rubber grommet, and bingo! A third of the wiring loom was now free! "Well, that was straight forward enough," I thought, "how much would be involved to remove the wiring from the front of the car to bring that inside the car?"
 Not
that much as it turned out. There's a long, thick cable from the battery and the
main fuse box to the starter motor to disconnect from the starter itself – then
there are the fuses boxes themselves to disconnect (a few locking connectors).
The front lamps had already disintegrated owing to Close Encounters of the
Hedgerow Kind – so nothing to disconnect there, and the side indicator repeaters
remove easily enough – although you need ideally to remove the wheel arch liners
to pull the cable out smoothly. Drawing all these cables together, they all
pushed through a large grommet just above the fuse panel in the upper part of
the driver's footwell. That was the other third of the wiring loom free. Well, I
was on a roll by now wasn't I? I succumbed to the temptation to complete the
job! The wiring loom inside the passenger cell, like that in the front and rear
of the car are all held in place with zip-tie clips. I tried to release these in
one go so as far as possible these could be salvaged for re-use on the Shed; all
the retainers on the Shed were destroyed when that car had been stripped down
(no surprise there then) – and actually this was largely unavoidable on many of
them; these retainers simply are not intended to be removed and re-used. With
the fuse panel/ multifunction ECU/ relay pack removed, the whole loom could be
lifted out. Crumbs! I did that! Err, what now?
Not
that much as it turned out. There's a long, thick cable from the battery and the
main fuse box to the starter motor to disconnect from the starter itself – then
there are the fuses boxes themselves to disconnect (a few locking connectors).
The front lamps had already disintegrated owing to Close Encounters of the
Hedgerow Kind – so nothing to disconnect there, and the side indicator repeaters
remove easily enough – although you need ideally to remove the wheel arch liners
to pull the cable out smoothly. Drawing all these cables together, they all
pushed through a large grommet just above the fuse panel in the upper part of
the driver's footwell. That was the other third of the wiring loom free. Well, I
was on a roll by now wasn't I? I succumbed to the temptation to complete the
job! The wiring loom inside the passenger cell, like that in the front and rear
of the car are all held in place with zip-tie clips. I tried to release these in
one go so as far as possible these could be salvaged for re-use on the Shed; all
the retainers on the Shed were destroyed when that car had been stripped down
(no surprise there then) – and actually this was largely unavoidable on many of
them; these retainers simply are not intended to be removed and re-used. With
the fuse panel/ multifunction ECU/ relay pack removed, the whole loom could be
lifted out. Crumbs! I did that! Err, what now?
(Picture right: a serpentine tangle of cables that comprise the MGF’s main wiring loom. Figuring out where everything goes could prove problematic if you hadn’t just removed it from another car – just as well I fitted it into the Shed on the same day as removal!)
Better get on and fit that wiring loom into the Shed while I could still remember where the ends of that now very daunting spaghetti-looking tangle of wires went! Fitted the passenger part of the loom first. Then the front under-bonnet compartment wires. Then the engine bay and finally the boot extensions – and after about 6 or 8 hours the entire wiring loom had been transferred from the donor into its new home in the Shed. A good day's work done, and quite a lot of cups of tea drank!
In a day, I had tackled what had appeared to be one of the most daunting parts of the whole strip down and Shed build: the wiring loom. It was a refreshing breeze!!! It would be plain sailing from now on! Would it heck...
Running out of things to do…
As the days wore on, I was slowly running out of things to remove from the donor. ABS pump and associated pipe work was removed from the donor, and stashed with the growing mountain of spare parts. As was the heater's air-box. The pedal box was next, along with the torque transfer bar to the brake master cylinder. The master cylinder yielded its vacuum hose and its connector; the pipe adapter on the Shed's master cylinder had been snapped off! Argh! Yes, I was starting to find an increasing list of small, and hitherto unidentified, areas of vandalism that had occurred during what had clearly been a very rapid strip down of the Shed while in the hands of Mini maniac, "Jack the Stripper".
And the day came when actually, I really had nothing else to remove from the car, other than the engine! Time for a little help from my friends. Tim Woolcott was on-board, of course. I also dropped a line to Dave Livingstone (he of MGs on Track fame), Andy "Scarlet Fever" Phillips and Emma Jackman – all of whom I owe a huge debt of thanks – cheers guys! I also need to thank my mother-in-law, who provided endless cups of tea, cold and hot refreshments through what was a hard but very productive day. For this day was "remove the rear subframe, complete with engine and gearbox and all other ancillaries" day. The cunning plan was to remove the rear subframe, wheel it out from under the car, service the engine (no service history – so assume the worst: cambelt change, fluid change, HT lead change, new distributor cap and rotor arm, new spark plugs, new airfilter) and then wheel the whole shebang under the Shed and bolt it in. Bingo – Project Shed would very nearly be mobile under its own power. Well, that was the plan...
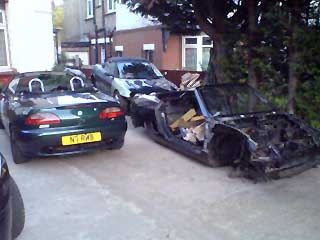
 (Picture
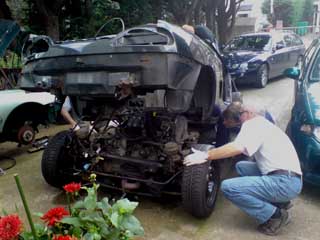
right: by hook or by crook, we managed to unbolt the rear subframe, and lift
the rear of the donor car’s shell high enough to wheel out the engine from under
the car. Note Project Shed to the left, and a couple of other of our MGs – to
the right, a 2004 ZS120, and background, a 2003 ZTT… [Picture credit: Emma
Jackman])
(Picture
right: by hook or by crook, we managed to unbolt the rear subframe, and lift
the rear of the donor car’s shell high enough to wheel out the engine from under
the car. Note Project Shed to the left, and a couple of other of our MGs – to
the right, a 2004 ZS120, and background, a 2003 ZTT… [Picture credit: Emma
Jackman])
Time to take the engine out
With the fuel lines disconnected, the hydragas spheres unhooked from their interconnection pipes, the clutch hydraulic pipe disconnected, speedo cable unscrewed and finally the throttle cable removed, the engine assembly was ready to come out, ready or not! I had intended to purchase a car lifter to raise the rear of the car clear of the transaxle assembly – but a thoroughly unsafe and absolutely "do not try this at home kids" approach involving axle stands, jacks and lots of hands, the subframe unbolted (well, I say 'unbolted', but 'sheared off seized bolt heads' would be more accurate) and the rear of the car lifted free of the whole transaxle-on-subrame assembly! What a moment – the engine could then be wheeled out from under the donor and out into the bright sun-shine!
 And,
oh. Blast. Utterances of the Anglosaxon swearing lexicon. There was a flippin'
great big rusty hole in the left hand steel engine mounting frame, and the front
cross-bar of the subframe had more perforations than a Tetley's tea bag! Not
enough oil leaks to stem the appetite of the ferrous oxide worms, that's the
problem with modern cars. To my surprise, given the prevalence of oxidised steel
on the Shed's outer panels (attributed in part to its life-long proximity to sea
salt), the donor's subframe was in far worse (if more complete) condition than
the one from the Shed: not sure why – perhaps the donor's higher mileage (over
100,000 miles) has something indirectly to do with it?
And,
oh. Blast. Utterances of the Anglosaxon swearing lexicon. There was a flippin'
great big rusty hole in the left hand steel engine mounting frame, and the front
cross-bar of the subframe had more perforations than a Tetley's tea bag! Not
enough oil leaks to stem the appetite of the ferrous oxide worms, that's the
problem with modern cars. To my surprise, given the prevalence of oxidised steel
on the Shed's outer panels (attributed in part to its life-long proximity to sea
salt), the donor's subframe was in far worse (if more complete) condition than
the one from the Shed: not sure why – perhaps the donor's higher mileage (over
100,000 miles) has something indirectly to do with it?
(Picture left – oh no! The dreaded tin-worm has been at work – and not just here, where the damage is at its most dramatic, but also else where on the subframe. Sadly this is scrap – and rather rained on my brilliant plan of unslotting the transmission from one car and nailing it into the other. Drat! [Picture credit: Emma Jackman])
Trouble down below
Little point trying to repair the donor's subframe, so I'd need to replace the missing engine mount on the Shed's original subframe. New, from X-Part, these cost over 100 quid. Over 100 quid for a bit of bent steel box-section? Not on your nelly! Off to fleabay again! A successful £4.90 bid later, I was off to Gloucestershire to collect an excellent condition 1998 MGF rear subframe, complete with a good condition steel support for the left hand engine mount. I didn't really need another subframe; I only needed the engine mounting support bar, but since this subframe was staggeringly cheap and is far better condition that the other two I now own, why not use that nice 'new' third one instead?
Ebay rant moment again. Yes, it is truely possible to find bargains on ebay, even now. But it does involve rather a lot of luck, being in the right place at the right time, and hoping no one else is after the same part as you at the same time. I was beginning to like eBay again, but perhaps that was simply because my luck had changed for the better – but would it last?
End of an era
The final chapter of Shed#2, the donor car's story was now entered, as the donor surrendered its fuel system, fuel tank and fuel filler pipework. As was becoming increasingly predictable, the Shed's fuel system had been butchered: the fuel filler pipe has a rubber hose between the fuel tank inlet and the steel pipe to the filler neck. This had been cut (although just slipping it off would have been just as easy). What was rather more frustrating, as I transferred all the fuel fittings to the fuel pump was the discovery that the fuel return pipe on the fuel tank had also been severed. Arrrrgggghhhh! It had a simple-to-release push-connector for goodness sake – why cut the pipe??? I had to salvage the semi rigid plastic hose from the donor car's fuel tank, which may I tell you was a pig of a job. Shed might yet actually need a replacement new fuel tank as the semi-rigid plastic hose was very, very difficult to push onto the Shed's fuel tank's fuel-return line. A new fuel tank just for one moment of laziness. How incredibly annoying. Why not use the 'tank from the donor I hear you ask. Unfortunately, that 'tank had expanded too much to actually get out of the car in one piece; the plastic fuel tanks are renowned for this, and much ignorance and violence had to be applied to get it out of the donor car's shell – it did come out eventually, but I didn't fancy trying to fit this now-oversized, bloated fuel tank into the Shed... Curiously, the Shed's fuel tank was far easier to remove – not sure why? Probably because the Shed' fuel tank was effectively empty of fuel and had been venting freely for about a year, unlike the one from the donor car, which appeared to still be half full, and the fuel filler cap securely locked in place. Oh, the fuel cap. I discovered why this had been re-designed for the later TFs – the originals on early MGFs are not that secure – but I'll say no more...
 So
that was finally it for the donor MGF. Stripped to an absolute bear and in
places crumpled shell, it had no further parts to yield. It was with some
sadness that I called a local scrap merchant to collect the shell – and thanks
to China's recent insatiable appetite for recycled metal (pre-credit crunch),
they collected for nowt. Why the sadness? Because it represented the end of the
beginning I guess. But it had to go – and suddenly the in-law's front drive had
an awful lot more space! Now was the time to concentrate on getting the
remaining parts onto the Shed – including that power train now making the
in-law's front garden look like breeding centre for MGF rear subframes (for now
I had three: the Shed's incomplete original, the donor's rusty but complete
example, and the rather surprisingly nicely preserved ebay specimen). They go
quite well with the two sets of alloy wheels and four 'space saver' steel
wheels... This spares surplus is starting to get ridiculous!
So
that was finally it for the donor MGF. Stripped to an absolute bear and in
places crumpled shell, it had no further parts to yield. It was with some
sadness that I called a local scrap merchant to collect the shell – and thanks
to China's recent insatiable appetite for recycled metal (pre-credit crunch),
they collected for nowt. Why the sadness? Because it represented the end of the
beginning I guess. But it had to go – and suddenly the in-law's front drive had
an awful lot more space! Now was the time to concentrate on getting the
remaining parts onto the Shed – including that power train now making the
in-law's front garden look like breeding centre for MGF rear subframes (for now
I had three: the Shed's incomplete original, the donor's rusty but complete
example, and the rather surprisingly nicely preserved ebay specimen). They go
quite well with the two sets of alloy wheels and four 'space saver' steel
wheels... This spares surplus is starting to get ridiculous!
(Picture right: three MGFs on the drive, and only one works! The donor car is now stripped of all parts – and for the purposes of maintaining any kind of relationship with the in-laws, this shell is to shortly depart for the scrap heap! The Project Shed parts car is in the background – and remains work in progress)