The project build as
featured in
![]()
![]()
|
|
The project build as
featured in |
Part 4 – The Full Monty
|
|
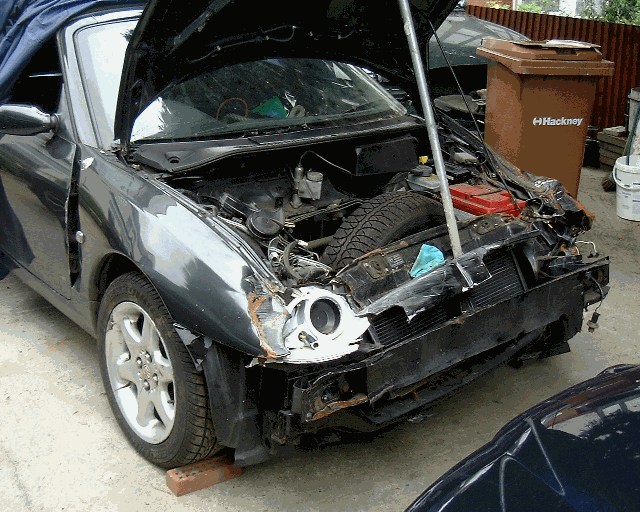
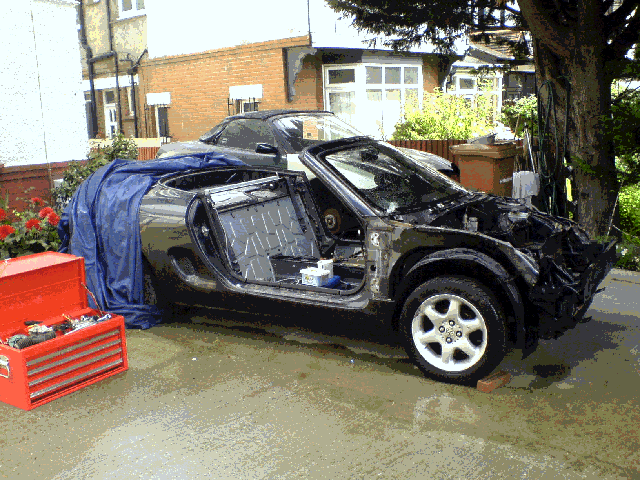
Project Shed has certainly moved ahead significantly with the arrival of the Graphite Grey Donor MGF (a 1998 1.8 MPi) – as this car brings with it nearly all the necessary parts to replace those that were unceremoniously removed from the Shed for the Frankensteinian re-birth of a Rover Mini in mid-engined guise. Well, I did say nearly all the parts because, as you can see, the 'new' car has had something of a close encounter with the "Great British Scenery". I am told that the car's young previous owner walked away from the wreck, and sold the remains on fleabay – and circuitiously, I purchased the car from the guy that purchased it from him. Erm, that's as about as clear as mud – but anyway, back to the plot – the frontal impact means that the donor is missing some parts that were casualties in the accident. The front bumper, head lamps, indicators are obvious. As indeed are a number of body panels that could have proven rather useful for replacing damaged/ rusty panels on the Shed. Less obvious perhaps, is the radiator. Although still fitted in the car, the radiator was moved so far back that the rear-mounted cooling fan was crushed behind it projecting the fan motor through part of the radiator's core. This means that another radiator needs to be found – what's left of the one on the donor is as useful as a chocolate tea pot for purposes of cooling, but might be useful for irrigating shrubs in the garden.
That said, the grey car is a honey pot of spare parts – so all I needed to do is remove them. Sounds brilliantly easy doesn't it? In Haynes manual fashion "remove parts from donor car, reassemble in recipient in reversal of disassembly". Well, actually, taking the donor car apart was pretty simple, but it wasn't really a quick task as there are an awful lot of bits to remove, particularly if working alone. That said, working alone is probably the best way to work at this stage, as you then know how everything came apart and therefore have some idea of how it goes back together again. Now some people (probably of the female of the species) would probably be keen to point out that there are books on how to take apart and put together MG cars (notably the official MG workshop manual), but being a chap, referring to an instruction manual was absolutely the last thing I was going to do (because, as all women know, all men are idiots). Fortunately, as it turns out, the MGF is a surprisingly simple car to take to pieces using nothing but common sense and a bit of evil guile – just so long as you work in a methodical and logical way it is all notably straightforward. I didn't find myself needing to refer to the manual for any of the disassembly tasks undertaken. That said, I am probably at a slight advantage over some, as I have worked on my own MGF many times, so some of the jobs I had done before and therefore familiar already, but I certainly hadn't stripped one of these cars down to a bare shell before! What made things easier is that once most of the trim had been removed, some of the jobs that were capable of inducing significant agony in the posterior were rendered simple too... (Have you ever tried to adjust the brake light switch on an MGF? Laugh a minute isn't it? Pretty easy when there's no dash board or steering column in the way though.)
Elementary, my dear Watson... (Or should that be alimentary?)
As with the strip down of the Shed, I couldn't resist attempting to piece together a little of the history surrounding the final moments of the Grey MG. Looking through the various cubby and storage bins revealed a number of receipts – including one for the car's purchase through an auction house in 2007, the purchase of some engine oil pretty much the same day, and a few other odds and sods – most frequently, fuel receipts. There was a note for a chap called Julian – the car's previous keeper perhaps? But also was a fast food takeaway carrier containing some fries and soft drink. Perhaps just as significantly was the presence of some pain killers – was this the meal of the morning after? Who knows... But I bet the driver had a bit of a headache after the final impact, as further inspection of the front end of the car revealed a comprehensively crushed front structure, distorted front subframe, damaged/bent front suspension and a snapped steering rack (little wonder the front wheels refused to point in the same direction!!! Curiously the air bag had failed to deploy – which didn't quite fit with the apparent damage to the front of the donor car. The explanation to this conundrum presented itself later – as I'll explain shortly.
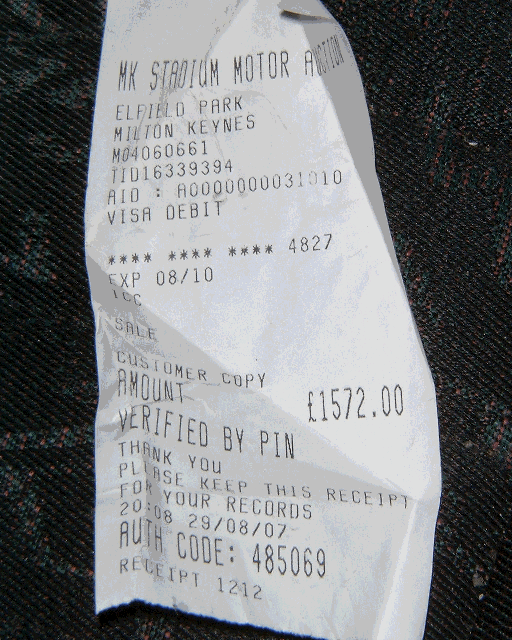 Picture above – credit card receipt following the car’s purchase at auction by its last owner – for a princely sum of £1572… |
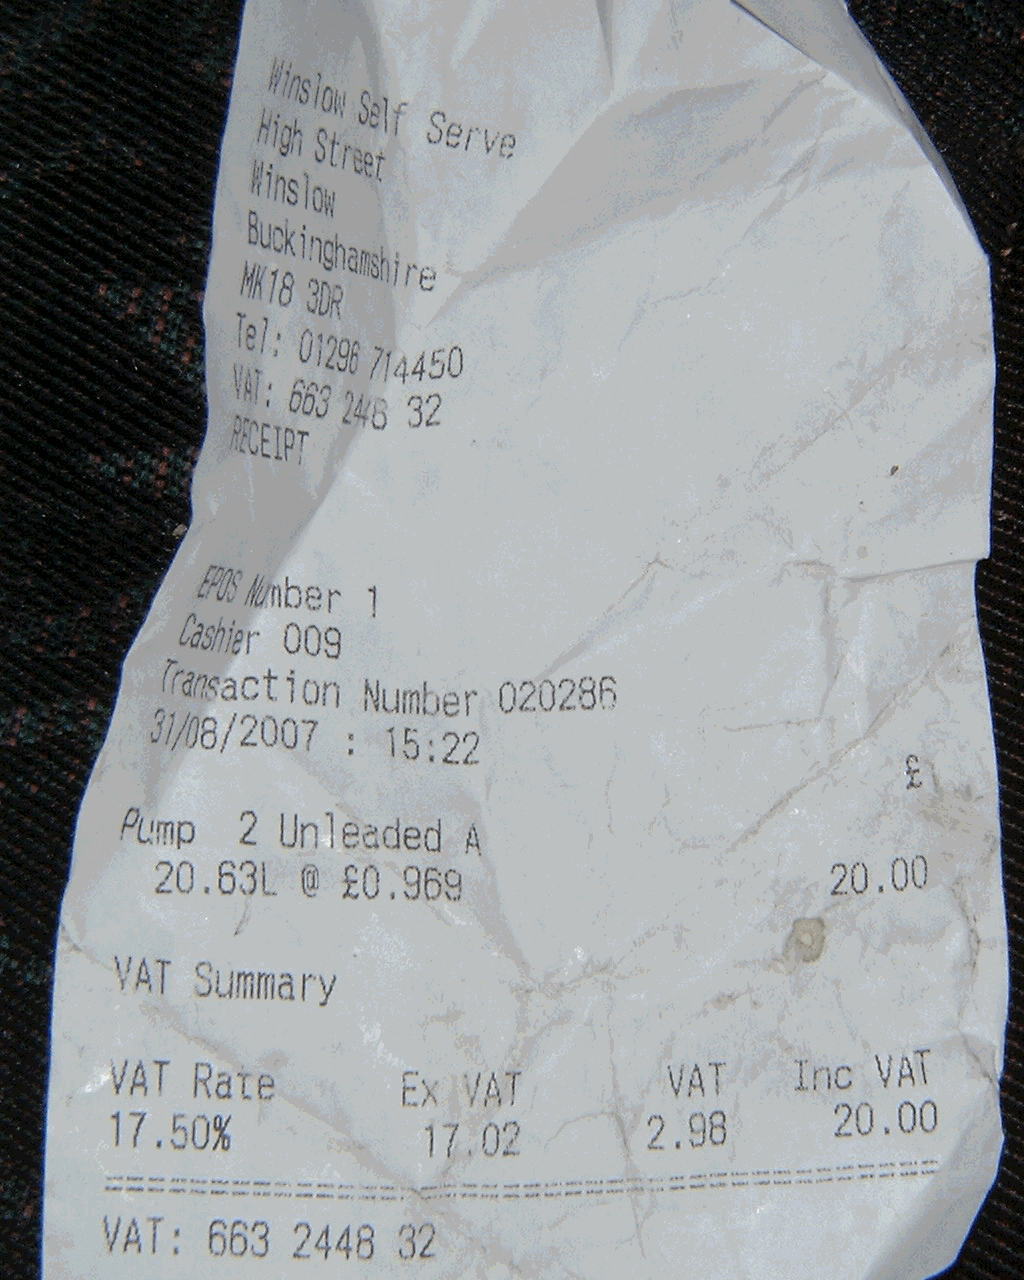 Picture above, possibly the first petrol receipt! |
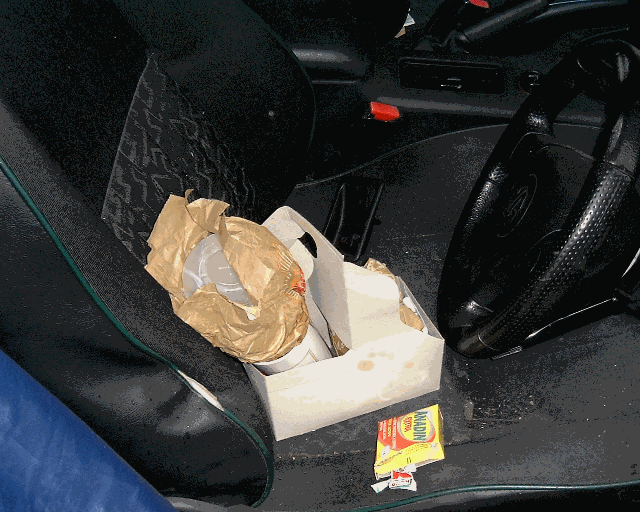 Picture above – the meal following a big night out? Or were the pain killers purchased following the frontal impact? Ouch… |
Other problems included the presence of the dreaded inner-edge front tyre wear. This is a common problem on these cars – often down to a combination of geometry issues relating to castor, excess camber and too much toe-out on the front suspension (read more here). Running the car on semi-slicks (resulting from the excessive tyre wear) won't have done any favours for front-end grip in the wet either – likely to result in dramatic understeer, particularly under braking. Cheap and nasty, mixed brand tyres fitted would simply have exacerbated matters further. But curiously – and wonder of wonders! - the ABS fitted to this otherwise standard MGF 1.8i would at least help to stave off lock up. The finding that this car had ABS was a real boon – not least because it meant that the Shed, originally a VVC, could retain this useful braking safety feature that might otherwise have been lost had the donor's wiring loom not come so equipped with the necessary wires and connectors. Bargain! Didn't save the hapless Grey MGF though – ABS doesn't alter Newtonian Physics. Nor indeed any other law of Physics that I am aware of. Drive too fast into a corner, you'll fall off (as I myself demonstrated to dramatic effect at the Luton Park Hill climb a couple of years ago – but that's another story)....
Apart from the optional-extra ABS, this was a pretty standard MGF 1.8i – with no other frills or fancies fitted (other than a high-level brake light – but that is not required for the Shed). I wasn't the first person to start taking parts from this car either; before I collected it, someone else had robbed it of its wiper mechanism, washer bottle and washer pump and the side windows and their motors. Largely this was of no consequence to me, as the Shed actually had these parts – except for the washer bottle. Perhaps a little more frustratingly, the grey car didn't come with keys and the central locking fob; they'd gotten lost at some point. But no worries, Steve, who I bought the parts car from, happily supplied these essential missing parts from other cars he'd broken – cheers Steve!
So the fun begins!
Spares car. In-law's front drive. Shed. Good combination for fostering good relations with one's father and mother in law isn't it? When Tim, Dick and I dropped the grey car off, I rashly "promised" to have the car stripped down and the shell removed to the crusher within two weeks. Did I achieve this?
What do you think?
No, of course not. It actually took eight weeks to clear the drive of the stripped shell. Oops. But because I'd worked hard on it on a near daily basis, I think that they were satisfied that at least I was making progress on the project, rather letting two vehicles languish on their drive, turning it from respectable to a passable impression of Steptoe and Son's back yard. And because their house in front of a bus stop, one of the first tasks was to buy a car cover; too many commuters were staring in at the frontally-collapsed MGF wondering what had become of the householder who presumably at the wheel at the time!
 So,
re-winding a little – where does one start when one has a complete spares car
and supposedly two weeks in which to strip it bare. I don't know either, but I
decided to start at the front, and tackle all those mangled bits of car and
consign those to the rubbish heap. At least that would make the car a little
safer from the sharp shards of metal perspective. Off came the remnants of
shattered bumper and head lamps. Bonnet came next – although I removed the
washer jets for spares, and I reckoned that the bonnet lamp would make a good
eBay sale for TF owners (a feature deleted by MG Rover as part of the
cost-saving 'Project Drive' that also saw the illuminated ignition switch, spare
wheel and second horn deleted to name just three). The crumpled front wings also
came off – although this required a little more brute force and ignorance to
remove due to obscured bolt heads under folds of mangled steel panelling.
Nothing that a length of aluminium pole couldn't sort out (I think it was
formerly the central pole from one of those rotary washing lines). A bit of
leverage here, a bit of lump hammer action there soon revealed the bolts – and
although some bolt heads sheared off, this wasn't a concern as the mangled front
wings were consigned to the rubbish pile.
So,
re-winding a little – where does one start when one has a complete spares car
and supposedly two weeks in which to strip it bare. I don't know either, but I
decided to start at the front, and tackle all those mangled bits of car and
consign those to the rubbish heap. At least that would make the car a little
safer from the sharp shards of metal perspective. Off came the remnants of
shattered bumper and head lamps. Bonnet came next – although I removed the
washer jets for spares, and I reckoned that the bonnet lamp would make a good
eBay sale for TF owners (a feature deleted by MG Rover as part of the
cost-saving 'Project Drive' that also saw the illuminated ignition switch, spare
wheel and second horn deleted to name just three). The crumpled front wings also
came off – although this required a little more brute force and ignorance to
remove due to obscured bolt heads under folds of mangled steel panelling.
Nothing that a length of aluminium pole couldn't sort out (I think it was
formerly the central pole from one of those rotary washing lines). A bit of
leverage here, a bit of lump hammer action there soon revealed the bolts – and
although some bolt heads sheared off, this wasn't a concern as the mangled front
wings were consigned to the rubbish pile.
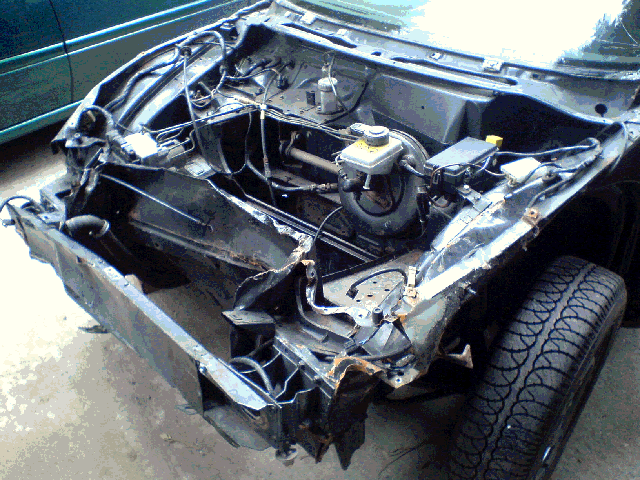
The front bonnet space was cleared next, leaving behind major electrical components – the wiring loom was, I felt, going to be a major challenge – so when the time came to remove it, I wanted everything it was connected to largely in place to enable me to transfer everything in one go.
Airbags. The safety device, not overly verbose uncles.
|
|
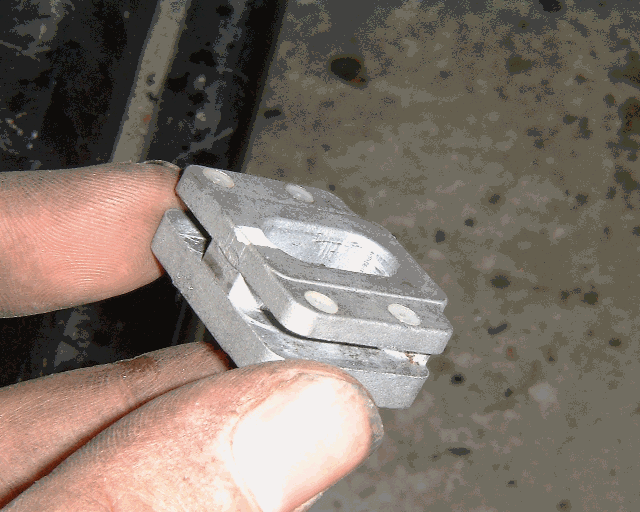 Close up of mounting brackets – the circles you can see on the upper surface are the plastic ‘rivets’ that pass between this alloy ‘shoe’ and the brackets on the steering column itself. It’s not designed to be repairable, and therefore the whole column is effectively scrap |
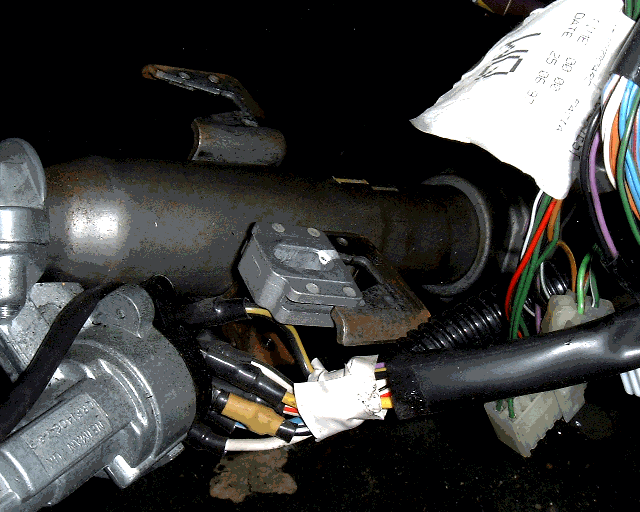
Moving backwards, the interior was next in my sights. Curiously, the parts vultures had already been at the steering column, and this was sitting in the driver's foot well. I am not sure what they had been after – perhaps they'd wanted to get the steering column, but this had been rendered valueless by the accident. The MGF's steering column is held in place by two bolts to the cross-bar under the dashboard, via two sheer-able brackets. As you can see in the pictures, these had sheered (surprise surprise). Made me wonder again as to why the air bag had not deployed?
Steering column out. Seats out. Rear bulkhead trim (the so-called T-bar) out . The 'transmission tunnel' trim out. Then the dash board. It's only held in place by the four bolts hidden under the front screen demisters and a further two bolts on either side (which only need to be loosened) once the centre console and instrument pack is removed. It was so simple, that I wondered why the dash on the shed was so heavily mutilated... but then, I was to discover later, the dash board wasn't the only item that was needlessly vandalised on the Shed.
 Now I had a nearly bear cabin and an increasing mountain of spare parts.
Eventually, the plan is to sell the unneeded parts on our old friend, Ebay – but
I haven't started this process just yet, as I haven't decided what to keep for
spares for my other MGF. I fear I have a touch of the Womble – an alarming
tendency to hoard stuff that might prove useful in the future. I do think
however, that I shall have to be strict on myself and de-clutter when the Shed
build nears completion! There's another temptation too – I could very easily
return the Shed into a fully functional road car with a civilised interior with
all the parts salvaged from the donor. But there's little chance of that; the
Shed is destined for the track!
Now I had a nearly bear cabin and an increasing mountain of spare parts.
Eventually, the plan is to sell the unneeded parts on our old friend, Ebay – but
I haven't started this process just yet, as I haven't decided what to keep for
spares for my other MGF. I fear I have a touch of the Womble – an alarming
tendency to hoard stuff that might prove useful in the future. I do think
however, that I shall have to be strict on myself and de-clutter when the Shed
build nears completion! There's another temptation too – I could very easily
return the Shed into a fully functional road car with a civilised interior with
all the parts salvaged from the donor. But there's little chance of that; the
Shed is destined for the track!
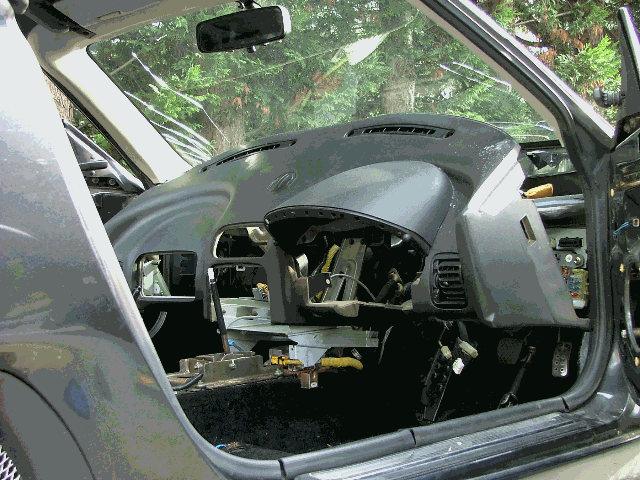
(Picture right: removal of the main dashboard assembly – by the time the interior has been removed to this extent, the main dash moulding is only held in place by four bolts, and pulling it out now is a doddle.)
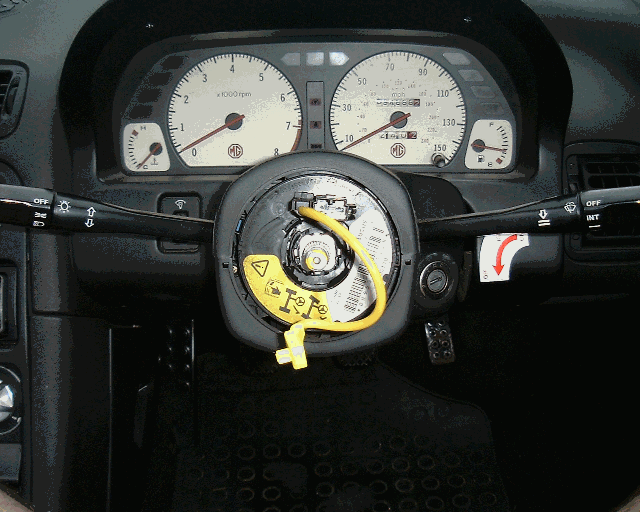
With the front half of the donor car 'de-cluttered' of mainly trim components, time to investigate the steering column; I needed to salvage the indicator stalks, the steering wheel cam (used in the indicator stalk self-cancelling mechanism) and the rotary coupler for the Shed. The latter is important, as it carries the electrical connection between the horn buttons on the steering wheel to the car's main wiring loom. On the road car, it also has the connections for the steering wheel's air bag – so it's an essential safety feature (albeit one that the Shed won't be using – but I am planning a steering-wheel mounted starter switch – more later on that – that will require the electrical connections).
To my surprise, on removing the steering wheel, the rotary coupler literally fell apart! The rotary coupler contains a long ribbon cable that is wound on and off a central 'bobbin' as steering lock is applied in one direction, and wound off again, as steering lock is applied in the other. The ribbon cable was pretty badly mangled on the donor car's coupler – and moreover, the connectors at either end had disintegrated. Nothing to do with the accident – but almost certainly explained why the air bag had not deployed. I doubt that the horns would have worked either... Perhaps the SRS warning light was permanently on when the car was on the road? Perhaps the SRS lamp had been disabled? I haven't investigated the latter – but if your buy a latter day MG Rover and the horn does not work, I'd suggest an inspection of the rotary coupler, as you may discover the air bag may not come out to play and save you when you need it most.
 Picture above: intact rotary coupler – it carries the horn and the essential SRS airbag cabling through to the steering wheel. If it’s damaged, then either or both will cease to function, with clear detriment to safety! |
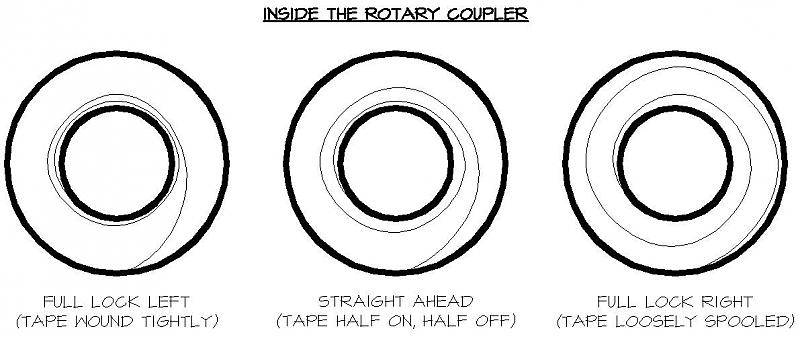 Picture above: Andrew Phillips’ excellent explanatory figure showing how the rotary coupler works, with the ribbon cable winding on or off the centre spindle as steering lock is applied/ wound off - click to enlarge. |
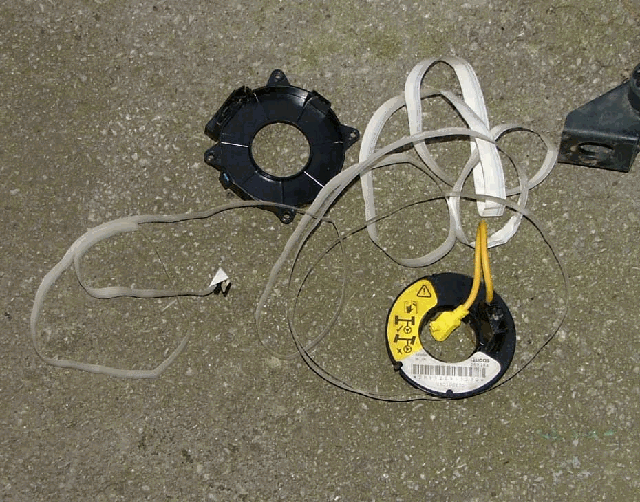 Picture above: rotary coupler simply disintegrated when I removed it from the donor car – the white tape is the ribbon connector that carries 6 wire ‘channels’ plus the SRS connections to the steering wheel mounted airbag. None worked – hence no airbag deployment during the terminal crash incident. Not very safe – fortunately the then-owner walked away. |
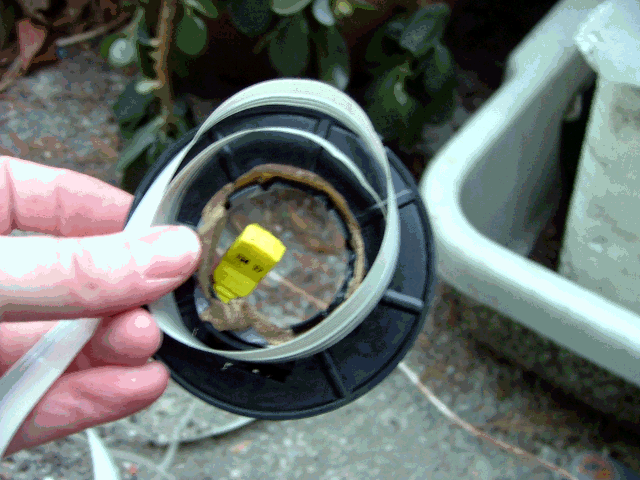 Picture above – as in Andrew Phillips’ schematic, the ribbon cable here winds around the centre spindle, allowing the steering wheel to be turned without loosing electrical contacts for the horn or airbag. Simple, but effective. Well, effective if the coupler is intact! Why this one was so badly damaged – the connectors at either side had disintegrated as well – is unknown. |
To get to this point had already taken the best part of two weeks. The strip-down enters extra-time! More next time.
(Picture right: donor car half way through strip down – nothing much left in the interior and the car is starting to look somewhat skeletal! Note that the Shed waits patiently in the background as a willing recipient of the parts yielded from the donor.)