The project build as
featured in
![]()
![]()
|
|
The project build as
featured in |
Part 10: The Car's the Star!
MGF15
|
|
At the end of the last instalment, I left you with a cliff hanger: would Project Shed make it to MGF15 – the 15th anniversary bash organised by the MGF Register - of the MGF's launch at the Geneva Motorshow way back in 1995? Like the first two manufacturer supported 'birthdays' (thank you, BMW), and of course the MGF10 event, the venue for the festivities was Gaydon, the national motor museum located off the M40 near Leamington Spa. I shall not keep you in suspense – the great news is that Project Shed did indeed make its first public appearance. Unsurprisingly on a back of a trailer rather under its own power, but there nonetheless. Here's the story of how the Shed made it to greet its admiring public...
Five days and counting...
|
|
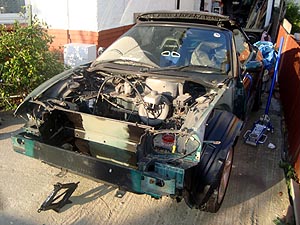
I had already reassembled the front subframe a weekend previously, but owing to on-call work commitments, the weekend immediately prior to MGF15 was unproductive from a car building perspective – which rather meant that all the finishing work would have to be put in during the few evenings immediately leading up to the event and, of course, the last whole day available to me – Saturday. As it happened, I was able to secure a few additional useful parts of the jigsaw during a couple of these evenings, including a Liquid levers Hydragas pump and a set of VVC 15” five-spoke alloy wheels purchased off Brian Gunn. The Friday saw me chasing off to Mini Spares up in Potters Bar (North London) to pick up a 5 litre can of Hydragas fluid which meant that when the subframe was successfully mated back into the car, I could re-charge the suspension and put the car onto four decent-looking alloys with road-legal rubber (not that the car is a runner at this stage, but it did mean that the Shed could look deceptively car-like when wheeled around Gaydon). Excitement and the tension were rising!
Saturday 31st June – the day before MGF15
|
|
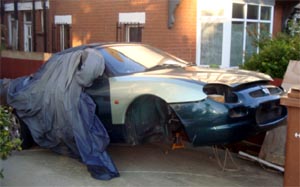
Saturday was to be the last-minute push to get the Shed to Gaydon. As they say in football circles- there was all to play for... The family wagon, the MG ZTT, was pressed into action once again. GRP bonnet strapped to the roof, fully assembled front subframe, four wheels, tool kit, Hydragas pump and fluid, replacement near-side wing and a few other sundries squeezed inside. I'm not sure that Cecil Kimber ever envisaged a load lugging estate car for his new M.G. Brand way back in 1924, but I am sure that he'd approve. A short drive to the in-laws saw all this kit disembarked over the drive like the contents of an Ikea flat pack wardrobe. Ready to rumble...
Front Subframe and rusty nails
|
|
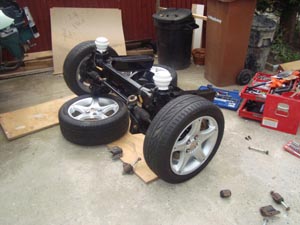
The front subframe was the key objective of the day – if I could not fit this, then Project Shed was going to have its second no-show at the MGF Register's annual show in as many years. Failure (I had long ago decided) was not an option. Manoeuvring the subframe was pretty simple after fitting the wheels to the hubs.
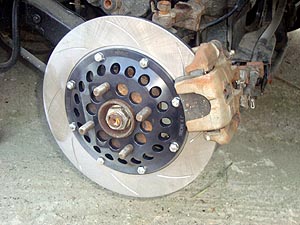
But to fit the wheels you must first fit the brakes. So on went the flashy new John Reed floating rotor 280mm brakes, along with the Tech-speed refurbished calipers. I fitted Mintex 1177 pads – but I am not yet sure whether these aggressive race-specification pads will be the ones that the car will ultimately run with; they're certainly an option though. John also tells me that his alloy bells (the alloy 'hub' to which the rotors themselves bolt to) are compatible with AP Racing products – which might possibly open the way to fitting AP ceramic discs... but I think at this stage that is something that is needlessly exotic. Besides, the current grooved steel discs looked impossibly racy, if not down-right sexy behind the five-spoke alloys. John also mentioned the possibility of engineering some 4-pot calipers. Tarox already do something similar (originally destined for the Metro GTi, but equally suitable for the MGF which shares the same hardware) - but if John can do it for less for similar quality, then I am certainly interested!
|
|
I also took the opportunity of fitting angled grease nipples to the suspension while everything was still relatively accessible (pictured right). This will make re-greasing the suspension in future a little easier.
|
|
So with the subframe shod with wheels and rubber, I could get the subframe under the car and start aligning them to the mounts. I started by bolting the mounts to the car, and then push the large subframe-to-body mount bolts through once the subframe and body mounts were aligned. In retrospect, this was the wrong way round (I did it the other way for the rear – bolting up the pair of mounts to the subframe, and then lifting the subframe and bolting the mounts to the body – and that went far more smoothly last year). I managed to get the front subframe mounts bolted up pretty quickly, but the rears were proving far more troublesome. I needed to push the subframe relative to the body a couple of millimetres. Moving the subframe was proving somewhat unrewarding, so I thought I'd have a go at shoving the body relative to the subframe. At this stage, I'd better remind you, dear reader, that my in-laws had had their kitchen extended, and this work had not long been completed. Also, the Shed was parked quite close to the fence with the neighbours. Well, those thoughtful builders had shoved a load of wood, obviously too long for the now departed skip between the fence and the car. Some of those planks of wood had nails. My left foot found one of those nails, passing through the sole of the shoe and punching a hole just behind the ball of my foot. Ouch ouch ouch... I'll save you the gory blood stained details, but it did slow progress a bit, just what I didn't need. And then I discovered that the bolts I had were too long for the TF mounts I was fitting. Sigh. Things weren't going well.
|
|
Cutting the long and for me rather uncomfortable story short, I was eventually able to align the front subframe, but I had to use the too-long bolts for now – until suitable replacement could be found. Looking for an alternative at 7pm of the day before the unveiling at Gaydon just wasn't going to happen.
So here we are, most of the day has gone, and I've only just got the subframe in place! There was me thinking that I had loads of time to get loads of jobs done – but no. So it was going to be another long day before a car show before the Shed was going to be going anywhere. And this time, I was on my own. But at least the remaining jobs went smoothly. Ish.
The plastic bonnet was a straight swap for the steel original (with the exception of one of the captive nuts that needed the thread re-cutting due to corrosion). The replacement front wing (obtained from a car that was going in for the chop as part of the last Government's daft Scrappage scheme) fitted easily too. Perhaps the most disappointing aspect of this wing was the fact that it was actually the correct colour! And then I could bolt the head lamps into place – and then, finally, the bumper. Crumbs, the Shed actually looked like a car again!
To ease the car's loading onto a trailer, ideally the suspension had to be pumped up so at least the front of the car would clear the ramps. Well, now I had a Hydragas pump and 5 litres of the correct fluid, this should be a doddle. Erm... well yes and no. I pumped a vacuum of 400psi and then re-charged the system to 400psi, but something wasn't right. The front came up, the rear didn't. I am a little uncertain as to what the problem is. Perhaps the rear Hydragas spheres didn't enjoy being deflated and the whole car's weight resting on them for the best part of a year: perhaps the nitrogen sphere membranes had ruptured? Or perhaps I'd failed to evacuate all the air from the system before re-charging with fluid? Hmm. Again, this is going to need further investigation after MGF15 – so in the mean time, the Shed was travelling to Gaydon with its rear slammed to the ground and the front appearing as though on stilts! So be it. All that remained was to be clear up and pack up much of the junk that was packed into the Shed's interior as a “temporary” store...
MGF15 – the big day!
I'd arranged to meet Tim Woolcott at 0700 at the in-laws to load Project Shed onto a hired trailer. I hobbled onto public transport, left foot really sore now – more so than the day before – flippin'eck! Ouch ouch ouch. So when I got out at Manor House tube and found the Shed already on the trailer with Tim busily tensioning the wheel lashings I was more than a little relieved! One remaining wheel lashed down, and we were good to go!
|
|
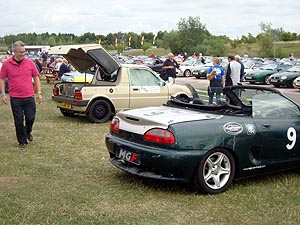
This was the start of the Shed's longest journey in 3 years; it's very nearly 3 years since we originally collected the body shell and this story started. Crumbs. And it was to prove a reassuringly an uneventful trip – waving at the MGFs passing us on the way to Gaydon in significant numbers seemed to indicate the success of the forthcoming show. Looks of incredulity were common place among MG pilots heading in our direction; how could such a shoddy looking MGF be going to an MG show? Well it was and eventually we arrived.
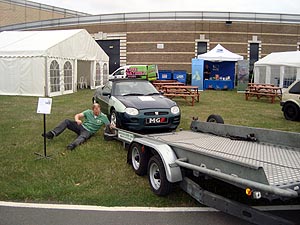
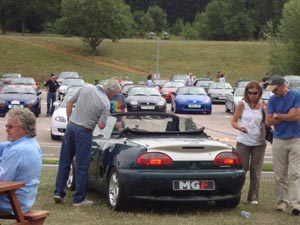
We discovered that the Shed had its own parking spot in the special display area on the left apron of the Gaydon Museum's front entrance, complete with an explanatory plaque. Nice touch chaps! So the Shed was unloaded from the trailer, and then it was down to the final detailing. Not cleaning or polishing. Oh no. White paint splashes left by the builders (which some thought was bird lime) just add to the character.
|
|
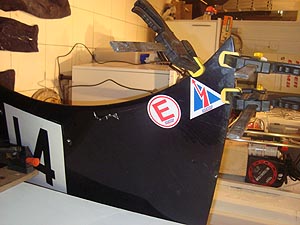
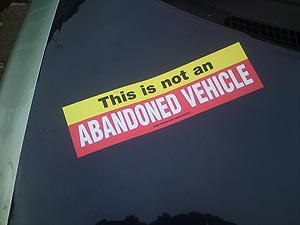
No, what I mean is some stickers. I nabbed some MGF
Register stickers from the Register stand, and then we applied some numbers, to
give it the sporty look. And a bumper sticker I'd found in a store on the
sea-front in Brighton, reading “This is not an ABANDONED VEHICLE” - which I
thought was perfect.
|
|
Tim and I then spent the day chatting to various people who were interested in the car, and shared their laughter of a show car that wasn't quite the usual faire for a car show. And I was even summoned to pose with the Shed for a photo-journalist working for a classic car mag! I wonder whether this was ever published? Let me know if you spot Project Shed in a glitzy magazine anywhere...
Then 2.30 came – Project Shed's big event. Project Shed, you see, was to be a feature car in the main arena! Wow. Walking with a hobble owing to painful left foot, I got the best seat in the house, steering the car as poor Tim and Steve Hill, erstwhile secretary of MGs on Track, pushed the car into position. This was a brilliant Mr Toad moment – brrrm brrrm, parp parp!
Jon Tully had been the show's narrator all day, so we had – and took – the opportunity to undertake a “Top Gear”-esque interview. We both had fun – I hope those listening enjoyed our little banter and perhaps gained some insight into this insane project.
|
|
And then we came to loading up the Shed for the journey home. What a day. And the Register were very kind to provide us with a nice bottle of wine (La Tour de Marrenon 2009) – thanks guys – much appreciated! One more decision to be made though – where to take the car back to? In-laws' spacious, flat and even front drive, or the very sloped and cramped one at my house? Well, we thought we'd give the in-laws some Shed respite, and brought it home to my house for the first time in 3 years. At least this way I have the option of undertaking some of the many small jobs still to be finished during the odd spare minute or two of an evening or weekend – but I probably need to take the car back to their flat drive for further suspension work... Yes, the rear suspension needs rebuilding with PU bushes, and moreover I need to sort Project Shed's sagging bum problem.
The end of the beginning?
So this brings to an end this chapter of the Shed's protracted build. Back on
four wheels. Engine and transmission in place. But loads of details to still
sort – and that'll be the subject of forthcoming build articles! I hope to make
more progress now – and I hope that the Shed will stop putting up a fight every
step of the way..!!! Well, here's hoping.