| Words and Pictures: Richard Eaton |
|
|
Illuminating the Cigar
Lighter
|
The following instructions were first published on Richard Eaton's MGF pages, www.mgfworld.co.uk
Although the MGF cigar lighter comes with an illumination ring around it (even the bulb is fitted!) for some reason, MG never saw fit to connect it up. This page gives simple instructions on how to wire up the cigar lighter so it illuminates when the ignition is switched on (MGF).
If you are a TF owner, then you may find that wiring up the lighter illumination ring in this way results in the cigar lighter being permanently lit: this is because of a difference in the wiring circuit (the cigar lighter being presumed to be a power point for mobile phone charging). The way around this is to instead of wiring the bulb to the cigar lighter live wire, instead run a wire spliced into the dashboard illumination circuit (red wire with a black tracer). This way, the cigar lighter lamp will only illuminate when the car's lights are switched on.
Many thanks to Julian (Bath) from the BBS for bringing this cigar lighter feature to everyone's attention.
 The standard cigar lighter before we've done anything. |
What
you need! The only tools and parts you need for the job are a small flatblade screwdriver, a crimping tool/pair of pliers, a small amount of plastic covered wire, and either a soldering iron and one plug on spade connector, or a snap lock connector and a plug on spade connector. |
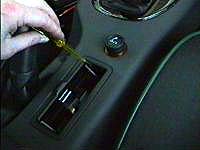
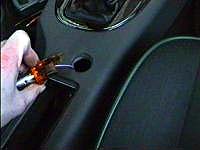
 Removing the ashtray insert. |
Step
1 - Remove the ashtray insert. Remove the insert from your ashtray, its difficult stuff this isn't it? I thought I'd start you off with something simple and gradually get harder as we go along. ;-) |
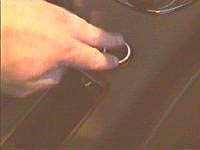
 Use the screwdriver to prise the clips towards you. |
Step
2 - Free the clips that hold the ashtray in. There are two small plastic clips that hold the ashtray holder in place (so you can't just pull it out). Use your small flatblade screwdriver to carefully prise these clips towards you (from the top of the clip). Do one at a time and pull the front (nearest the dashboard) edge of the ashtray holder up as the clips come out. |
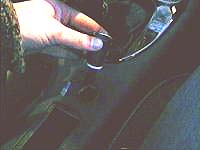
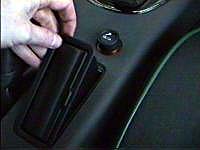 Remove the ashtray with the lid closed. |
Step
3 - Remove the ashtray holder. The ashtray should now pivot on the back edge. To remove it, slide the ashtray lid closed and pull up and forwards at the same time. This should come out easily so don't use excessive force. |
 Push the inner part of the cigar lighter out from behind. |
Step
4 - Removing the inner part of the cigar lighter. With the ashtray removed, you now have access to the back of the cigar lighter. Prise out the middle metal bit with your fingers, this requires an average amount of force. |
 The inner part of the cigar lighter should pull out like this. |
Step
5 - Still removing the inner part of the cigar
lighter. The inner part of the cigar lighter should now be free and will have a connector with two wires attached to it coming up through the hole If you've got this far, you're doing fine. |
 Then push out the outer part in the same way. |
Step
6 - Removing the outer part of the cigar lighter. You should now remove the outer part of the cigar lighter in the same way. I found this to be a bit tighter than the inner and it therefore required more force to remove it. You can now pull the 2 wire connector off the bottom of the cigar lighter. |
 Solder a wire to the centre connector. |
Step
7 - Adding our "light" wire. You can now go inside to warm up and make a cup of tea while your soldering iron heats up! Take a small piece of (plastic coated) wire about 7cm long and solder it onto the base of the central terminal. Crimp the right size (sorry, not sure what it is but you can try it on the orange ring terminal) female spade connector onto the other end. Note: If you haven't got a soldering iron then you can use a snap lock connector in the cars wiring. Just connect your light wire (with spade connector on the other side) to the purple/grey wire with the snap lock connector. |
 Replacing the outer part of the cigar lighter. |
Step
8 - Replacing the outer part of the cigar lighter. Right, back out to the car again! Replace the outer part of the cigar lighter in its hole. It will have to go in at an angle as the bulb holder sticks out from the side. Make sure that this "sticky out bit" faces towards the back of the car. This will make the next step easier. |
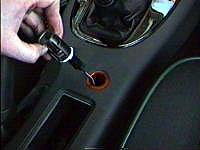
 Replacing the inner part of the cigar lighter. |
Step
9 - Replacing the inner part of the cigar lighter. First of all, reconnect the two wire block the the bottom of the cigar lighter. This now needs to be put inside the outer part of the cigar lighter. This will only go in when located in the slots and the two prongs need to go in the slots towards the back of the car (you should also see a terminal sticking out from here down the hole). Now comes the only tricky bit, connecting your spade terminal to the bulb terminal on the bulb holder. If you did as suggested and put this towards the back of the car, this shouldn't be "too" difficult. |
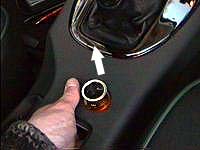
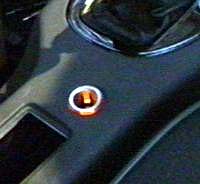 Bingo! An illuminated cigar lighter. |
Step
10 - Test that it works! Right, now for the moment of truth! If you've done everything right, then when the ignition is switched on, the light around the cigar lighter will illuminate. I know that it would be better if it only came on when your main lights were used but those wires are not as accessible and it wouldn't be as easy to do! Now just click your ashtray holder and ashtray back into the hole where they came from and enjoy your illuminated cigar lighter! |