|
Words and pictures: Tim Woolcott and Rob Bell |
|
This page contains: Introduction | What you'll need | How to |
|
|
Wiper Motor Replacement
|
Have you ever thought about how important windscreen wipers are? If you are anything like me, you don't give them a second thought - just flick on the switch and get that precipitation off your windscreen. But if you are like me, and your windscreen wipers have failed whilst it is raining, you know how important they are... it's blooming dangerous not being able to see out of the car!
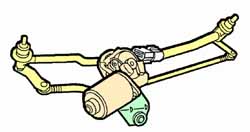 Above: schematic of wiper assembly. Yellow: linkages and spindles. Orange: wiper motor. Green: motor mounting bracket. |
In my case, the problem started one evening, driving into an unknown part of Warwick looking for the University. It was getting dark, and it had just started to rain: that slightly annoying kind of misty rain that soaks everything with a fine sprinkling of water. At first the wipers worked fine. Then they looked as though they were struggling - almost as though the windscreen were sticky. And then they stopped completely. Occasionally they'd magically return to life, only to go awol just a few minutes later. Fortunately, the rain was behaving in a similar manner, so I actually didn't need the wipers on the whole time - but the drive took on a frisson of unwanted danger, along the lines of will they won't they [the wipers] work and will it or won't it rain... I guess it was a form of aqueous Russian Roulette!
Naturally, I missed my turn off and got completely lost. I eventually got to my destination an hour later, frustrated and angry.
I already had an idea what the trouble was - I'd already checked the fuse and the wiring harness appeared sound on inspection under the canopy of a fuelling station. What was clear is that the wiper responded to a good thump - which was therapeutic for me, given the mood I was in at the time. The motor was at fault. And a known MGF 'fault' is flooding of the wiper motor.
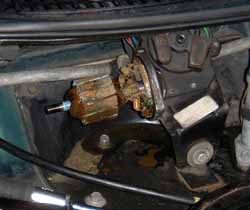 Sludge, horrible brown oily water everywhere, and a rather poorly electric motor: above the wiper motor with the casing removed... |
I got home later the next day, and took the casing off the motor housing, to be confronted with a not insignificant quantity of oily, rusty, foul looking water and a fair amount of brown sludge. Nice. Yes, the wiper motor housing was indeed flooded.
Luckily, it responded to a bit of clearing up, and it got working again. But I wasted no time in ordering a replacement (in my case, from the MGF Centre - their second hand parts tend to look and work as good as new - but second hand replacements often come up on flea bay if you don't fancy new replacement part prices from X-Part).
As it turned out, purchasing a replacement wiper motor was a good idea. A few weeks later, in similar weather conditions to the first failure, the wiper motor simply and abruptly stopped working on the way to work. There was no reprise of function this time however - this felt a good deal more 'electrical' rather than 'intermittent mechanical'. And so it proved to be on post-mortem on return to home...
On opening the wiper housing for the second time, it was clear that one of the internal wires had come adrift. Despite cleaning the motor internals thoroughly at the first attempt to clean up the murky water mess, one of the terminals had completely corroded through. I made a vain attempt to solder the connector back to a stub of metal, but to no avail. Replacement was called for. And this is the topic of this particular page (apologies for the long pre-amble!!!).
Tools
|
Time
|
Parts
|
The following instructions cover the removal of the wiper motor and its mechanism. Much of the following will also apply to replacing the wiper mechanism with Mike Satur's upgraded, ball-jointed version.
| 1. |
 The
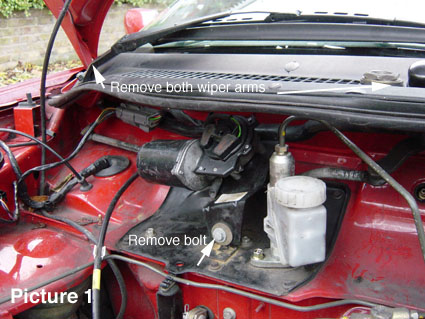
first step is to open the front bonnet and remove the front bulkhead shroud. The
first step is to open the front bonnet and remove the front bulkhead shroud.To do this, first remove the spare wheel and tool bag. This will give you better access to the cowl and its fixings. The white arrows show the location of two 10 mm nuts that need to be removed before removal - plus there are an additional 2 lugs under the cowl and not visible from this angle (yellow arrows). One further phillips head screw needs to be removed prior to lifting out the cowl: this is located above the brake master cylinder & servo (green arrow). The cowl can then be pulled up and away out of the car to reveal the wiper motor that is located in front of the passenger on the front bulkhead. |
| 2. |
 The
next step is to identify the key components. As can be seen in picture 1,
there is a single large 13mm bolt retaining the wiper motor in place. The
next step is to identify the key components. As can be seen in picture 1,
there is a single large 13mm bolt retaining the wiper motor in place.
Tim suggests removing this, and the wiper arms at this stage. I did the same when it came to replace my wiper motor, but I would suggest a slightly alternative approach... |
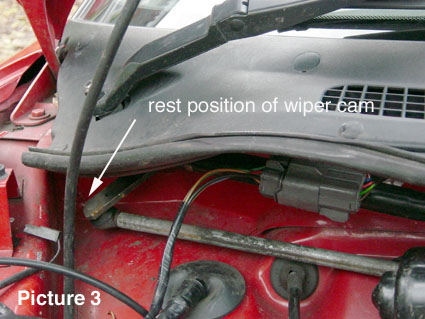 Note
the rest location of the wiper mechanism levers - with the armature located
to the extreme right (see picture 3, opposite). Note
the rest location of the wiper mechanism levers - with the armature located
to the extreme right (see picture 3, opposite).
Unfortunately, there is no way that the wiper motor can be removed with the mechanism in this position - and the workshop manual only provides a small clue as to what to do... |
|
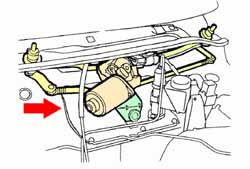 Which
is shown in the schematic opposite, right: the linkage armature needs to be
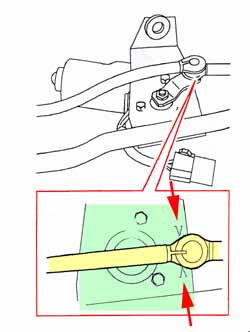
set in the opposite direction that found at rest (red arrow)... Which
is shown in the schematic opposite, right: the linkage armature needs to be
set in the opposite direction that found at rest (red arrow)... |
|
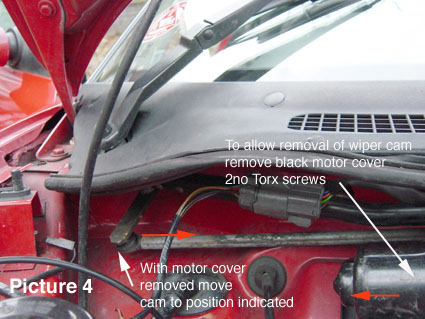 With
the wiper arms still attached, move the linkage through 1/2 sweep of the
wiper arms, so that the armature lever is pointing in the opposite
direction, as pictured here in picture 4. With
the wiper arms still attached, move the linkage through 1/2 sweep of the
wiper arms, so that the armature lever is pointing in the opposite
direction, as pictured here in picture 4.One way to achieve this is to remove the motor casing, and advance the wiper linkage operating cam manually. The other way, assuming that the motor still has some life in it, is to operate the wiper and turn the ignition off when the arms are at full sweep. Of course, if your motor is totalled like mine was, then the manual rotor rotation is your best hope. The motor casing is held in place by a pair of small torx head screws (T25 - although later versions used differing fixings - check your motor) - and once these are stowed safely, the housing can be simply pulled off to expose the inner workings. |
|
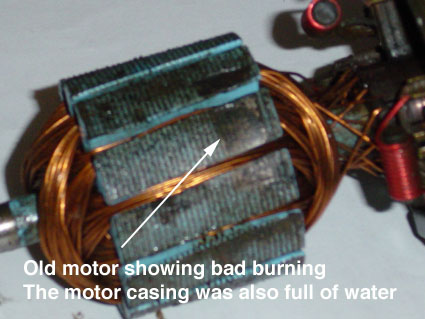 This
picture of Tim's wiper motor reveals the damage water can do - with some
damage to the windings and the rotor itself (the permanent magnets of the
motor are attached to the outer casing). This
picture of Tim's wiper motor reveals the damage water can do - with some
damage to the windings and the rotor itself (the permanent magnets of the
motor are attached to the outer casing).
[Actually, compared to the 12 year old motor from my car, his actually looks rather healthy, but I am not starting a competition here... ] The wipers can now be moved through their arc by rotating the motor winding clock-wise - keep turning until either the wipers are at their full sweep, or the armature lever is left-most, as indicated in picture 4 above. |
|
| 3. |
 Now,
with the wipers in the full-sweep position, you can start to remove the
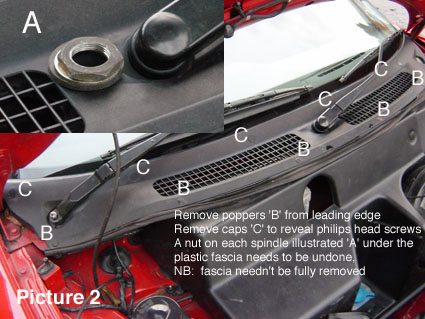
remaining parts of trim (apologies for this picture being out sequence). Now,
with the wipers in the full-sweep position, you can start to remove the
remaining parts of trim (apologies for this picture being out sequence).First remove poppers (B) retaining the sealing rubber strip from the leading edge of the windscreen cowl trim. Next remove the covers for the windscreen cowl screen screws (C). The are prised gently out from a small indent at their lower edge. Some will come out easily. Others will, I assure you, be complete bar-stewards. Fortunately, replacement covers are cheap to replace for when they become hopelessly mangled. Remove the 6 phillips head screws. Now you can remove the wiper motor spindles. These are retained by large 32mm nuts - and you'll need a deep socket to remove them. Halfrauds do them - but cheaper sources may be found on the internet if you have time to search for one. Once removed, retain the rubber washer in the correct orientation. |
| 4. |
 Now
release the electrical connector (this is of a simple squeeze and release
design). Now
release the electrical connector (this is of a simple squeeze and release
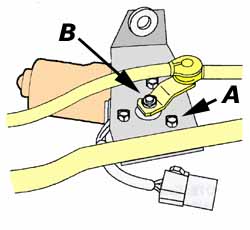
design).The wiper motor, complete with the linkage mechanism, can now be gently withdrawn from the under bonnet space to allow access to the motor retaining bolts (of which there are three, 10mm, indicated by arrow A opposite) located on the underside of the mounting bracket. In addition, you will need to undo the centre rotor/ cam nut to release the motor drive spindle from the lever mechanism (B, figure opposite) Once released, you can discard the old motor. In my case, I had to remove the connector from the original motor because the replacement I had sourced came from a later car irritatingly came with a different type of connector to the main loom. Fortunately, the motor wiring itself was the same, so this was no chore - just a bit of time connecting up the same coloured wires to one another with some solder and protected from the elements with shrink wrap. |
| 5. | Now we're coming
to the reassembly side - and things are not quite 'reversal of disassembly'
of lore. The first important step is to connect your new, replacement motor
to your car's loom. With the ignition on, the motor will return to its
natural 'park' position, assuming that you haven't left the wiper stalk in
an operation position! Failure to complete this step (as I did first
time!!!) will result in your wipers failing to park in the correct place
(probably part way up the windscreen, and probably wiping the cowl trim
rather than the windscreen!
The next step on attaching the new motor to the mounting bracket is to ensure that the wiper cam is in the correct position. Attach the wiper armature to the motor spindle, ensuring that the linkage is positioned between the two arrow markers on the under side of the mounting bracket (as pictured opposite, and highlighted by the two red arrows). Again, failure to complete this step successfully will result in your wipers not parking in the correct place, and not having the correct sweep. This all sounds a bit complicated, but it isn't - it is worth getting it all right at this stage and avoiding having to remove the wiper linkage from the car once you've thought you'd completed the job (I say this with the voice of experience!) Tighten bolt to 12Nm. |
| 6. |
To
get the linkage back into the car successfully, we need to reposition the
linkage in the far left position once again (as arrowed), or else the
assembly simply will not fit into the available space. Again, this can be achieved in one of two ways: either connect the motor to the car's wiring loom and run the motor until it is half way through its sweep cycle, or remove the motor's outer casing and rotate the inner winding to achieve the same effect. |
 If
doing the latter, you find that the magnets in the motor housing can make
threading the motor casing back on over the winding spindle a little hard,
but persevere, it will go back on with a bit of fiddling. Also ensure that
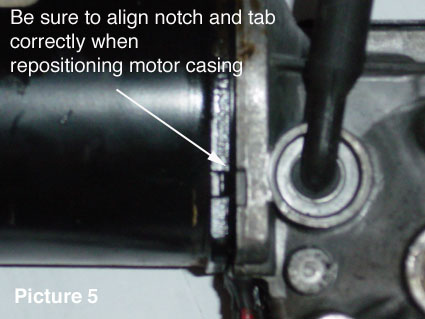
the notch and tab are correctly aligned, as shown opposite in picture 5,
before replacing the two T25 Torx fastenings. If
doing the latter, you find that the magnets in the motor housing can make
threading the motor casing back on over the winding spindle a little hard,
but persevere, it will go back on with a bit of fiddling. Also ensure that
the notch and tab are correctly aligned, as shown opposite in picture 5,
before replacing the two T25 Torx fastenings.Incidentally, many espouse the virtues of drilling a small drain hole on the underside of the motor casing. If you've removed the motor's outer casing to rotate the winding spindle to adjust the position of the wiper armature, this may be an ideal time to undertake this modification. |
|
| 7. | Once the wiper
mechanism is slotted back in place, pop the spindles back up through the
scuttle panel - and retain these with their 32mm nuts (ensuring that you've
put back the washer and rubber grommets in their correct orientation), and
retain the motor bracket on its 13mm bolt (tighten to 18Nm). The bulkhead trim panel, the windscreen cowl panel and finally the windscreen wiper arms can now all be replaced. Finally, the best way to ensure that your motor does not become flooded once again is to ensure that rain does not find a route to the motor. The bulk head trim's main function is actually to ensure that the wiper is protected from the elements, so make sure that it slides completely under the windscreen cowl's grille on the driver's side - this grille is directly above the motor, and is probably the main source of contaminating water. Now sit back and enjoy the reassuring sweep of fully functioning, reliable wipers!!! |
 Now
attach the motor to its mounting bracket. The three mounting screws are set
to 12Nm torque.
Now
attach the motor to its mounting bracket. The three mounting screws are set
to 12Nm torque.