MGF steering rack to TF upgrade
| Words and Pictures: Rob Bell |
|
|
Steerage class MGF steering rack to TF upgrade
|
If you've owned and cherished your MG for a long time, you come to appreciate its strengths and weakness. In my case, on my MGF, the single greatest bug-bare from the day of purchase is its steering. I've driven plenty of other marques of sports car both before and since, and none offer the same wonderful package of charms and practical virtues that my F possesses. But many do have a more tactile helm. Often, these cars have a faster, wrist-flick steering - a Caterham 7 in particular making the MGF's steering seem slow and pondersome. Okay, so maybe comparing a car as focused as a Caterham to the MG is unfair, but I'd love to have a fraction of the Caterham's steering intimacy in my car.
During the recent MG World handling comparison tests, we discovered that the new TF had that extra fraction - clearly Rob Oldaker's boys in the MG chassis development department were aware of the need to sharpen the MGF's steering's act. So it was time to delve deeper. Do you want to know what the chief difference between the MGF and TF steering systems? The steering rack. Both the F and TF use a responsive rack-and-pinion design, but the TF uses a faster ratio that drops the number of turns from lock to lock from 3.2 of the electrical power-assisted steering (EPAS) equipped MGF to 2.8. Could this system be retrofitted to an early 1995 MGF? I, with the willing assistance of the lads at Tech-speed motorsport, decided to find out.
As it transpired, the new TF steering rack is a straightforward and direct swap for the old item - see the fitting sequence opposite. Did it make a big difference? I confess to initially feeling slightly disappointed. I suspect that I had irrationally hoped that the steering would be transformed into a system that was "wrist-flick lightening-quick". As it turned out, the advantages of the new rack were rather more subtle, and ultimately perhaps, more rewarding than that. Yes, the rack is just noticeably quicker. Better though, was the improved feel through the steering wheel - more messages were being telegraphed from the tarmac to my hands. Not quite the almost neurological connection that some specialist sports cars possess - but at least it was verbal communication as opposed to "a letter sent in the mail last Tuesday" that was the system of old. Could this improved feel be because I'd just replaced a 60+ thousand mile-old steering rack with one that was factory fresh? I'd say not - I've driven plenty of factory-fresh MGFs, and none had the characteristics associated with this new rack. And the good news continued. On the way home on the M40, the motorway proved to be a completely unexpected revelation. Whereas the MGF always seemed to require a strong hand (or rather, hands!) to maintain direction on the motorway at speed, with the TF 'rack, the car now steered arrow straight - even at autobahn-busting 3-digit speeds. In fact, one could now maintain direction with just one hand on the steering wheel at these velocities, should you be so suicidally inclined.
Worth fitting a TF steering rack to your MGF? I'd say so, yes. Indeed, the chaps at Tech-speed were so impressed themselves, after being politely sceptical over the advantages of a TF rack over the standard MGF item, they now offer the TF steering rack upgrade along with their other MGF chassis packages and options. And if you fancy taking this job on as a 'do-it-yourself' option, remember that TFs are now finding their way into the hands of specialist auto breakers - including those listed here.
DIY steering rack installation Guide
Installing a new steering rack is pretty straightforward for the dedicated amateur mechanic. The photo-sequence that follows is not intended to be a comprehensive guide to the installation process, but gives a strong indication as to how to proceed with the job. Many thanks to Tech-speed for their kind assistance with this feature, and especially to Greg who performed all the hard work!
Tools Required
Comprehensive socket set and torque wrench
Taper/ ball joint splitting tool
Time Required
Greg professionally undertook this job in under an hour - for us mere mortals, budget a day's work!
Parts Required
One TF steering rack - part number QAB000240 (RHD). This part is also available as a reconditioned item for about 50% of the new price from X-Part (assuming that you can locate one). It has the same part number, but with a 'R' suffix.
 |
 |
 |
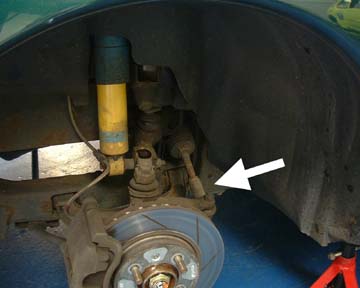
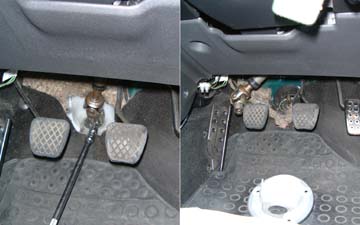
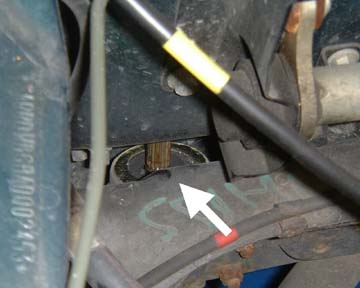
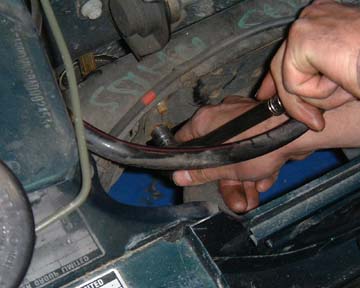
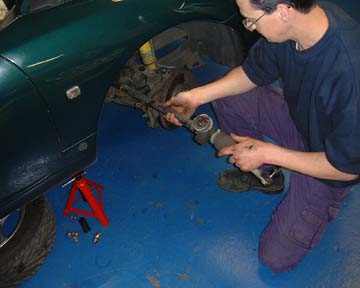
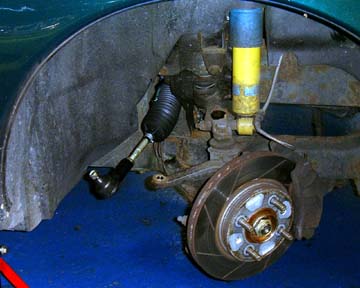
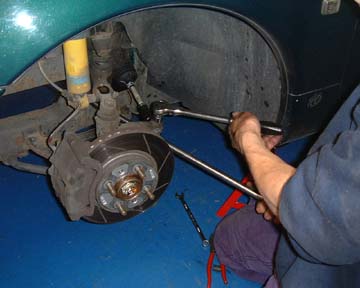
| Photo 1: Remove the road wheels. The steering rack (arrowed) can be readily identified as the suspension link behind the sub-axle: rubber gaiter and track road end bolted to the hub steering arm can be clearly seen. | Photo 2: Uncouple the universal joint at the base of the steering column that connects this intermediate shaft to the rack and pinion gear of the steering rack. Then remove the three nuts retaining the white pinion cover (shown removed on the left of the image). | Photo 3: Split the taper joints at the track road ends by first removing the retaining nut as shown, and then splitting the taper joint (Rover recommended tool: 18G1584). In the photo can be seen the track rod removed from the steering arm (arrowed). |
 |
 |
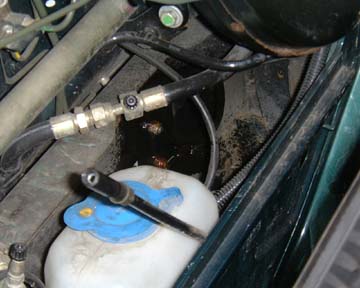 |
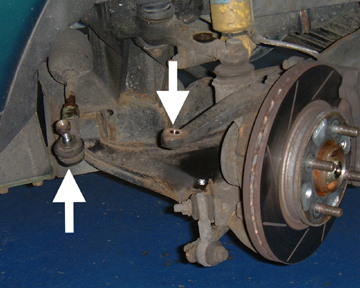
| Photo 4: Splined drive to steering rack shown - difficult to see with the subframe in situ in car! | Photos 5&6: Next job is to remove the steering rack retaining bolts. The steering rack is bolted to the front subframe using one U-bolt (shown being removed in photo 6) and one steering rack clamp (sprayed with penetrating oil in photo 7). Chances are that these bolts have not been disturbed since they were installed at the factory, so some penetrating oil is certainly a good idea! | |
 |
 |
 |
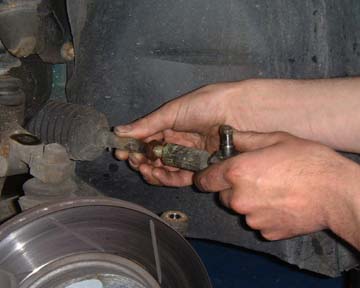
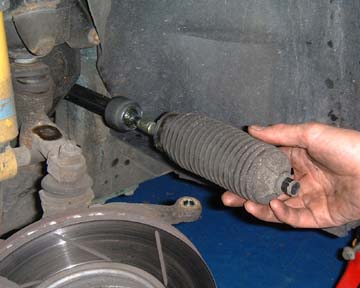
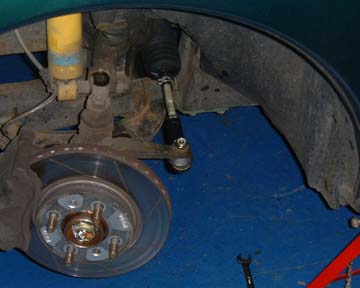
| Photo 7: On the left hand side of the car (off-side/ passenger side on a right hand drive car), make a note of the number of threads that the track rod end is screwed onto the rack. Remove the track rod end by unscrewing, as shown. | Photo 8: Now remove the gaiter... | Photo 9: ... and then from the driver's side of the car (right hand side on a right hand drive car), carefully withdraw the old steering rack from the subframe. |
 |
 |
 |
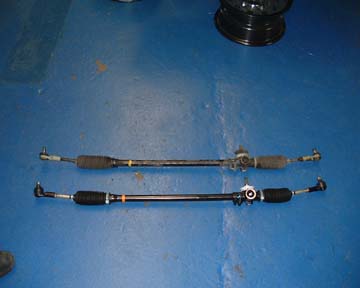
| Photo 10: This picture shows the new TF steering rack below the original MGF steering rack above. As is evident, the two are outwardly identical. | Photo 11: Now remove the left-hand side track rod end and gaiter from the new steering rack. From the driver's side of the car, carefully slide the new steering rack into place. | Photo 12: Now reattach the gaiter and track rod end to the steering rack. Knowing the number of flats that the old track rod end was screwed onto the original steering rack is useful as a guide as to how far to screw the new track rod end onto the replacement steering rack. The result is the new rack should be very nearly centralised and the tracking not too far out. |
 |
 |
|
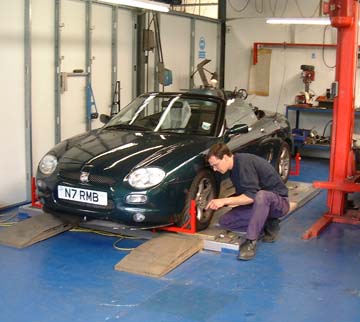
| Photo 13: Reattach the track rod ends to the steering arms on the hubs (bolt torque 22 Nm). Reposition the steering rack inside the subframe, and fit the U-bolt - but do not tighten the nuts just yet. Now re-attach the steering rack clamp. Fit the clamp nuts, and tighten to 22Nm. Now the U-bolt nuts can be torqued up (22 Nm), ensuring that the thread protrusion behind each nut is approximately equal. | Photo 14: Reattach the pinion cover and nuts, the steering column to the steering rack, and replace the road wheels. Now the car needs to have the steering rack checked for centralisation and the tracking re-set on the front wheels (car shown here being re-tracked by Greg on Tech-speeds own tracking rig). | |