(Or, how to change your steering wheel, airbag, rotary coupling and the indicator & wiper stalks!)
|
Words and Pictures: Rob Bell |
|
|
Steersmanship (Or, how to change your steering wheel, airbag, rotary coupling and the indicator & wiper stalks!)
|
|
Box 1 – How does the rotary coupler work? |
|
This page contains: |
Introduction | airbag | steering wheel | rotary coupler | indicator stalks | intermittent wiper circuit diagram |
Introduction: why change?
There’s nothing new under the sun; people having been changing their steering wheels for some time, and as the 10 year airbag inspection/replacement time comes up on earlier MGFs, many MGF owners are faced with the need to consider changing this essential safety feature too. Not necessarily a bad thing cosmetically either, as this offers the opportunity for owners of earlier MGFs to upgrade their airbag to one finished with the full-colour MG Octagon logo fitted to later models.
 Another reason for wanting to remove the steering wheel is
to replace the rotary coupling – one potential cause of a permanently
illuminated SRS warning light (see more about the rotary coupler in Box 1).
Another reason for wanting to remove the steering wheel is
to replace the rotary coupling – one potential cause of a permanently
illuminated SRS warning light (see more about the rotary coupler in Box 1).
 And then there is the opportunity to change the steering
wheel control stalks. Why would you want to do that? I agree, the standard items
work efficiently enough, but they can look and feel a bit cheap.
And then there is the opportunity to change the steering
wheel control stalks. Why would you want to do that? I agree, the standard items
work efficiently enough, but they can look and feel a bit cheap.
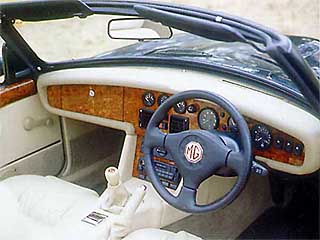
Interestingly the steering wheel stalks fitted to 1990's Rover 600, 800, the MG RV8 (pictured left), Land Rover Discovery and Freelander are a straight swap – and intriguingly offer the potential for variable dwell period intermittent wiping… This ‘dark-side’ modification was first pioneered on the MG Rover.org forum by Clive back in 2006 – as I say, nothing new under the sun.
It’s a great modification too – the RV8 indicator stalks look classy and function in a more satisfying way. And that variable intermittent period? I am not going to cover this just yet – other than to say that it is possible to institute the wiper control module from the MG RV8 (the same as the earlier Rover Metros), but this is a project for another day.
The following instructions are therefore of interest to
anyone who may be looking to change their airbag module, their steering wheel,
the rotary coupler or their steering column stalk controls. Or, like me, wanting
to change all the above except the rotary coupler!
| Tools required: | Time required: | Parts required: | ||
|
|
|
How to replace the steering wheel/
rotary coupler/ indicator stalks
| Removal/ replacement of the airbag: | |
|
1 |
Make note of any stereo security codes.
|
|
2 |
 Centre up your steering, and lock the ignition/steering lock to prevent movement
of the steering column. Centre up your steering, and lock the ignition/steering lock to prevent movement
of the steering column. |
| 3 |
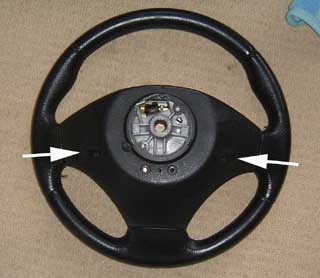 We need to remove the airbag. To do this, there are two T30 torx srews to be
undone – they’re located on the rear face of the steering wheel boss – as shown
on the steering wheel (that I prepared earlier – how Blue Peter is that?) to the
right (arrowed)... We need to remove the airbag. To do this, there are two T30 torx srews to be
undone – they’re located on the rear face of the steering wheel boss – as shown
on the steering wheel (that I prepared earlier – how Blue Peter is that?) to the
right (arrowed)... |
 And here’s an up-close shot of the T30 torx screw, nestling up inside the
steering wheel… And here’s an up-close shot of the T30 torx screw, nestling up inside the
steering wheel… |
|
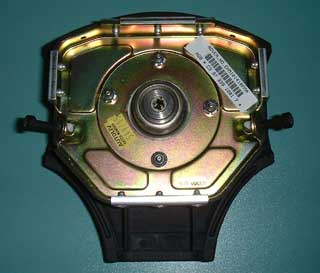 The airbag module can now be removed – gently withdraw the airbag module from
the steering wheel boss – and now remove the yellow SRS wiring harness plug from
its centre (making a note of how it is orientated). Once removed, the airbag
module will look like this from behind… The airbag module can now be removed – gently withdraw the airbag module from
the steering wheel boss – and now remove the yellow SRS wiring harness plug from
its centre (making a note of how it is orientated). Once removed, the airbag
module will look like this from behind… |
|
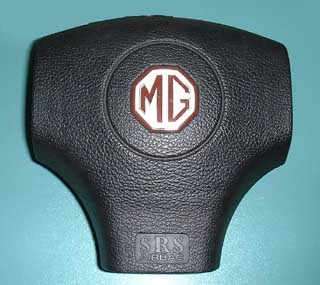 And if all you are doing is removing the airbag, then you can now replace with
your smart new replacement, like the one pictured right: And if all you are doing is removing the airbag, then you can now replace with
your smart new replacement, like the one pictured right:In true Haynes style, replacement is reversal of removal! |
|
| Removal/ replacement of the steering wheel: | |
| 4 |
 Now we can remove the steering wheel itself – it is held in place by a 19mm
Nyloc nut. Undo and disconnect the horn wiring from the rotary coupler and pull
the steering wheel off the splined steering column shaft, revealing the steering
column as shown below: Now we can remove the steering wheel itself – it is held in place by a 19mm
Nyloc nut. Undo and disconnect the horn wiring from the rotary coupler and pull
the steering wheel off the splined steering column shaft, revealing the steering
column as shown below:If you are simply looking to replace your steering wheel with a leather version, or a later TF wheel, then now put back the new steering wheel – and yes, reassembly is reversal of the disassembly instructions! |
| Removal/ replacement of the rotary coupler: | |
| 5 |
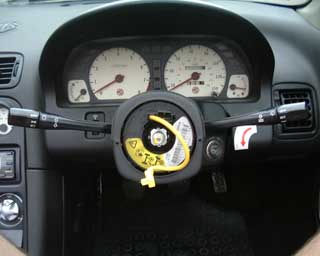
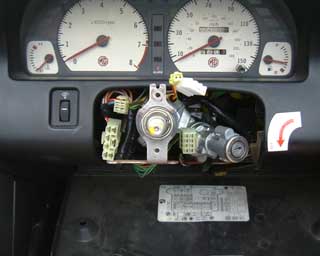
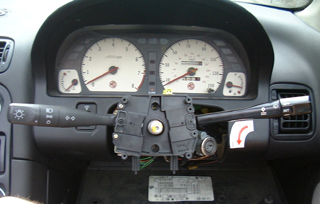
 Now move to remove the steering column cowl – you’ll find that it is retained by
three Phillips screws all in the lower half of the cowl and one of which is
hidden away inside the fuse box. The two halves then pull away (above and
below). Now move to remove the steering column cowl – you’ll find that it is retained by
three Phillips screws all in the lower half of the cowl and one of which is
hidden away inside the fuse box. The two halves then pull away (above and
below).This will reveal the fixtures for the rotary coupling – as shown below. Now is a good time to use some masking tape to fix the two halves of the coupling into position (the reason for this is shown in box 1). This is shown right: |
| 6 |
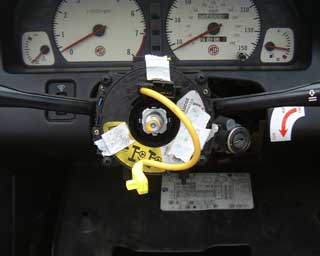
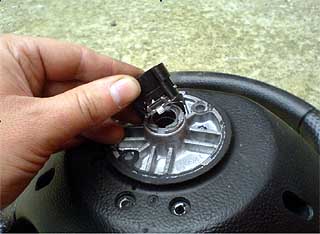
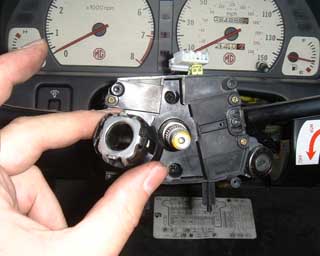 Now we can move to remove the rotary coupler. This is held in place by four
Phillips head screws at each corner (they’re black). Disconnect the rotary
coupler from the main harness and withdraw the coupler. This will reveal the
fixtures for the steering column stalks – and also frees the steering cam… Now we can move to remove the rotary coupler. This is held in place by four
Phillips head screws at each corner (they’re black). Disconnect the rotary
coupler from the main harness and withdraw the coupler. This will reveal the
fixtures for the steering column stalks – and also frees the steering cam…The steering cam is essential for the self-cancelling indicator switches – remove and carefully store (note the way that the cam fits into the back of the steering wheel – when re-assembling, ensure that the cam is correctly orientated): Of course, if all you are doing is replacing the rotary coupler, then replace with the appropriately centred unit on the column – and once again, assembly is reversal of disassembly. |
|
How to change the indicator stalks |
|
| 7 |
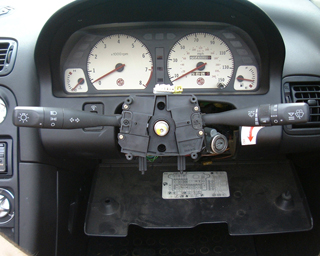
 Now undo the two retaining Phillips screws holding the column switch assembly to
the steering column (they’re positioned vertically above and below the steering
column shaft), disconnect the multi-plugs from both stalks and remove the
switches to reveal the naked column as shown right: Now undo the two retaining Phillips screws holding the column switch assembly to
the steering column (they’re positioned vertically above and below the steering
column shaft), disconnect the multi-plugs from both stalks and remove the
switches to reveal the naked column as shown right: |
| 8 |
 Now we can move the remove the stalks from the main assembly – they’re retained
in position by two Phillips screws for each side – plus a barbed plastic
retainer that is positioned between the two screws just inboard. Now we can move the remove the stalks from the main assembly – they’re retained
in position by two Phillips screws for each side – plus a barbed plastic
retainer that is positioned between the two screws just inboard.First remove the screws: |
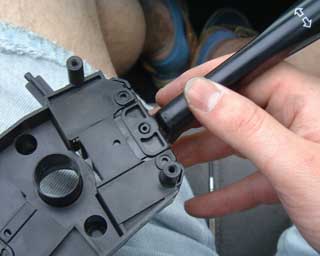 Then gently lift the plastic casing over the top of the plastic retainer
(circular hole, on main body of housing) and withdraw the stalk switch… Then gently lift the plastic casing over the top of the plastic retainer
(circular hole, on main body of housing) and withdraw the stalk switch… |
|
| 9 |
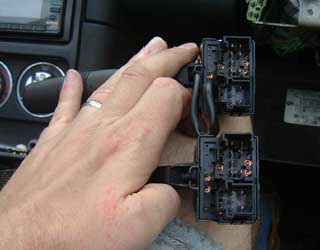 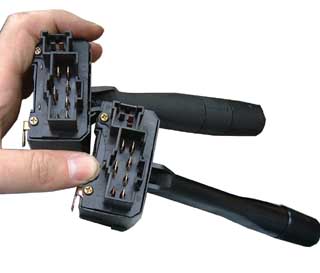 Comparing the R800 stalks with the MGF items (above and below respectively), we
can see that the connectors are absolutely identical. Comparing the R800 stalks with the MGF items (above and below respectively), we
can see that the connectors are absolutely identical.
|
 Moreover, the replacement stalk just pushes straight into the existing column
switch assembly – as if it were meant to have been that way in the first place!
In the image to the right, compare the R800 indicator stalk with the MGF wiper stalk… Moreover, the replacement stalk just pushes straight into the existing column
switch assembly – as if it were meant to have been that way in the first place!
In the image to the right, compare the R800 indicator stalk with the MGF wiper stalk…
The R800 stalks are slightly shorter, and come out at a slightly different (more
horizontal) angle. In use, you’ll just notice this (especially now that I’ve
mentioned it!), but it isn’t a problem in practice… |
|
| 10 |
 Final straight now – plug the loom connectors into the new stalks, and re-attach
the column stalk assembly to the steering column. Final straight now – plug the loom connectors into the new stalks, and re-attach
the column stalk assembly to the steering column. |
 Ensure that the steering cam is correctly orientated (as shown below), re-attach
the rotary coupler and put back the steering wheel and airbag assembly,
reconnecting connectors as necessary as you go. Ensure that the steering cam is correctly orientated (as shown below), re-attach
the rotary coupler and put back the steering wheel and airbag assembly,
reconnecting connectors as necessary as you go.Re-attach the battery and check that all functions as it should. It is pretty remarkable that these column stalks from another car in the Rover range should fit – and do so so easily. It really does beg the question – why weren’t they fitted as standard? Surely having a variable intermittent wash wipe function is something that roadster drivers would like to have on their cars too? Certainly MG RV8 owners had it. I guess it was all a question of expense. A shame, but it does give us an opportunity for a nice modification! |
|
Verdict
As mentioned, I replaced the airbag, the steering wheel and the steering column
stalks all at the same time, and the end result affected quite a difference to
the look and feel of these major controls. Much more luxurious, if such things
can impart such a feeling! A leather wheel is more tactile to touch, the
coloured airbag brightened up the interior nicely and the steering column
switches look and feel much nicer. Perhaps the only downside is the positioning
of the stalks – they’re now somewhat hidden behind the spokes of the steering
wheel and they’re a little more of a finger reach to operate, but this hardly
causes a problem in practice. Worth doing? Airbag is worth doing if it’s up for
replacement anyway. The steering wheel is definitely worth doing – I don’t know
why I left it so long to do it! As for the steering column controls? If, like
me, you want variable intermittent wipers, then yes. But this is another project
that is going to take a bit more work to figure out (as long-term followers of
the MG Rover forums will already know…)
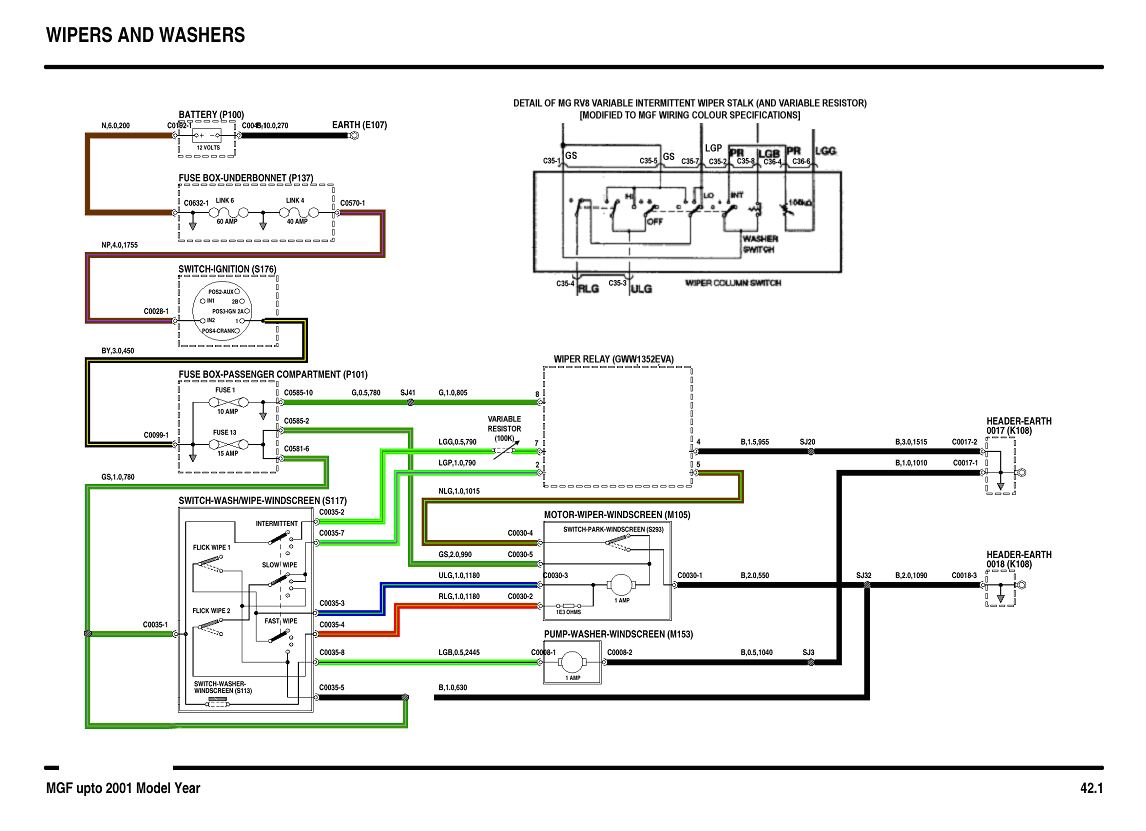
Intermittent wiper wiring circuit on MG RV8:
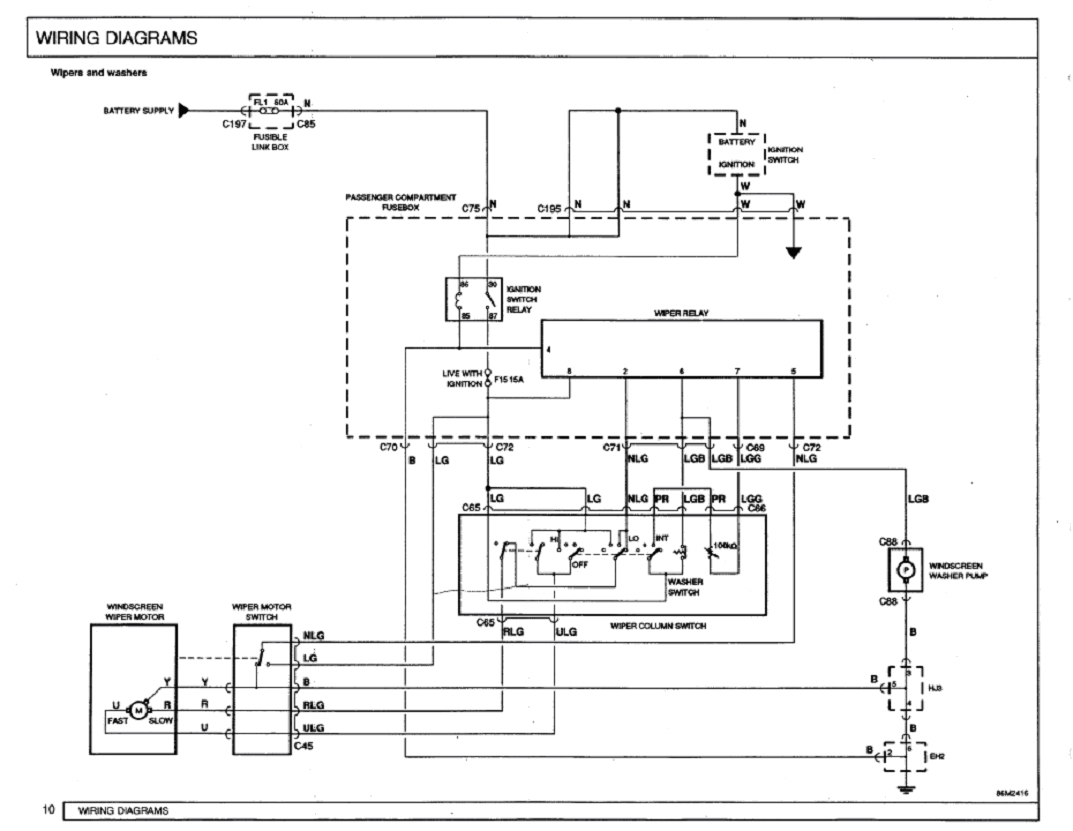
Adapted MGF wiring diagram to incorporate MG RV8 Pektron
intermittent wiper relay: