|
Words and pictures: Rob Bell |
|
|
Front Brake Pad replacement
|
 Brakes are not
an area that should be left neglected: this seems so incredibly self evident
doesn't it? And yet, it is so easy not to never notice brake pad wear until that
tell-tale squeal of metal upon metal sound of expired pad on brake rotor. When
the pads have reached this stage, you've really missed the boat!
Brakes are not
an area that should be left neglected: this seems so incredibly self evident
doesn't it? And yet, it is so easy not to never notice brake pad wear until that
tell-tale squeal of metal upon metal sound of expired pad on brake rotor. When
the pads have reached this stage, you've really missed the boat!
As in so many cases, prevention is better than the cure (often replacement brake discs!) - so do get in the habit of regularly checking the pad thickness (albeit tricky unless the road wheel has been removed).
So, assuming that your pads need replacing, how do you go about it?
Tools required:
Axle stand
Socket set
Torque wrench
Wire brush
Other materials:
Copper grease
Brake cleaning spray
Time required:
Approximately 30 minute per side for first attempt.
Instructions:
| 1. | Loosen road wheel nuts. |
| 2. |
Jack up the front of the car, having choked the wear wheels. Make safe by securing car onto an axle stand. Remove road wheel. |
| 3. |
|
| 4. |
|
| 5. |
|
| 6. |
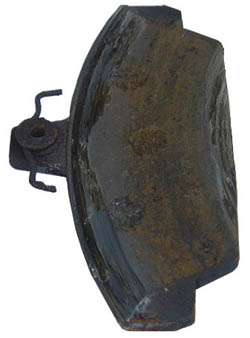
 Now
the old brake pads can be removed from the caliper
- they should fall out pretty easily. Now
the old brake pads can be removed from the caliper
- they should fall out pretty easily. |
| 7. |
|
| 8. |
Slide in the new brake pads, and reassemble the calliper. The new pads should move freely in the calliper - if not, then clean the calliper further if necessary and remove any excess paint from the brake pad backing plate. The torque setting for the sliding through bolt is 45 Nm. Before replacing the road wheel, sparingly apply some copper grease to the hub mating surfaces to prevent the alloy wheel binding to the steel hub. Replace the road wheel, and lower the car back to the ground. Torque wheel nuts to approx. 65 lb.ft |
| 9. | Once both set of pads have been replaced, reset the piston by repeated application of the brake pedal until the pedal resistance starts to feel firm once again. |
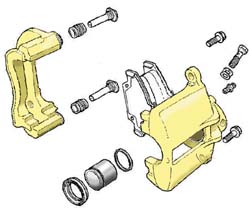 Front
(and rear) caliper is a of a sliding through-bolt design, the components
for which are shown in the figure opposite. The caliper has just one
piston, which bares against one pad, whilst the reaction pulls the pad on
the opposite side of the rotor onto the brake disc. The two halves of the
calliper are bolted together with two through-bolts at a torque of 45Nm.
These are the bolts that we'll have to tackle in order to replace those
worn pads.
Front
(and rear) caliper is a of a sliding through-bolt design, the components
for which are shown in the figure opposite. The caliper has just one
piston, which bares against one pad, whilst the reaction pulls the pad on
the opposite side of the rotor onto the brake disc. The two halves of the
calliper are bolted together with two through-bolts at a torque of 45Nm.
These are the bolts that we'll have to tackle in order to replace those
worn pads. 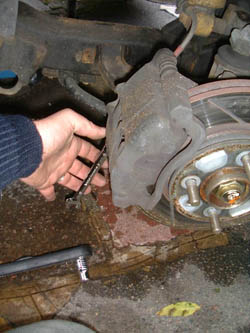 The next step is
to undo and remove the lower of the two sliding retaining bolts. I've used
a ratchet spanner here, that is helpful in ensuring that you undo the bolt
rather than tightening it up (harder to orientate yourself than you might
think as you are working backwards as it were)!!!
The next step is
to undo and remove the lower of the two sliding retaining bolts. I've used
a ratchet spanner here, that is helpful in ensuring that you undo the bolt
rather than tightening it up (harder to orientate yourself than you might
think as you are working backwards as it were)!!!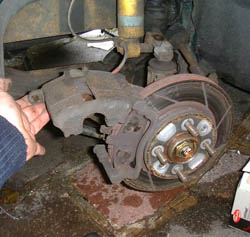 Once
the lower slide bolt has been removed, the whole caliper can be swung
upward and out of the way.
Once
the lower slide bolt has been removed, the whole caliper can be swung
upward and out of the way.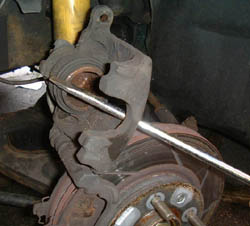 Before
the pads can be replaced, the
piston has to be pushed back into the caliper to make space for the new pads
which are inevitably are going to be a good deal thicker than the old ones
you've just removed.
Use an old stout screw driver and lever the two halves of the calliper apart. You may want
to turn the steering wheel to the calliper is pointing out towards you to get better
Before
the pads can be replaced, the
piston has to be pushed back into the caliper to make space for the new pads
which are inevitably are going to be a good deal thicker than the old ones
you've just removed.
Use an old stout screw driver and lever the two halves of the calliper apart. You may want
to turn the steering wheel to the calliper is pointing out towards you to get better Clean
up the calliper with a scraping tool (an old screw driver!), wire brush
and some brake cleaning spray (available at Halfords).
Clean
up the calliper with a scraping tool (an old screw driver!), wire brush
and some brake cleaning spray (available at Halfords).