|
Words and pictures: Rob Bell |
How to… cure a sloppy gear change
|
| This page contains: | Introduction | Quick Shift options | What you'll need | How to do it |
|
Quick/ Slick shift options: There are a number of alternative aftermarket kits to improve the gear change quality and speed of your car's gear change. These range from a rebuilt standard gear lever mechanism - which is the quick-shift system available from Tech-speed motorsport, through to remanufactured kits, such as the Slick Shift available from Mike Satur. |
 Moss Europe:
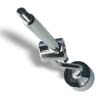
The Moss kit comprises of a new gear selector lever, attractively chromed,
that replaces the original longer item. The kit helps shorten the throw of
the lever, but on the example I tried, the mechanism was very loose - and
probably needed tightening up using the instructions mentioned below! Moss Europe:
The Moss kit comprises of a new gear selector lever, attractively chromed,
that replaces the original longer item. The kit helps shorten the throw of
the lever, but on the example I tried, the mechanism was very loose - and
probably needed tightening up using the instructions mentioned below! |
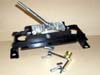 Mike Satur:
Mike Satur's kit is the most comprehensively re-engineered kit available on
the market - replacing the whole lever assembly with milled alloy
components. It provides a pleasing rifle-bolt like action, but on some examples I've
tried, can be somewhat notchy. Mike Satur:
Mike Satur's kit is the most comprehensively re-engineered kit available on
the market - replacing the whole lever assembly with milled alloy
components. It provides a pleasing rifle-bolt like action, but on some examples I've
tried, can be somewhat notchy. |
 Brown and Gammons: I am not completely sure on the detail of the B&G
kit, but appears to be very similar to Mike Satur's - and knowing that the
two companies often collaborate with their product lines, I wouldn't be surprised to
find that they are in fact the same. Which means the same high quality gear shift
- but do check on details if considering purchase. Brown and Gammons: I am not completely sure on the detail of the B&G
kit, but appears to be very similar to Mike Satur's - and knowing that the
two companies often collaborate with their product lines, I wouldn't be surprised to
find that they are in fact the same. Which means the same high quality gear shift
- but do check on details if considering purchase. |
On my Project MGF, Project Shed, this was certainly the case. The gear selector had been salvaged from a car with over 100,000 miles showing on the clock – so some wear is probably to be expected. But the gear-change quality was simply unacceptable, and would undoubtably lead to missed gear selections when used in anger on track. Plus the lever was awfully long – which seems to exacerbate free movement. The question is, can this be rectified on a DIY basis?
There are three “quick shift” solutions available – typified by the kits sold
by Moss Europe, Tech-speed motorsport and Mike Satur. But each of these options,
although certainly worthy, are not all that cheap – but the kits from Moss, B&G and
Mike Satur are available for DIY fitment (see side bar).
I'll not go into much more detail on this here, but there are articles on the
web where people have fitted these and posted their own opinions.
Instead I was inspired by an article posted on the T-Bar forum:
http://www.the-t-bar.com/en/forum/54-how-tos/24204-curing-a-sloppy-gear-change--shorty-gear-lever
This very neat write up showed how to tighten up the yokes of the gear lever
selector gimbal to eliminate play and improve the preciseness of the gear
change. The clever thing is the demonstration on how to do this without removing
the interior trim, and is certainly worth a read.
However, on Project Shed, tightening these bolts had no impact whatsoever on the
gear shift quality. The good news was that the Shed does not have any interior
trim, so I decided to strip the gear lever/selector assembly down and see what
could be done. As it turns out, replacing one washer had a tremendous impact and
restored the shift quality to as-new. Here’s how I did it.
What you'll need:
|
Tools required: To remove the interior trim:
To disassemble lever assembly:
|
Materials required:
|
Time required:
|
How to strip down and refurbish standard gear lever assembly
| 1. | There are two options here -
either remove most of the interior trim (which is what I have done for
Project Shed), or just remove the centre console/ dash - as this should
reveal enough of gear lever mechanism for you to work on (although I am not
100% sure, as I have not tried doing it this way). If removing seats, you’ll need to disconnect the SRS airbag system – so for safety, disconnect the battery 30 minutes before starting work. Make sure you have all necessary codes to reactivate your stereo before hand though. |
| 2. |
 If removing the centre console only, follow
instructions
here on how to do this, and jump to (5).
If removing the centre console only, follow
instructions
here on how to do this, and jump to (5). |
| 3. | Remove seats and then remove T-bar |
| 4. | Remove centre console/dash and then remove central tunnel trim |
| 5. |
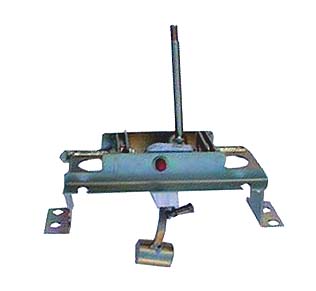
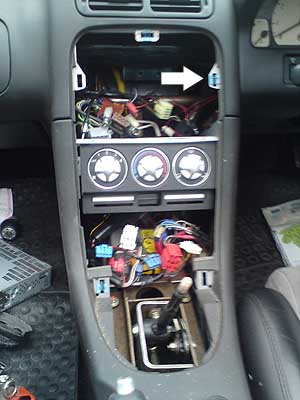
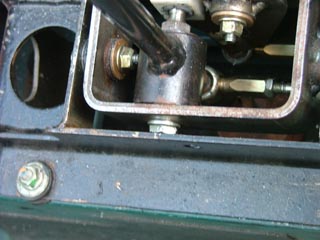
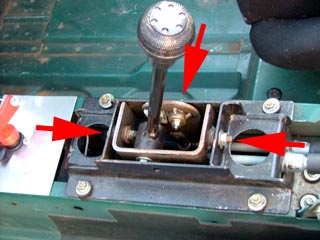 Now the gear lever selector assembly is exposed to work on.
First, as suggested by PQD44 in his T-bar forum post, tighten up the three
outer gimbal
bolts (arrowed in image left). This may be sufficient to tighten up the gear change quality. If only the
centre dash section has been removed, then the rear most bolt is probably
best accessed via removing the ash tray, or from the central oddment box
(liner pulls out easily). Now the gear lever selector assembly is exposed to work on.
First, as suggested by PQD44 in his T-bar forum post, tighten up the three
outer gimbal
bolts (arrowed in image left). This may be sufficient to tighten up the gear change quality. If only the
centre dash section has been removed, then the rear most bolt is probably
best accessed via removing the ash tray, or from the central oddment box
(liner pulls out easily). |
| 6. |
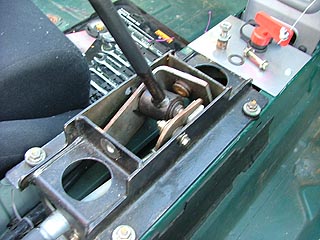 If however tightening the
bolts alone is insufficient (as it was in my case), work
your way round and remove each in turn – making careful note of assembly
order of bolts/washers. If however tightening the
bolts alone is insufficient (as it was in my case), work
your way round and remove each in turn – making careful note of assembly
order of bolts/washers. |
| 7. |
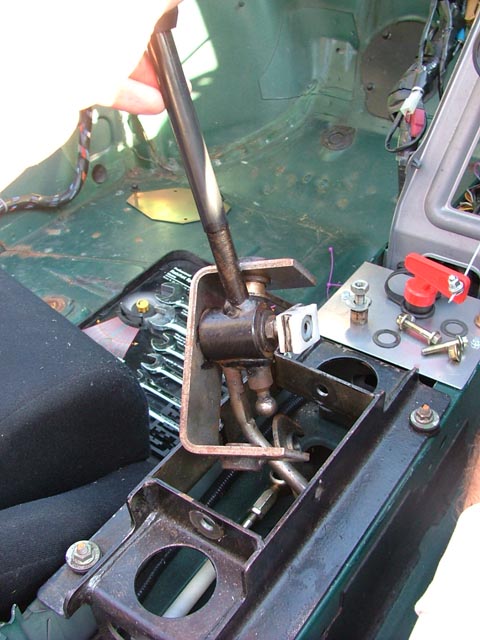 Now remove the lever pivot bolt from the central yoke. You
will
need to disconnect the cable – it’s a ball and cup joint, and the two will
separate with gentle levering. Now remove the lever pivot bolt from the central yoke. You
will
need to disconnect the cable – it’s a ball and cup joint, and the two will
separate with gentle levering. |
| 8. |
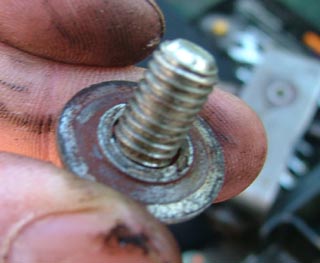 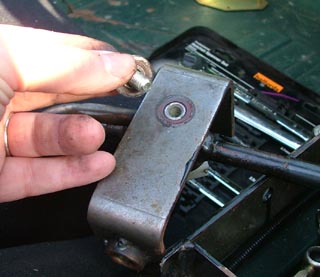 Inspect the components – you may find that the thrust washer
has become heavily worn – as was the case on my gear lever – and is
responsible for much of the slack and lost motion. Inspect the components – you may find that the thrust washer
has become heavily worn – as was the case on my gear lever – and is
responsible for much of the slack and lost motion. |
| 9. |
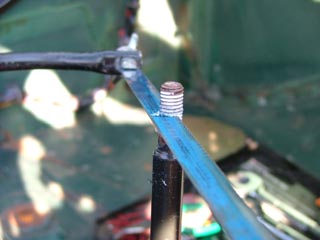 This is the easiest point at which to shorten the gear lever
should you wish – as you can take it to a work bench and cut down with a
junior hack saw in the comfort of your workshop (garage/ kitchen/ pavement
of road outside etc). This is the easiest point at which to shorten the gear lever
should you wish – as you can take it to a work bench and cut down with a
junior hack saw in the comfort of your workshop (garage/ kitchen/ pavement
of road outside etc). |
| 10. |
 Reassemble with a replacement washer. Re-grease pivots as you
go. Reassemble with a replacement washer. Re-grease pivots as you
go. |
| 11. | Reconnect the cable and complete reassembly of the gear lever mechanism. Check change quality – and marvel at your handy work! |
| 12. | Reassemble interior trim in true Hayne’s manual style. |