|
Words and Pictures: Rob Bell |
Prior to 2005, all MGFs and TFs used a transparent, green-tinted plastic rear
screen, which is perfect for the purpose of providing a light-weight flexible
solution for providing rearward vision when the hood is in the erected
position. The downside to this solution is that rear visibility diminishes
dramatically when the plastic screen gets dirty - which it does inside and out -
and worse still can scratch and even split, the latter occurring as the material
ages and especially when the weather turns cold.
Clearly replacing the whole hood when the transparent plastic screen fails is not a viable option for everyone - nor is replacing the whole assembly with a BAS manufactured glass-screen equipped hood. For those on a tighter budget, DIY replacement of the rear screen is possible. There are, as usual, a number of different options available - from OEM style or new OE rear screens (these cost the most) to cheaper, aftermarket refurbished replacements - you can try any of the established traders for either of these, or even try a local trimmer or soft top specialist (you'll find your local specialists in the Yellow pages - in the UK, try http://www.yell.co.uk/).
For me, I decided to go for a cheaper option, and obtained an after market screen from the MGF Centre. The following instructions are how the original screen was removed, and how the replacement was fitted.
| 1. |
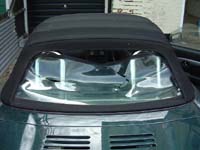 The first task is to
raise the hood and unzip the rear screen. In the picture opposite, it is
possible to see how badly split it had become - oh dear! The first task is to
raise the hood and unzip the rear screen. In the picture opposite, it is
possible to see how badly split it had become - oh dear! |
| 2. |
 Next,
undo the hood retaining catches - there are five clamping the rear of the
hood to the deck panel that are tucked behind the hood well carpet
(opposite). Next,
undo the hood retaining catches - there are five clamping the rear of the
hood to the deck panel that are tucked behind the hood well carpet
(opposite).Lay the rear screen flat on into the hood well. |
| 3. |
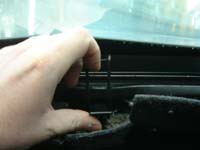
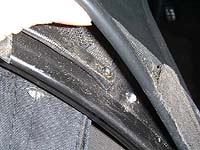
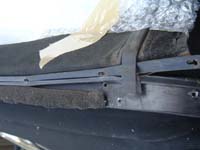
 Raise
the rear of the hood - now the rivets retaining the rear screen to the hood
frame become clear. Raise
the rear of the hood - now the rivets retaining the rear screen to the hood
frame become clear.The first rivets to identify and remove are those retaining the inner edge of the rear quarter hood retaining strips - my index finger is pointing towards this rivet. |
| 4. |
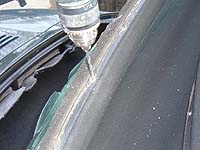
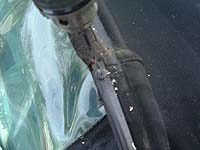 Drill
out the rivet using a 3.5mm drill bit. Drill
out the rivet using a 3.5mm drill bit. |
| 5. |
 This
will enable you to bend back the strip to reveal two hidden rivets (one
under each quarter retainer strip on each side of the hood). You may find
that it is easier to remove an additional rivet from the rear quarter
retaining strip to gain access to these, as access remains tight if only the
one rivet is removed. This
will enable you to bend back the strip to reveal two hidden rivets (one
under each quarter retainer strip on each side of the hood). You may find
that it is easier to remove an additional rivet from the rear quarter
retaining strip to gain access to these, as access remains tight if only the
one rivet is removed. |
| 6. |
 Now
drill out the 13 retaining rivets holding the rear screen to the hood frame.
The screen will now pull free from the hood frame. Now
drill out the 13 retaining rivets holding the rear screen to the hood frame.
The screen will now pull free from the hood frame. |
| 7. |
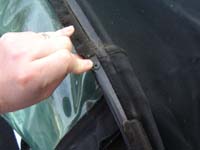
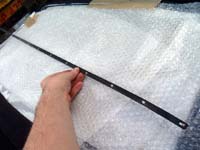 Collect
the retaining strip (pictured right) - this will be re-used when we come to
install the replacement screen. Collect
the retaining strip (pictured right) - this will be re-used when we come to
install the replacement screen. |
| 8. |
 To
completely remove the rear screen from the hood, you will need to completely
undo the zip. On my car (and I am pretty sure on all others too), there is a
metal clasp retainer, part covered by a square of Velcro glued to the free
end of the zip. To
completely remove the rear screen from the hood, you will need to completely
undo the zip. On my car (and I am pretty sure on all others too), there is a
metal clasp retainer, part covered by a square of Velcro glued to the free
end of the zip.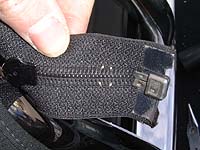 On
the other side of the clasp retainer, four staple-like 'arms' can be found
protruding through the material that holds the clasp in place. These arms
can be straightened with careful use of a pair of pliers and the clasp
removed. The Velcro tab can be peeled off, and kept for later re-use. On
the other side of the clasp retainer, four staple-like 'arms' can be found
protruding through the material that holds the clasp in place. These arms
can be straightened with careful use of a pair of pliers and the clasp
removed. The Velcro tab can be peeled off, and kept for later re-use. |
| 9. | Now tap out all the old pop rivets that remain in the hood frame - I found that a nail punch did a brilliant job at doing this, although an old 6" nail would probably be just as effective! Drill out the holes with the 3.5mm drill bit ready for reassembly of the rear screen. |
|
|
Now remove any metal swarf from the work area to prevent damage to the new screen. |
| 10. | If you are using a reconditioned rear screen, chances are that there are already holes corresponding to the rivet positions on the hood frame, which is the ideal situation. If there are no holes, you'll need some assistance. Take the rear screen and position it on the frame - and ensure that the screen is centralised. Take a great deal of care at this stage, as a mistake made now will cause a great deal of heart ache later on! Now transfer holes into the new rear screen panel, and enlarge the holes to 3.5mm. |
| 11. |
 Now
transfer the screen panel back to the hood and position the retainer so that
the holes align with those in the rear screen panel and the hood frame. Note
that the screen panel has a plastic retaining lip that the retainer strip
slips into. This can be seen in the picture, right. Now
transfer the screen panel back to the hood and position the retainer so that
the holes align with those in the rear screen panel and the hood frame. Note
that the screen panel has a plastic retaining lip that the retainer strip
slips into. This can be seen in the picture, right. |
| 12. |
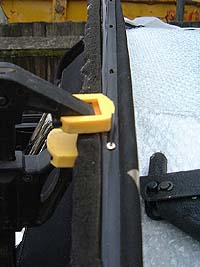 The
workshop manual recommends that you start re-riveting the rear screen panel
from the centre. I didn't do this, but in retrospect, I think that starting
from the centre and working outwards IS the best approach. The
workshop manual recommends that you start re-riveting the rear screen panel
from the centre. I didn't do this, but in retrospect, I think that starting
from the centre and working outwards IS the best approach.Take the pop rivet and pass through the retainer strip, rear screen panel material and hood frame. I found it easier if the retaining strip is brought as closely as possible to the hood frame. To achieve this, I used a G-clamp, as pictured opposite. Be careful not to rivet over the plastic retaining lip though. |
| 13. |
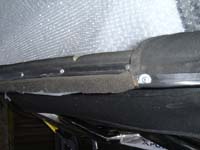 For
the final rear quarter rivets, the originals had large heads - in part to
presumably spread the clamping load, but also because it would appear that
the hole drilled for these particular rivets are over sized (perhaps to aid
positioning?). I didn't have any large-head pop rivets, so I used a penny
washer to mimic the same effect - as shown opposite, right. For
the final rear quarter rivets, the originals had large heads - in part to
presumably spread the clamping load, but also because it would appear that
the hole drilled for these particular rivets are over sized (perhaps to aid
positioning?). I didn't have any large-head pop rivets, so I used a penny
washer to mimic the same effect - as shown opposite, right. |
| 14. |
 Now
reattach the zip. Once the rear screen has been zipped up, the retainer
clasp can be re-affixed to the zip to prevent the zip from coming apart in
use. The clasp effectively staples the zip together - I reattached mine
using a pair of pliers to push the legs of the clasp through the material,
and then bent them over to keep the clasp in place. The Velcro tab can then
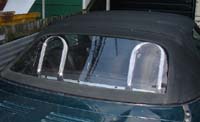
be glued back onto the zip using a contact adhesive. Now
reattach the zip. Once the rear screen has been zipped up, the retainer
clasp can be re-affixed to the zip to prevent the zip from coming apart in
use. The clasp effectively staples the zip together - I reattached mine
using a pair of pliers to push the legs of the clasp through the material,
and then bent them over to keep the clasp in place. The Velcro tab can then
be glued back onto the zip using a contact adhesive.The rear of the hood can now be clamped down with the five catches - and now stand back and admire your nicely repaired hood! |