|
Words and pictures: Rob Bell |
|
This page contains: Introduction | Tools, parts and time required | How to instructions | the TF d/lock | And finally... |
|
|
Replacing the driver’s side door Lock
|
Introduction This
MGF door-lock replacement feature may also be of interest to TF owners too.
I have heard it said that the door lock mechanism is a known weak point –
perhaps a victim of the notorious ‘project Drive’ employed by MG
Rover to cut the manufacturing cost of their products – the cheaper TF door
lock perhaps being one cut too far? The nylon cogs can apparently wear – a
problem that I have yet to hear reported on an MGF lock of any age. When MGF
door locks fail, they seem to do so in broadly a similar nature to that
reported in this article.
Common Problem:
TF door lock failure
We’re lucky – the MGF was born into the age of remote central locking. Who
remembers the days when you actually had to put a key in a lock to open the car
door? How very twentieth century!
Central locking systems have to be reliable – and fortunately, the system used on the MGF is exactly that – but for the fact that now the oldest cars are now years old, will have had a lot of use and perhaps also had continuous exposure to the elements, problems can, and do, occur.
The locks on my 1995-built MGF remained in rude health until the beginning of this year (2008) when it started developing some rather annoying habits: occasionally not wanting to unlock (throwing the door locking pins into spasms of click-click-click-click lock/unlock cycles) and most recently, not switching off the interior door lamps when the doors were closed. Enough became enough and I decided time had come to replace the lock; interrogation with a multi-meter revealed that either there was a sticking micro-switch inside the lock casing or a short circuit, leading to a permanent ‘open door’ signal – a feature that fortunately the super-locking function would override to switch the interior lights off when the car was left over night.
If the ratta-tatta-tatta of pulsing door locks all sounds
all too familiar, then
read on…
So you have a misbehaving door lock – how do you replace it?
Replacing the driver’s door lock
| Tools required: | Torx bits, Phillips screw driver |
| Materials required: | lubricating grease and a replacement door lock! |
| Time required: | Approximately an hour |
| 1. |
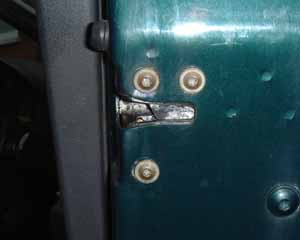 The driver’s and passenger door lock mechanisms are held in place by three
Torx
head screws – as pictured below. The driver’s and passenger door lock mechanisms are held in place by three
Torx
head screws – as pictured below.
These will need removing to replace the lock, but first… |
| 2. |
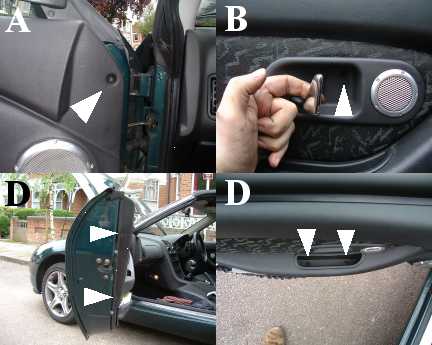 …
you will need to remove the door card. You can find more instructions on how
to do this
here, but in essence, you will need to remove 6 retaining screws – two
on the rear edge of the door card (C), two in the door pull tray (D), one
behind the interior door handle (B), and one at the front edge of the door
trim (A). See illustration right. …
you will need to remove the door card. You can find more instructions on how
to do this
here, but in essence, you will need to remove 6 retaining screws – two
on the rear edge of the door card (C), two in the door pull tray (D), one
behind the interior door handle (B), and one at the front edge of the door
trim (A). See illustration right. |
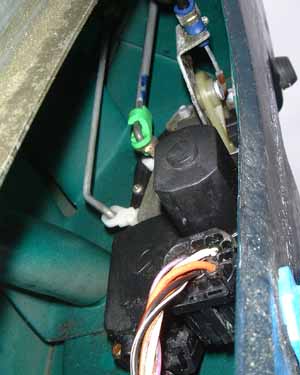
| 3. |
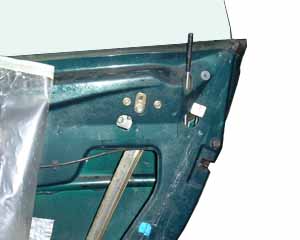 Next, peal back
the plastic ‘splash guard’ sheet so you can gain access to the majority of
the workings of the door lock and its associated linkages. See right: Next, peal back
the plastic ‘splash guard’ sheet so you can gain access to the majority of
the workings of the door lock and its associated linkages. See right: |
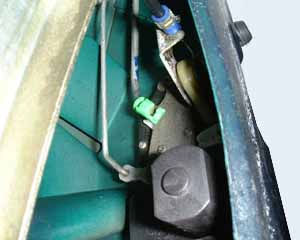
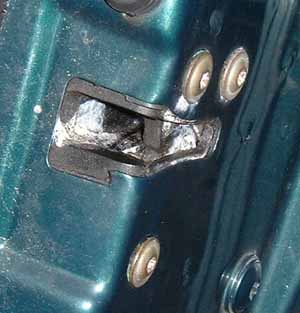
| 4. |
 The first task is
to disconnect the exterior door handle linkage – that’s the green clip seen
in the centre of the picture right – use a thumb and finger to separate – it
comes apart fairly easily... The first task is
to disconnect the exterior door handle linkage – that’s the green clip seen
in the centre of the picture right – use a thumb and finger to separate – it
comes apart fairly easily... |
| 5. |
 …As is shown in
the picture right. The interior door linkage can be tackled once the door
lock is out of the door. …As is shown in
the picture right. The interior door linkage can be tackled once the door
lock is out of the door.
The exterior key lock is rather more troublesome – and is actually what consumed the most time in my experience. I found it easiest to pop up the retaining circlip in the exterior door handle moulding and release the key lock barrel, and remove the assembly whole (see picture in step 8). |
| 6. |
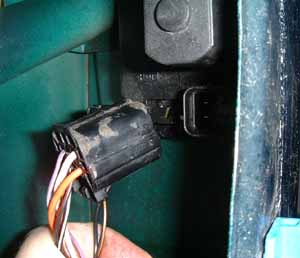 Now
disconnect the electrical connectors from the door lock. Now
disconnect the electrical connectors from the door lock.
On my 1995 car, these connect directly to the door lock body – but as I discovered, on later cars, the connectors are remote from the body of the lock. Chances are yours are of the latter type. |
| 7. |
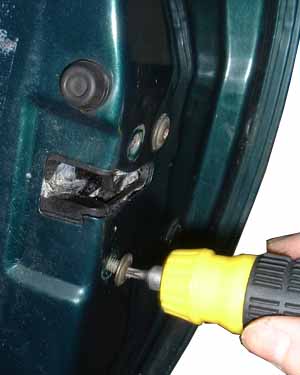 Now we
are at the
stage where we can undo the retaining screws – unscrew in no particular order,
but keep them safe! Now we
are at the
stage where we can undo the retaining screws – unscrew in no particular order,
but keep them safe! |
| 8. |
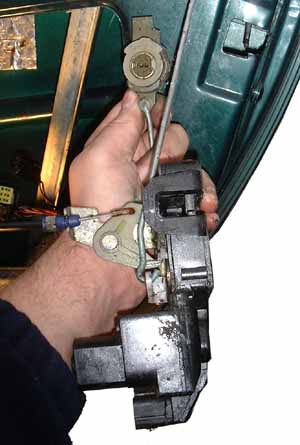 Here
we have the door lock assembly removed from the door. Here
we have the door lock assembly removed from the door.
By my thumb is the key lock barrel. The longest linkage going vertically upward is the locking pin (if you are thinking of changing the lock pin trim for a chrome Jaguar item, now’s the time to do it!) The interior door handle linkage is a cable pull – rather like a push-bike brake cable. The end is that blue plastic in front of my hand. Removal of this is now very simple. |
| 9. |
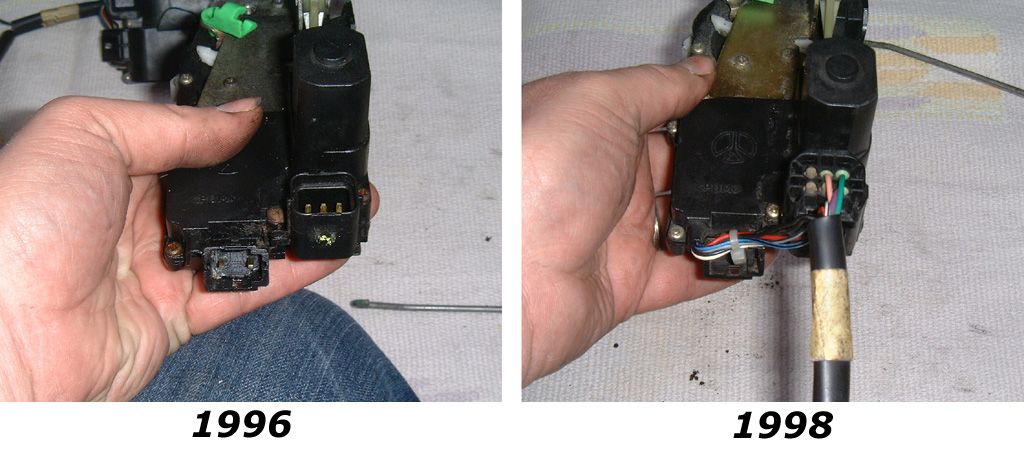
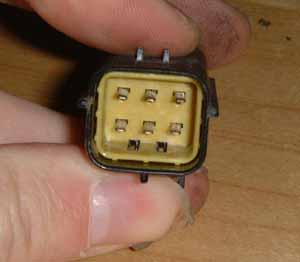
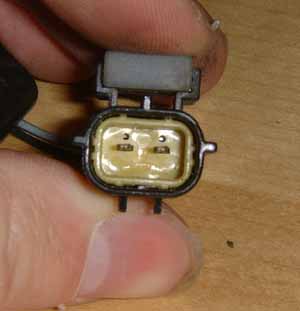
 Comparison of old
and ‘new’ – in my case, a lock obtained from ebay - a 1998 vintage MGF door
lock. There ought not have been any significant electrical differences
between a 1996 and 1998 MGF, but clearly there was a change in the design of
the door lock electrical connections (click to enlarge images) - Comparison of old
and ‘new’ – in my case, a lock obtained from ebay - a 1998 vintage MGF door
lock. There ought not have been any significant electrical differences
between a 1996 and 1998 MGF, but clearly there was a change in the design of
the door lock electrical connections (click to enlarge images) -
I have no idea why the design was changed – the earlier design appears more elegant – and it is clear that the later version uses the same moulding, but is ‘bodged’ to include the additional short remote wiring harness. If anyone here knows why this was changed, please do let me know! My guess is that it may have something to do with ensuring that the connectors were kept as free from damp as possible? |
| 10. |
 Fortunately, the
main electrical connector is identical between both versions of door lock. I
was able to connect up the new door lock directly to the car’s wiring loom. Fortunately, the
main electrical connector is identical between both versions of door lock. I
was able to connect up the new door lock directly to the car’s wiring loom.
 The other, two-pin connector, sadly, wasn’t quite so straightforward. The
pins are the correct size, but the dimensions of the plug are different
meaning that the two are incompatible. To get around this, I had to
dismember the lock’s plug and push the connector blades directly into the
car loom’s female connector. The other, two-pin connector, sadly, wasn’t quite so straightforward. The
pins are the correct size, but the dimensions of the plug are different
meaning that the two are incompatible. To get around this, I had to
dismember the lock’s plug and push the connector blades directly into the
car loom’s female connector.If yours is a later MGF, you won’t be suffering from this compatibility issue and the result will be ‘plug and play’ That said, once I had spliced the connectors together, the replacement door lock worked perfectly! Just not as elegant a solution I would have hoped for – and I didn’t fancy modifying the standard car loom for the sake of a second hand car part in case I found the correct early-type door lock at a later date. To weather-proof my solution, I put this connection on the inside of the plastic splash guard, having made a hole for the wires to pass through. So far so good; the lock is proving reliable to date. |
| 11. |
 Putting
everything back together again was, luckily, just a case of reversing the
disassembly process. Access is a bit awkward in the door – making some of
the linkages a bit fiddly – especially the key lock barrel, but really this
is all pretty straight forward. Putting
everything back together again was, luckily, just a case of reversing the
disassembly process. Access is a bit awkward in the door – making some of
the linkages a bit fiddly – especially the key lock barrel, but really this
is all pretty straight forward.The final task is to spray the moving parts of the replacement lock with lubricating grease, as shown right. |
What about the TF?
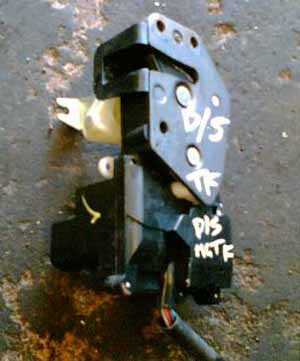 I have included here a picture from ebay showing the TF door
lock – there are some very obvious external differences to the earlier MGF
version; it isn’t as bulky for starters.
I have included here a picture from ebay showing the TF door
lock – there are some very obvious external differences to the earlier MGF
version; it isn’t as bulky for starters.
But the mountings are identical, as are the linkage connectors.
Which raises the possibility for TF owners (particularly of those pre-2003MY TFs) to use earlier MGF parts, should the need arise. Given the rate of door lock failure on some of these models, this might present quite an attractive prospect for some.
However, at
some point in 2003/4, the wiring system of the TF was completely redesigned. How
this alters the operation of the central locking electronics I am not sure – and
unfortunately, nor
do I have access to a late model wiring diagram to find this out. Bottom line is
therefore I cannot fully comment on the compatibility of MGF door locks on these
later cars - but would love to hear from anyone who has looked into this.
And finally...
I guess the end message is “never fear”; many
jobs on our MGs are very simple. We’re lucky that we have a car with a very
simple electrical system – the MG ZT on the other hand, is another kettle of
fish, but that’s another story for another forum!